
sideblog for @letardoursprout so i have somewhere to collect all the tutorials/advice that i likeicon by lovelyshiz. header by hexh-pixel
66 posts
Latest Posts by ardouradvice - Page 2

just saw another fic that completely misunderstood elementary schoolers. going to make a post as soon as my shift is done
Hi pigs "whale yuri Wednesday" with wings!!! I think the colors in your art are very cute nd i was wondering if you have a method with picking them? I struggle a lot with color picking when i dont have smth to work off of!
Also not an ask but you should post more about your original art/reblog it!! ocs too!! :]
well!! i don't have a specific method most of the time I'm eyeballing all of that!! but i can give some general tips on how i personally pick colours...
also: thank you 🫶🫶 ... i do not make art very often so most of the time i feel like there is nothing to post about!! but i will try to reblog my own art more often!! i have been working a lot on one oc of mine so perhaps you will see more of it :]
- i tend to first put all the colours side by side to get a sense of how they'll all look together!!
- usually i start with a very light or very dark colour that i like, and build off of that.


- after i choose a color to work off of, i tend to pick another colour that's similar to the first colour. (black and white can go well with basically every colour if you're stuck!)
i personally try to keep the colours distinct enough that you can tell it's another colour. this isn't totally necessary, it's mostly because i use a lineless style and my shapes won't be distinguishable if i don't make it clear which colour is which. for example with fhese two images - it's easier to tell between the colours on the right than the colours on the left.


specific processes here:
in the top left corner here, i chose the black, then the dark blue/dark purple, then the purple, then the light purple. they're all in the same area of the colour wheel but each one gradually progresses in brightness and moves into another area of the colour wheel.

same with the top right corner - i started with the white and chose a shade of orange that was easy to see against it. then a similar shade of yellow to pair with the orange, and then i wanted a highlight colour to stand out. since the general pattern of this colour set is bright/warm colours, we can choose another bright or warm colour that's different in brightness or shade - in this case i chose a bright green, but a bright red would have also gone nicely with this.
the bottom left and right is mostly the same as above, but finding a colour palette like the bottom right can be trickier. i started with a combination of white, cyan, and purple but thought that it looked a bit boring. so i picked a colour that wasn't blue or purple but a bright(er) red so that it stood out. could have also used bright orange/yellow/pink instead, but i think the red gives it an interesting contrast. i like to think that it's all about contrast
i tend to make colour palettes at random just for fun, so i think that practice or just putting colours together to see what looks good can also help!! some more examples below of just. colour palettes or colours that work well together

and yeah! to be honest i don't really know what i am doing but i like messing around with groups of colours. do what you want, lay down some colours that you like and most importantly have fun 👍👍👍
Good Traits Gone Bad
Exploring good traits gone bad in a novel can add depth and complexity to your characters. Here are a few examples of good traits that can take a negative turn:
1. Empathy turning into manipulation: A character with a strong sense of empathy may use it to manipulate others' emotions and gain an advantage.
2. Confidence becoming arrogance: Excessive confidence can lead to arrogance, where a character belittles others and dismisses their opinions.
3. Ambition turning into obsession: A character's ambition can transform into an unhealthy obsession, causing them to prioritize success at any cost, including sacrificing relationships and moral values.
4. Loyalty becoming blind devotion: Initially loyal, a character may become blindly devoted to a cause or person, disregarding their own well-being and critical thinking.
5. Courage turning into recklessness: A character's courage can morph into reckless behavior, endangering themselves and others due to an overestimation of their abilities.
6. Determination becoming stubbornness: Excessive determination can lead to stubbornness, where a character refuses to consider alternative perspectives or change their course of action, even when it's detrimental.
7. Optimism becoming naivety: Unwavering optimism can transform into naivety, causing a character to overlook dangers or be easily deceived.
8. Protectiveness turning into possessiveness: A character's protective nature can evolve into possessiveness, where they become overly controlling and jealous in relationships.
9. Altruism becoming self-neglect: A character's selflessness may lead to neglecting their own needs and well-being, to the point of self-sacrifice and burnout.
10. Honesty becoming brutal bluntness: A character's commitment to honesty can turn into brutal bluntness, hurting others with harsh and tactless remarks.
These examples demonstrate how even admirable traits can have negative consequences when taken to extremes or used improperly. By exploring the complexities of these traits, you can create compelling and multi-dimensional characters in your novel.
Happy writing!
okay hey real question: what are good ways to describe fat characters?
I see a lot of 'have more fat characters' and I'm Here For It but as someone who is skinny and in a world where most existing literature makes characters fat only as a joke or an indication of some variety of moral badness, I'm not really sure how to describe them in a way that's not objectifying or insulting. like, I've grown up on poetic descriptions of thin characters ('long slim fingers' and 'willow figure' etc etc) but I haven't read flattering descriptions of fat characters and I don't know where to start. I've seen a lot of 'how to describe poc' or 'how to describe disabled characters' or whatever and I've seen art ref posts for drawing fat characters, but no posts about how to write them well. so. open call for advice or for examples you've found and like??
Things That May Be Causing Your Writer's Block- and How to Beat Them
I don't like the term 'Writer's Block' - not because it isn't real, but because the term is so vague that it's useless. Hundreds of issues all get lumped together under this one umbrella, making writer's block seem like this all-powerful boogeyman that's impossible to beat. Worse yet, it leaves people giving and receiving advice that is completely ineffective because people often don't realize they're talking about entirely different issues.
In my experience, the key to beating writer's block is figuring out what the block even is, so I put together a list of Actual Reasons why you may be struggling to write:
(note that any case of writer's block is usually a mix of two or more)
Perfectionism (most common)
What it looks like:
You write one sentence and spend the next hour googling "synonyms for ___"
Write. Erase. Write. Rewrite. Erase.
Should I even start writing this scene when I haven't figured out this one specific detail yet?
I hate everything I write
Cringing while writing
My first draft must be perfect, or else I'm a terrible writer
Things that can help:
Give yourself permission to suck
Keep in mind that nothing you write is going to be perfect, especially your first draft
Think of writing your first/early drafts not as writing, but sketching out a loose foundation to build upon later
People write multiple drafts for a reason: write now, edit later
Stop googling synonyms and save that for editing
Write with a pen to reduce temptation to erase
Embrace leaving blank spaces in your writing when you can't think of the right word, name, or detail
It's okay if your writing sucks. We all suck at some point. Embrace the growth mindset, and focus on getting words on a page
Lack of inspiration (easiest to fix)
What it looks like:
Head empty, no ideas
What do I even write about???
I don't have a plot, I just have an image
Want to write but no story to write
Things that can help:
Google writing prompts
If writing prompts aren't your thing, instead try thinking about what kind of tropes/genres/story elements you would like to try out
Instead of thinking about the story you would like to write, think about the story you would like to read, and write that
It's okay if you don't have a fully fleshed out story idea. Even if it's just an image or a line of dialogue, it's okay to write that. A story may or may not come out of it, but at least you got the creative juices flowing
Stop writing. Step away from your desk and let yourself naturally get inspired. Go for a walk, read a book, travel, play video games, research history, etc. Don't force ideas, but do open up your mind to them
If you're like me, world-building may come more naturally than plotting. Design the world first and let the story come later
Boredom/Understimulation (lost the flow)
What it looks like:
I know I should be writing but uugggghhhh I just can'tttttt
Writing words feels like pulling teeth
I started writing, but then I got bored/distracted
I enjoy the idea of writing, but the actual process makes me want to throw my laptop out the window
Things that can help:
Introduce stimulation: snacks, beverages, gum, music such as lo-fi, blankets, decorate your writing space, get a clickity-clackity keyboard, etc.
Add variety: write in a new location, try a new idea/different story for a day or so, switch up how you write (pen and paper vs. computer) or try voice recording or text-to-speech
Gamify writing: create an arbitrary challenge, such as trying to see how many words you can write in a set time and try to beat your high score
Find a writing buddy or join a writer's group
Give yourself a reward for every writing milestone, even if it's just writing a paragraph
Ask yourself whether this project you're working on is something you really want to be doing, and be honest with your answer
Intimidation/Procrastination (often related to perfectionism, but not always)
What it looks like:
I was feeling really motivated to write, but then I opened my laptop
I don't even know where to start
I love writing, but I can never seem to get started
I'll write tomorrow. I mean next week. Next month? Next month, I swear (doesn't write next month)
Can't find the time or energy
Unreasonable expectations (I should be able to write 10,000 words a day, right????)
Feeling discouraged and wondering why I'm even trying
Things that can help:
Follow the 2 min rule (or the 1 paragraph rule, which works better for me): whenever you sit down to write, tell yourself that you are only going to write for 2 minutes. If you feel like continuing once the 2 mins are up, go for it! Otherwise, stop. Force yourself to start but DO NOT force yourself to continue unless you feel like it. The more often you do this, the easier it will be to get started
Make getting started as easy as possible (i.e. minimize barriers: if getting up to get a notebook is stopping you from getting started, then write in the notes app of your phone)
Commit to a routine that will work for you. Baby steps are important here. Go with something that feels reasonable: every day, every other day, once a week, twice a week, and use cues to help you remember to start. If you chose a set time to write, just make sure that it's a time that feels natural to you- i.e. don't force yourself to writing at 9am every morning if you're not a morning person
Find a friend or a writing buddy you can trust and talk it out or share a piece of work you're proud of. Sometimes we just get a bit bogged down by criticism- either internal or external- and need a few words of encouragement
The Problem's Not You, It's Your Story (or Outline (or Process))
What it looks like:
I have no problems writing other scenes, it's just this scene
I started writing, but now I have no idea where I'm going
I don't think I'm doing this right
What's an outline?
Drowning in documents
This. Doesn't. Make. Sense. How do I get from this plot point to this one?!?!?! (this ColeyDoesThings quote lives in my head rent free cause BOY have I been there)
Things That Can Help:
Go back to the drawing board. Really try to get at the root of why a scene or story isn't working
A part of growing as a writer is learning when to kill your darlings. Sometimes you're trying to force an idea or scene that just doesn't work and you need to let it go
If you don't have an outline, write one
If you have an outline and it isn't working, rewrite it, or look up different ways to structure it
You may be trying to write as a pantser when you're really a plotter or vice versa. Experiment with different writing processes and see what feels most natural
Study story structures, starting with the three act structure. Even if you don't use them, you should know them
Check out Ellen Brock on YouTube. She's a professional novel editor who has a lot of advice on writing strategies for different types of writers
Also check out Savage Books on YouTube (another professional story editor) for advice on story structure and dialogue. Seriously, I cannot recommend this guy enough
Executive Dysfunction, Usually From ADHD/Autism
What it looks like:
Everything in boredom/understimulation
Everything in intimidation/procrastination
You have been diagnosed with and/or have symptoms of ADHD/Autism
Things that can help:
If you haven't already, seek a diagnosis or professional treatment
Hire an ADHD coach or other specialist that can help you work with your brain (I use Shimmer; feel free to DM me for a referral)
Seek out neurodiverse and neurodiverse writing communities for advice and support
Try body doubling! There's lot's of free online body doubling websites out there for you to try. If social anxiety is a barrier, start out with writing streams such as katecavanaughwrites on Twitch
Be aware of any sensory barriers that may be getting in the way of you writing (such as an uncomfortable desk chair, harsh lighting, bad sounds)
And Lastly, Burnout, Depression, or Other Mental Illness
What it looks like:
You have symptoms of burnout or depression
Struggling with all things, not just writing
It's more than a lack of motivation- the spark is just dead
Things that can help:
Forget writing for now. Focus on healing first.
Seek professional help
If you feel like it, use writing as a way to explore your feelings. It can take the form of journaling, poetry, an abstract reflection of your thoughts, narrative essays, or exploring what you're feeling through your fictional characters. The last two helped me rediscover my love of writing after I thought years of depression had killed it for good. Just don't force yourself to do so, and stop if it takes you to a darker place instead of feeling cathartic
Quick editing tip: Passing time
Hey all, here’s a quick tip about showing the passage of short amounts of time in a scene. I see a lot of beats like this:
She hesitated
He paused
A few seconds later
There was a long silence
He waited for her to answer
She didn’t respond
Instead of telling us there’s a brief moment of silence or pause in your scene, try showing us by creating the feeling that time has passed through action, description, or inner monologue. Here are a few examples.
Before:
“Are you coming or not?”
He waited for her to answer, but she didn’t respond.
“Clare? Did you hear me?”
“Huh?”
After:
“Are you coming or not?”
Clare scrolled through her phone, her face illuminating with a eerie blue glow.
“Clare? Did you hear me?”
“Huh?”
Before:
Jared lingered at the suspect’s front gate. If this guy didn’t answer Jared’s questions, he was screwed.
“Hey you!” a voice shouted. “Get off my property!”
Jared hesitated. Finally, he turned to face the man. “I’m afraid I can’t do that.”
After:
Jared lingered at the suspect’s front gate. If this guy didn’t answer Jared’s questions, he was screwed.
“Hey you!” a voice shouted. “Get off my property!”
Jared patted his holster. He had a gun, but he certainly didn’t want to use it. Taking a deep breath, he turned to face the man. “I’m afraid I can’t do that.”
Not only does creating a pause instead of describing a pause allow your reader to feel the moment more vividly, it gives you a chance to explain what exactly that pause is about. People hesitate, pause, don’t respond, etc. for all kinds of reasons. Give us as much insight as you can into your weird quiet moment.
Of course, you don’t need to do this every single time. Sometimes it’s fine to say “he paused” or “the room was quiet for a moment”—it could be the best choice for that scene. But look back through your draft and see if you’ve used those “telling” descriptions more often than you needed to. If so, try to create the feeling of a pause—perhaps one that gives the reader a bit more information—using these techniques.
Hope this helps!
Oh my gosh. I just found this website that walks you though creating a believable society. It breaks each facet down into individual questions and makes it so simple! It seems really helpful for worldbuilding!
Writing a Blind or Visually Impaired Character
A Multi-Step Guide Written by a Visually Impaired Writer and Blogger
I’m hoping this blog will over time develop its own following, and when it does people will inevitably see my bio and notice what I included: I’m visually impaired.
Yes, a visually impaired writer, and I’ve written with two blind characters before so I have some practice in the field.
So, inevitably, someone is going to ask how to write a blind character.
Or, at least, I hope you’ll ask someone who’s actually blind or visually impaired about writing a blind character before you get too involved with your new WIP.
All parts will be tagged #blindcharacter in my blog, and I will add links to every post as I finish each part. Follow my blog for more writing advice.
Note, this post updates fairly often and old versions are still floating around out there. The most current version of this post is pinned to my blog with any new guides or links you might of missed.
As of 24 January 2021, this is the most extensive and screen reader friendly version of this post.
Part One: Crafting the Blind Character
In which I tell you how to begin making a blind character who is more than a cardboard cutout
Part Two: Narrative Choice, Visual Description, Verbal Description, Social Interaction
In which I give you a basic rundown on how to write from the perspective of a character who can’t see and still make the narration descriptive
Part Three: Tropes and Clichés to Avoid
Your blind readers will thank you for not being the 5000th person to do this and manage to actually finish your story. (Do you have any idea how many stories I’ve noped out of within two chapters because of these clichés? A Lot.)
-New- Part Four: Canes, Guide Dogs, and O&M
Everything I can tell you about 1) how to learn how to use a cane 2) how a cane works 3) how to describe what your character experiences with their cane 4) everything I know on guide dogs
Part Five: Small Aspects of being Blind You Never Thought Of
5 January 2021 Edit: This link has been fixed to correspond with the correct post
Or, really, very normal everyday things for blind people, the inclusion of which will make your characters more real and authentic. It’s the tiny details.
Part Six: Should You Cure Your Character’s Blindness? (Short Answer: No)
There’s no way to write a cure for your blind character that doesn’t make blind readers hate you. Sorry. We came here to finally experience a relatable character who experiences the world like us, but none of us are getting cured so seeing this character we learned to love become something alien from us in the end feels like a slap in the face
Why I’m Blind and What I See -NEW-
I thought I’d finally make a post explaining the complicated situation about my vision. Includes an explanation of visual snow and exotropia, two of the three causes for my vision issues.
Writing Blind Characters Falling in Love, an Advice Post:
Someone asked what being blind and falling in love have to do with each other. Honestly, blindness changes your perspective on everything and it makes an impact on every relationship you have. This includes some things that you definitely do not want your character’s love interest to be/do.
Writing Blind Jokes (Should You Do It?)
You know those flow charts of “should you do x?” going around? It’s like that, but screen reader friendly. Should you write blind jokes. It’s pretty complicated and there are a lot of possible scenarios and details to consider.
Advice for Writing Toph Beifong -NEW-
In this I discuss what I would like to see done in fanfiction with Toph’s character after ten years of reading Avatar the Last Airbender fanfiction
A small essay addressing the frequently asked question on giving your blind character a superpower to help them “see.”
It’s became a popular question, so to make the answer easier/faster for everyone to access, I wrote what will usually be my initial answer. Below there are a few links to some notable past questions on this subject.
Mourning My Vision, it’s More than Depression.
A small personal essay addressing the nuances of the mourning period you experience with a new disability. The mourning period is mentioned in other guides, but this is more detailed.
Dealing with Heightened Senses, a video by Molly Burke with additional commentary by me
While Molly talks about the myths and truths about heightened senses, I talk about the correlation with blindness and neuro-divergency and how co-morbid disorders/disabilities might affect sensory processing.
Satirical Commentary on the phrase “that blank look in their eyes” used too often in fiction to identify a blind character
a:tla, I’m looking at you (and my eyes aren’t blank)
I Found a Lost Piece of Blindness History
My grandmother told me about her blind aunt and how she sent letters. It led me to speculate about all the O&M things people develop on their own but never get a chance to pass onto other blind people. Technology and techniques are lost in history and reinvented, including the white cane ad guide dogs.
Includes a little history on the introduction of guide dogs into the 20th century
The Following are Answered Anon Questions
Making Your Blog More Accessible
Making Links Accessible to Screen Readers
Reblogging to Add an Image Description to Someone Else’s Image
Why I Write Image Descriptions
Writing Blind Characters
Advice for a Character Who was Born Blind
Over-Protective Parents of a Blind Character, Why They’re Over-Protective and How to Avoid Crossing a Line
A Blind Character in Victorian Era Historical Fiction
Is It Bad Not to Have Guide Dogs in a Fantasy/Historical Setting Without Guide Dogs (short answer: it’s not bad)
Someone Asked About My Thoughts on a Medusa-like Character Blinding Herself to Avoid Hurting Anyone
-New- Characters Who Have Recently Gone Blind and Avoiding Inspiration Porn
Talking about Popular Blind Characters In Media
Does Daredevil’s Echolocation Negate His Blindness
Someone Else was Asked How to Write Daredevil Fanfiction
Blind Characters with Superpowers/Fighting Styles
World Setting where the General Population has a Superpower
Superpowers that don’t involve sight, Five questions to ask yourself if this superpower is a bad idea or a good one
-New- Your character would not use a cane as a weapon, it’s a bad idea
D&D/Roleplaying Blind Characters
-New- Animal Familiars Acting as Service Animals and Advice for Communicating with Your DM
-New- Portraying Older Blind Characters + Causes for Vision Loss with Old Age
IT'S FINISHED! I'VE FINISHED IT!
for the past few months i've been putting together a guide for writers looking to make OCs who suffer from DID, since i have a personal investment in good representation and an absurd amount of autism. and today it is FINISHED!!
it's gone up on my neocities, but i really wanted to post about it too.
here's the link

please check it out / bookmark it / share it if you're interested! if just one person finds this useful and makes art from it all my hours of hyperfixation will be worth. ok. love you
Apparently a lot of people get dialogue punctuation wrong despite having an otherwise solid grasp of grammar, possibly because they’re used to writing essays rather than prose. I don’t wanna be the asshole who complains about writing errors and then doesn’t offer to help, so here are the basics summarized as simply as I could manage on my phone (“dialogue tag” just refers to phrases like “he said,” “she whispered,” “they asked”):
“For most dialogue, use a comma after the sentence and don’t capitalize the next word after the quotation mark,” she said.
“But what if you’re using a question mark rather than a period?” they asked.
“When using a dialogue tag, you never capitalize the word after the quotation mark unless it’s a proper noun!” she snapped.
“When breaking up a single sentence with a dialogue tag,” she said, “use commas.”
“This is a single sentence,” she said. “Now, this is a second stand-alone sentence, so there’s no comma after ‘she said.’”
“There’s no dialogue tag after this sentence, so end it with a period rather than a comma.” She frowned, suddenly concerned that the entire post was as unasked for as it was sanctimonious.
HOW TO WRITE A CHARACTER WHO IS IN PAIN
first thing you might want to consider: is the pain mental or physical?
if it’s physical, what type of pain is it causing? — sharp pain, white-hot pain, acute pain, dull ache, throbbing pain, chronic pain, neuropathic pain (typically caused by nerve damage), etc
if it’s mental, what is the reason your character is in pain? — grief, heartbreak, betrayal, anger, hopelessness, fear and anxiety, etc
because your character will react differently to different types of pain
PHYSICAL PAIN
sharp and white-hot pain may cause a character to grit their teeth, scream, moan, twist their body. their skin may appear pale, eyes red-rimmed and sunken with layers of sweat covering their forehead. they may have tears in their eyes (and the tears may feel hot), but they don’t necessarily have to always be crying.
acute pain may be similar to sharp and white-hot pain; acute pain is sudden and urgent and often comes without a warning, so your character may experience a hitched breathing where they suddenly stop what they’re doing and clench their hand at the spot where it hurts with widened eyes and open mouth (like they’re gasping for air).
dull ache and throbbing pain can result in your character wanting to lay down and close their eyes. if it’s a headache, they may ask for the lights to be turned off and they may be less responsive, in the sense that they’d rather not engage in any activity or conversation and they’d rather be left alone. they may make a soft whimper from their throat from time to time, depends on their personality (if they don’t mind others seeing their discomfort, they may whimper. but if your character doesn’t like anyone seeing them in a not-so-strong state, chances are they won’t make any sound, they might even pretend like they’re fine by continuing with their normal routine, and they may or may not end up throwing up or fainting).
if your character experience chronic pain, their pain will not go away (unlike any other illnesses or injuries where the pain stops after the person is healed) so they can feel all these types of sharp pain shooting through their body. there can also be soreness and stiffness around some specific spots, and it will affect their life. so your character will be lucky if they have caretakers in their life. but are they stubborn? do they accept help from others or do they like to pretend like they’re fine in front of everybody until their body can’t take it anymore and so they can no longer pretend?
neuropathic pain or nerve pain will have your character feeling these senses of burning, shooting and stabbing sensation, and the pain can come very suddenly and without any warning — think of it as an electric shock that causes through your character’s body all of a sudden. your character may yelp or gasp in shock, how they react may vary depends on the severity of the pain and how long it lasts.
EMOTIONAL PAIN
grief can make your character shut themself off from their friends and the world in general. or they can also lash out at anyone who tries to comfort them. (five states of grief: denial, anger, bargaining, depression and eventual acceptance.)
heartbreak — your character might want to lock themself in a room, anywhere where they are unseen. or they may want to pretend that everything’s fine, that they’re not hurt. until they break down.
betrayal can leave a character with confusion, the feelings of ‘what went wrong?’, so it’s understandable if your character blames themself at first, that maybe it’s their fault because they’ve somehow done something wrong somewhere that caused the other character to betray them. what comes after confusion may be anger. your character can be angry at the person who betrayed them and at themself, after they think they’ve done something wrong that resulted in them being betrayed, they may also be angry at themself next for ‘falling’ for the lies and for ‘being fooled’. so yes, betrayal can leave your character with the hatred that’s directed towards the character who betrayed them and themself. whether or not your character can ‘move on and forgive’ is up to you.
there are several ways a character can react to anger; they can simply lash out, break things, scream and yell, or they can also go complete silent. no shouting, no thrashing the place. they can sit alone in silence and they may cry. anger does make people cry. it mostly won’t be anything like ‘ugly sobbing’ but your character’s eyes can be bloodshot, red-rimmed and there will be tears, only that there won’t be any sobbing in most cases.
hopelessness can be a very valid reason for it, if you want your character to do something reckless or stupid. most people will do anything if they’re desperate enough. so if you want your character to run into a burning building, jump in front of a bullet, or confess their love to their archenemy in front of all their friends, hopelessness is always a valid reason. there’s no ‘out of character’ if they are hopeless and are desperate enough.
fear and anxiety. your character may be trembling, their hands may be shaky. they may lose their appetite. they may be sweaty and/or bouncing their feet. they may have a panic attack if it’s severe enough.
and I think that’s it for now! feel free to add anything I may have forgotten to mention here!
My biggest tip for fanfic writers is this: if you get a character's mannerisms and speech pattern down, you can make them do pretty much whatever you want and it'll feel in character.
Logic: Characters, just like real people, are mallable. There is typically very little that's so truly, heinously out of character that you absolutely cannot make it work under any circumstance. In addition, most fans are also willing to accept characterization stretches if it makes the fic work. Yeah, we all know the villain and the hero wouldn't cuddle for warmth in canon. But if they did do that, how would they do it?
What counts is often not so much 'would the character do this?' and more 'if the character did do this, how would they do it?' If you get 'how' part right, your readers will probably be willing to buy the rest, because it will still feel like their favourite character. But if it doesn't feel like the character anymore, why are they even reading the fic?
Worry less about whether a character would do something, and more about how they'd sound while doing it.
Roles on a Pirate Ship
[by Mark Cookman / Tribality 1, 2, 3] @we-are-pirate, @we-are-scarlet-corsair

Officer Roles on a Pirate Ship
If you are running a game with pirates in it, then you should know what the job entails. It’s not all boarding ships, counting booty, and drinking rum like you might think. A great deal of hard work is required to run a sailing ship with a law-abiding crew, let alone one populated by pirates. In this essay we are going to examine the five principle officers on board a pirate ship, their duties, and their responsibilities. This is part one of a three part lesson. In the next lesson we will examine the duties and responsibilities of other officers and crew members with special duties. In the final lesson, we will look at one very special group of crew members that are almost always overlooked. Read on to learn what pirates expected of their primary officers.
The principal officers of a pirate ship were the captain, the quartermaster, the pilot, the boatswain, and the master gunner. On some ships these positions were all elected by an equal vote of the crew and on others the captain picked the crew members he wanted to serve in the positions. The captain on a pirate vessel was almost always elected by an equal vote of the crew. On a privateer vessel this was not very often the case. Privateer captains were often the owners of the ship or were given commission by their monarch to take a vessel to sea. So it follows with the other officers. If the captain was elected, then generally all of the officers were elected. If the captain was appointed or held his position by means of ownership, then generally he picked the officers. In either case, an officer on a pirate ship served at the whim of the crew. Even a man picked by the captain would be booted down to a simple crewman if he could not do his job. For the most part though, a person elevated to serve as one of the principle officers did so for life. The title of this article refers to the fact that most often the authorities that captured, tried, and hung pirates concentrated on the five principle officers of the ship. These officers were generally the most intelligent and skilled crewmen on board the pirate vessel. They were people that everyone else on board the ship admired for their ability to do their job. Diligent action is the mother of respect on board a ship.
Captain
The captain, however he came to his position, was chosen for his leadership, bravery, and cunning. The captain was responsible for the ship and everything aboard her; every item and every man. He was responsible for the overall decisions affecting the ship and her crew. The captain decided where to sail and what to attack. He was the voice of his crew to all beyond the ship. He often led his crew in battle. In terms of daily duties, the captain kept a log of the voyage, managed the affairs of the ship through the officers, and generally served a four to six hour shift at the helm. The captain stayed in power by being successful. As long as there are prizes to plunder, rum to drink, and food to eat, the captain will not be voted out or mutinied against. It is when things get lean that the captain must worry about crew voting him unfit for command.
Quartermaster
The quartermaster (or first mate on a privateer vessel) was the number two man on the ship. He was responsible for enforcing the ship’s articles and administering punishment when necessary. The quartermaster was the trustee of the ship and her crew. He directly represented the crew to the captain. It was his responsibility to serve as a counterbalance to the captain in decisions that might be hazardous to the ship or the crew. A wise captain made no decisions that his first mate didn’t support. The quartermaster took responsibility for prize vessels and picked the treasure that the crew would take from a prize. He was also responsible for counting the booty and splitting the shares. Each day would find him working with his subordinate officers the boatswain, the master gunner, and the master at arms to effectively run the ship. The first mate also served a turn at the helm, generally a four to six hour shift.
Pilot
The pilot was the number three man on the ship and often the most educated. He served as the ship’s navigator and was generally the best all around sailor aboard the ship. He was responsible for plotting the ship’s course and maintaining that course. The pilot maintained all of the ship’s charts and maps as well as the tools of navigation. He was charged with keeping a daily log of every event relating to the sailing of the ship. He recorded the depth, the currents, the wind patterns, the ship’s location, the locations of reefs and sandbars, and the state of the rigging. He reported directly to the captain. The pilot oversaw the work of the sail-master and almost always had at least one assistant (a pilot’s mate) to help him with his duties. The pilot and his mate both served separate shifts at the helm in addition to taking readings from the moon and stars to plot and maintain the course.
Boatswain
The boatswain was the number four man on the ship and often the most feared by the crew. He was in charge of the provisions for the ship. He maintained the stores of food, water, rum, gunpowder, shot, sails, rope, wood, and tar required to keep the ship and crew fit for action. The boatswain also directed the loading of cargo into the hold to maintain the proper ballast to ensure level sailing. He was in charge of keeping the watches on the ship and maintaining discipline among the deck crew. He was responsible for the ship’s longboats and for picking a crew to man the sweeps when the longboats were used. The boatswain was charged with maintaining the ship’s seaworthy status. He oversaw the duties of both the carpenter and the cook. The boatswain generally had a mate to help him with his responsibilities. In general, his duties were to make certain that all the work of running the ship was done. He reported to the quartermaster. The Boatswain was often the most feared man on the ship because his obligations often made him uncompromising. It was his responsibility to keep everything “ship-shape”. Leniency was something the quartermaster might give to the crew, but it was not something the boatswain was in the position to give. Day and night, the boatswain would drive the crew to do whatever work was required. He maintained the watch log and reported any problems to the quartermaster.
Master Gunner
The master gunner was the number five man on the ship. He was responsible for the care and cleaning of all firearms, culverin (deck guns), and cannons on board the ship. He was also responsible for training the crew in the use of both firearms and ship’s weaponry. The master gunner picked and ran the gunnery crew. He reported to the quartermaster, but was responsible to the entire ship to make certain that the cannons hit the declared target. He was also responsible for maintaining the inventory of powder and shot for all of the guns on the ship. The master gunner was the only crew member besides the captain and the quartermaster entrusted to carry a key to the ship’s powder magazine. Additionally, the master gunner often led or picked hunting parties when they were called for. His day to day duties mainly consisted of drilling the gunnery crew and maintaining the guns.

The Next in Line to Hang – More Roles on a Pirate Ship
In this second part of a three part lesson dealing with the crew positions aboard a pirate vessel, we are going to look at the responsibilities of the Sail-master, the Carpenter, the Cook, the Surgeon, and the Master at Arms. These were all lower officer positions and were either voted upon or assigned by the captain as discussed in the first part of this lesson. The sailors who served in these positions were skilled laborers and, as such, their skills were always very much in demand on a ship. They were almost always offered a greater share of the treasure because of their skills. These were definitely crew members that a pirate ship could not function without.
Sail-master
The Sail-master was the most experienced crewman in the rigging and usually one of the best sailors on the ship. He was responsible for maintaining the sails and the rigging. The Sail-master knew every knot, line, rope, block and tackle in the rigging as well as how to repair them all. He was also responsible for training and running the sail crew as well as overseeing the making and patching of sails. The Sail-master took orders from and reported to the pilot.
Carpenter
The Carpenter was a skilled wood worker, often with some shipwright experience, who did all of the woodworking required by the crew. He was primarily responsible for repairing damage to the wooden portions of the ship and for plugging leaks that got too bad. (Ye should understand right now, before ye go to sea, that all ships leak, mates. It’s just when they really leak badly that you have to worry about it.) The Carpenter was also responsible for the construction of barrels and crates, as needed, to store cargo, as well as maintaining the tools of his trade. He took orders from and reported to the Boatswain.
Cook
The Cook was one of the most important of the lower officers. He was in charge of all matters relating to food on the ship. He made certain there was enough food, water, and rum on board for the planned cruise. He cooked the meals and suggested rationing when it was necessary. The Cook butchered the meat brought back by hunting parties and was the only man trusted to light a fire below decks. He maintained the necessary tools for both cooking and butchering. The Cook took orders from and reported to the Boatswain.
Surgeon
The Surgeon was likely one of the toughest men on the ship. He served as the barber/doctor/emergency surgeon for the entire crew. He was equally capable of shaving your beard and cutting off your damaged leg. The Surgeon dealt with not only the sick and the wounded, but also the dead. He, like the other lower officers, was responsible for maintaining the necessary tools of his trade. The Surgeon took his orders from and reported to the Quartermaster. It was rare for a ship to have a real doctor and it was common for the carpenter or the cook to fill this role as needed.
Master at Arms
The Master at Arms was often the most skilled warrior on the crew. He was responsible for training the crew in hand to hand combat. He also led the ship’s boarding parties and hunting parties when they were necessary. The Master at Arms position was not a separate position on every vessel and often these responsibilities fell to the Quartermaster. When the Master at Arms position was filled on a ship, he took orders from and reported to the Quartermaster.
These 5 core positions represent the Non-Commissioned Officers of a pirate or privateer ship. These men all commanded other men on work details and so their words carried great sway with the crew. It was often from among these men that the next captain was chosen when a captain lost his position through a vote of no confidence. Thus, these were the men that the captain had to keep loyal to him to stay in command of the ship.
And Hang the Musikers, Too – Even More Roles on a Pirate Ship
In this article, we will be looking at the makeup of the crew itself. Remember that the only rule with pirates is that there are no rules; no two crews of any two pirate ships were exactly the same. Even so, we can narrow down some roles common to pirate/privateer crews based upon the jobs that must be done aboard ship. Most simply put, pirate crews are a mixture of brutes, gunners, swabbies, and musikers. Let’s examine each category in turn.
Brutes
A great deal of hard work and heavy hauling is involved in just sailing a tall-masted ship. In strong winds the canvas sails must be man-handled by a deck crew that is stronger. Loading and unloading supplies, most especially cannons or chests of gold, requires a number of strong backs. This is why every ship has its share of brutes – big, strong men capable of handling themselves no matter the work or the fight. In addition to the tasks already mentioned, brutes would be key men in hunting parties, ship boarding, and raiding groups as well. Keep in mind that not all brutes need to be hulking bruisers. A wiry-tough and dexterous hunter, skilled with both blades and long rifle, could be a brute as well. Brutes, no matter their size, do not shrink from a hard task. Men of this sort make up perhaps as much as ½ of a pirate crew, but they will be mixed among the gunners and swabbies, not a stand alone corp. Most of the men on a pirate or privateer ship were probably gunners.
Gunners
Depending upon the size of their shot, each cannon required a crew of either 3 or 4 men to load and fire it. So a sloop carrying 4 small guns per side would require a minimum of 24 men to fully maintain them and that does not include the officers directing the cannon fire. On a large ship, like Blackbeard’s Queen Anne’s Revenge, a full gun crew would be 160 men dedicated only to firing the cannons. (It is important to note here that Blackbeard had a total crew compliment of 125 on board the Queen Anne’s Revenge.) These crewmen would have to be available 24/7 to do their job whenever required, but otherwise might have no duties on the ship. There was double-duty in most crews though. Most pirate ships didn’t keep a full compliment of gunners like warships of the time did because fewer crew members meant fewer shares and that meant more money for everyone when the treasure was split. Gunners could make up between 1/3 to 2/3 of a crew.
Swabbies
Swabbies, or actual trained sailors, are the crew members responsible for handling the rigging and the sails to keep the ship moving. These are the guys and gals who climb the ratlines into the rigging and walk the spars that jut from the masts. Swabbies sometimes fight from the highest position that they can get to on their own ship and then leap into the rigging of the enemy vessel when boarding. Often dexterous fighters, swabbies are known for leaping into the fray, but sometimes they hide in the rigging as deadly snipers. It might be surprising to discover that skilled sailors usually comprised less than 1/3 of the total crew compliment of the ship.
Musikers
It is difficult to prove that “musikers”, or musicians as we call them, were ever a stand-alone part of a pirate crew. However, two excellent examples from the pirate period demonstrate that they have been a common part of most ships of war, pirate and privateer ships included. The first example is from the early Seventeenth century. In Captain John Smith’s advice concerning how to conduct a one-on-one naval engagement he remarks when preparing to board one should, “… sound Drums and Trumpets, and Saint George for England.” The second example comes from the early Eighteenth century. In the articles of Captain Bartholomew Roberts it is stated: “The Musikers to have Rest on the Sabbath Day, but the other six Days and Nights, none without special Favour.” When thinking about the musicians on board a ship in the 16th to 18th centuries, one must not think of a band. That would be far too organized a concept. There is no way to know how many crew members may have been musicians, but one assumes that the number is not large.
It is likely that ships of this period had crew members who owned musical instruments as varied as brass horns, mouth harps, fiddles, bag pipes and accordions. Furthermore, sailors could gather numerous instruments from the various ports of call their ship made. Examples here are numerous: cowhide and goatskin drums from Africa, dried gourd maracas from Cuba, bamboo drums and flutes from Hispaniola, and even tambourines from Morocco. Pause a moment and consider the combined sounds of all of the instruments mentioned here. Now you know why a band is not the idea you want to have. The musicians were popular with the crew, as they were entertainment as well as a valuable battle element. The musicians played during meal times and during work breaks allowing the crew some entertainment to break the monotony of long hours of tiring work. This boost in moral was welcome at anytime, but was perhaps the most effective when used in battle.
From stories of Bartholomew Roberts crew and others, we know that when a ship with musicians approached another ship with the intention to fight, the effects of the music could be terrifying to the enemy. The musicians would play marches and other martial music. There were drum rolls, trumpet and bugle calls, and perhaps even a piper given the nationality of the crew. Add to this the noise of the ship’s cook beating upon his pots and pans and the crew stamping their feet or beating their weapons against the ship. Finally top this off with the sounds of shouting, screaming, and shooting, both pistols and rifles as well as cannons and deck guns. Your imagination can supply you with the details of the scene. The intended result is achieved: the morale aboard the pirate vessel is raised to a fevered pitch while the morale of their intended prize is shaken. So do not forget that pirates and privateers know the value of bardic inspiration when you run those encounters.
Writing References: Character Development
50 Questions ⚜ "Well-Rounded Character" Worksheet
Basics: How to Write a Character ⚜ A Story-Worthy Hero
Basics: Character-Building ⚜ Character Creation
Key Characters ⚜ Literary Characters ⚜ Morally Grey Characters
Personality Traits
5 Personality Traits (OCEAN) ⚜ 16 Personality Traits (16PF)
600+ Personality Traits
East vs. West Personalities ⚜ Trait Theories
Tips/Editing
Character Issues
Character Tropes for Inspiration
Tips from Rick Riordan
Writing Notes
Allegorical Characters
Binge ED
Childhood Bilingualism ⚜ Children's Dialogue ⚜ On Children
Culture ⚜ Culture: Two Views ⚜ Culture Shock
Emotional Intelligence ⚜ Genius (Giftedness)
Emotions ⚜ Anger ⚜ Fear ⚜ Happiness ⚜ Sadness
Facial Expressions
Fantasy Creatures
Happy/Excited Body Language ⚜ Laughter & Humor
Hate ⚜ Love
Health ⚜ Frameworks of Health
Identifying Character Descriptions
Jargon ⚜ Logical Fallacies ⚜ Memory
Mutism ⚜ Shyness
Parenting Styles
Psychological Reactions to Unfair Behavior
Rhetoric ⚜ The Rhetorical Triangle
Swearing & Taboo Expressions
Thinking ⚜ Thinking Styles ⚜ Thought Distortions
Uncommon Words: Body ⚜ Emotions
Voice & Accent
Writing References: Plot ⚜ World-building
pssssst hey. hey. free and expansive database of folk and fairy tales. you can thank me later
STOP DOING THIS IN INJURY FICS!!
Bleeding:
Blood is warm. if blood is cold, you’re really fucking feverish or the person is dead. it’s only sticky after it coagulates.
It smells! like iron, obv, but very metallic. heavy blood loss has a really potent smell, someone will notice.
Unless in a state of shock or fight-flight mode, a character will know they’re bleeding. stop with the ‘i didn’t even feel it’ yeah you did. drowsiness, confusion, pale complexion, nausea, clumsiness, and memory loss are symptoms to include.
blood flow ebbs. sometimes it’s really gushin’, other times it’s a trickle. could be the same wound at different points.
it’s slow. use this to your advantage! more sad writer times hehehe.
Stab wounds:
I have been mildly impaled with rebar on an occasion, so let me explain from experience. being stabbed is bizarre af. your body is soft. you can squish it, feel it jiggle when you move. whatever just stabbed you? not jiggly. it feels stiff and numb after the pain fades. often, stab wounds lead to nerve damage. hands, arms, feet, neck, all have more motor nerve clusters than the torso. fingers may go numb or useless if a tendon is nicked.
also, bleeding takes FOREVER to stop, as mentioned above.
if the wound has an exit wound, like a bullet clean through or a spear through the whole limb, DONT REMOVE THE OBJECT. character will die. leave it, bandage around it. could be a good opportunity for some touchy touchy :)
whump writers - good opportunity for caretaker angst and fluff w/ trying to manhandle whumpee into a good position to access both sites
Concussion:
despite the amnesia and confusion, people ain’t that articulate. even if they’re mumbling about how much they love (person) - if that’s ur trope - or a secret, it’s gonna make no sense. garbled nonsense, no full sentences, just a coupla words here and there.
if the concussion is mild, they’re gonna feel fine. until….bam! out like a light. kinda funny to witness, but also a good time for some caretaking fluff.
Fever:
you die at 110F. no 'oh no his fever is 120F!! ahhh!“ no his fever is 0F because he’s fucking dead. you lose consciousness around 103, sometimes less if it’s a child. brain damage occurs at over 104.
ACTUAL SYMPTOMS:
sluggishness
seizures (severe)
inability to speak clearly
feeling chilly/shivering
nausea
pain
delirium
symptoms increase as fever rises. slow build that secret sickness! feverish people can be irritable, maybe a bit of sass followed by some hurt/comfort. never hurt anybody.
ALSO about fevers - they absolutely can cause hallucinations. Sometimes these alter memory and future memory processing. they're scary shit guys.
fevers are a big deal! bad shit can happen! milk that till its dry (chill out) and get some good hurt/comfort whumpee shit.
keep writing u sadistic nerds xox love you
ALSO I FORGOT LEMME ADD ON:
YOU DIE AT 85F
sorry I forgot. at that point for a sustained period of time you're too cold to survive.
pt 2
also please stop traumadumping in the notes/tags, that's not the point of this post. it's really upsetting to see on my feed, so i'm muting the notifs for this post. if you have a question about this post, dm me, but i don't want a constant influx of traumatic stories. xox
writing tips - fevers
guys so the injury post absolutely fucking exploded (500 notes in 24 hours is a lot for me) and the fever part really threw yall for a loop.
I didn't go into it but I can! just to clear up questions.
Fevers are funky asf
like, there are so many factors that indicate when a fever is like a big deal and when it's not. part of it has to do with the age of the patient, how long the fever lasts, any causes or prexisting conditions....
Like this:
If person is feverish due to an infection, their symptoms are gonna be slightly different than someone who is fighting the flu. this is because the antibodies are attacking different parts of the nervous system with different kinds of chemicals blah de blah blah blah.
The younger the patient, the more susceptible they are. if the character is a child, a fever of 102 F is way worse than a 30 year old man experiencing that. It'll take a larger toll on the baby's body.
Some people have naturally higher body temps. There is a standard deviation away from the target temp that is still ok. Some people simply exist at 99.2 F, even though for some that's febrile.
idk man it's weird people are weird don't @ me about it.
obviously it's bio science which means not everything has exactly a clear answer. there are so mnay variables at play that it's easier just to blanket statement the whole thing.
because this isn't a blog for medical advice.
please don't use this blog for medical advice.
100% of death.
thanks guys love the effort
xox
When your Character...
Gets into: A Fight ⚜ ...Another Fight ⚜ ...Yet Another Fight
Hates Someone ⚜ Kisses Someone ⚜ Falls in Love
Calls Someone they Love ⚜ Dies / Cheats Death ⚜ Drowns
is...
A Child ⚜ Interacting with a Baby/Child ⚜ A Genius ⚜ A Lawyer
Beautiful ⚜ Dangerous ⚜ Drunk ⚜ Injured ⚜ Shy
needs...
A Magical Item ⚜ An Aphrodisiac ⚜ A Fictional Poison
To be Killed Off ⚜ To Become Likable ⚜ To Clean a Wound
To Find the Right Word, but Can't ⚜ To Say No ⚜ A Drink
loves...
Astronomy ⚜ Baking ⚜ Cooking ⚜ Cocktails ⚜ Food ⚜ Oils
Dancing ⚜ Fashion ⚜ Gems ⚜ Mythology ⚜ Numbers
Roses ⚜ Sweets ⚜ To Fight ⚜ Wine ⚜ Wine-Tasting ⚜ Yoga
has/experiences...
Allergies ⚜ Amnesia ⚜ Bereavement ⚜ Bites & Stings ⚜ Bruises
Caffeine ⚜ CO Poisoning ⚜ Color Blindness ⚜ Food Poisoning
Injuries ⚜ Jet Lag ⚜ Mutism ⚜ Pain ⚜ Poisoning
More Pain & Violence ⚜ Viruses ⚜ Wounds
[these are just quick references. more research may be needed to write your story...]
Can I get an outline for reference of how you draw bodies please? ^^ if you can and want to


[text in the first image: fat rolls are cute as fuck put them every where]
I don't really think I'm the best person to ask... I don't think of anatomy often HAHA. this is more my chibi style? but it's the exact same just smaller heads hands n feet w/ my normal style so it . is analogous.
best tip! make every line curve slightly outward. cus it's cute. also add a little fat roll to the back as a treat. for me. for me. for me.


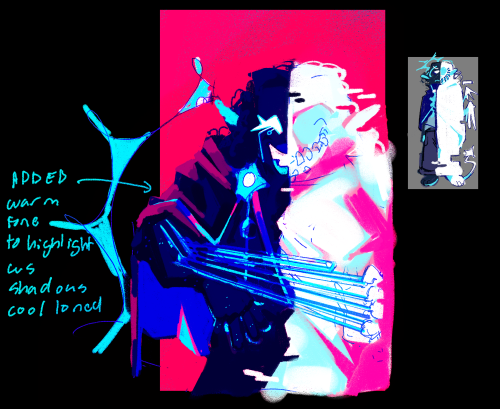
hey i hope its okay to ask but i was wondering what your process for art looks like? you have a really unique style thats like. somewhat eyestrainy but still soft looking and i'm just curious because it is very tasty
Got super long winded so check under cut :]
also this is for my more.. recent art? for more of my older stuff I made THIS a while back <- the prev thing also has a lot more actual discussion on the Whys of color choices and the like. More informative? I actually cared a lot more about making things look nice back than HAHA


Sometimes I will stop here [most of the time actually [or a bit before [forgoing colored lines]]]


And again, liable to stop at Any of these points. [exept Only flat colors that looks boring as hell HAHA]
Finished product VVV

your art is so cool- oh my golly, do you have any drawing tips? and colouring tips? ❤🙏 (happy pride month btw)
I wrote a lot for this one X]] it's under the cut

First I'd just flat something out. I really just eyeball most color schemes, so I'm super sorry I don't have the most tips on that X[ The flats on this piece are mostly analogous. They're colors next to each other on the wheel, dark blue and cyan are next to each other, so they look all pretty together. Usually I like using complementary though, opposites, cus contrast is soooo pretty. I actually change it to that right after flats X]

than I either use a few multiply or screen or overlay layers on top! as a treat! or just like... eyeball some more colors. I like using colors from other places on the piece, so it looks cohesive. This is where I'll usually merge all my layers down to a single layer [including sketch, flats, shading, and background],,, I don't recommend it but this is just part of my process now X]

Next thing I do is just like,,, eyeball where I want More? He looked a bit boring being only blue, so I wanted to add more color; I chose red because the background is that lovely cherry pink, taking colors from other parts of the piece yippie! This is also just eyeballed too though...I just pick what I think looks pretty, sorry X[


than I just start rendering? I kinda just turn my brain off when I do I really don't know how to explain how I render, and looking at examples of the bullshit I deal with you probably don't want to render like me either HAHA [drew even more references X))]

and than it's done!!! yippie! I put it under a layer of chromatic aberation too cus I enjoy the affect X]] not shown here this is just the finished like. render render. w/out the extra bits. And happy pride month! completly forgor woof HGHG
i love your art so much!! would you be alright sharing some info about your process for art? i'm in love with all of it especially your more recent painterly stuff :D if i could eat your art to gain its power i would
Thank you so much!!! :DDD and ofc! I'll try and articulate whatever I do (I truly just See What Looks Good tbh) below the cut :]
I'll use my most recent work as an example :]

So I start off with the sketch of course, for this I'll usually have the general idea of what I'm doing planned out in my mind, but if I can't figure out the pose/layout or whatever I'll usually scour pinterest for references/inspiration

Then COLOUR SHIT. Ok, I couldn't get a version of this without shading bcus I sadly merged the layers already </3 but basically once I have the base colour(s) down I'll mess with the layer's colour settings until it works with the lighting I'm doing and then I'll start shading. I'd say there's a more refined process but tbh I kinda just pick a section (skin, hair, clothes, etc...) and go ham.


After that, rendering! (And small details [the first pic]) tbh I have no idea what rendering is/how to do it? But my definition is 20 layers of airbrushing at low opacity until it looks good 👍 (for this piece that was alot of dark blues, reds and purples. In general I try to use the dreaded Colour Theory to make things look nice and cohesive [complimentary colours and the like]) this section is very much trial and error, I'll also mess with the settings and colours for everything I've done so far ALOT, as well as go back and fix little things I did forever ago

Then the background/any final details! (Usually if I'm doing a more complicated background I'll work on that at the same pace as every thing else [sketch, colour, render] but for pieces like this where it's simple, I'll do that whenever)
But yeah! Hopefully that's helpful (?) In some way. My process is all over the place and I usually break my own order of doing things and start like rendering half way through colouring half the time?? Anyway thank you!!! It feels very awesome to know people like my art and wanna see how I do stuff :DDD
I love your art so much!! It's inspiring me to get back into pixel art (I gave up quickly). A huge problem I had was I didn't know what size was best to set my canvas for specific projects. I always ended up overestimating and making it too big and then it looked less like pixel art and more like grainy digital art. Do you have a rough guide you stick to for landscapes/bedrooms/cities VS. things like animals and characters?
aw thank you i'm happy to hear that! i hope u stick with it ♥
with landscapes/bedrooms/cities i use 275x155. this provides a fair amount of detail while still keeping it pixely, plus it resizes to wallpaper size. for vertical i just reverse it at 155x275.
i've also recently started to use 215x215 (same amount of pixels as above) so that i can resize my art to easily fit both wallpapers, and mobile videos... since tiktok and instagram reels are everything nowadays 😒
for characters and animals, generally i will base the size of the canvas around how i stylize eyes.


so i'll draw the eyes first, then just draw everything else around that.


i also have a smaller resolution style with 2px dot eyes that i use for adding characters to landscapes, since my landscape resolution is too small for my regular style unless the character is close to the screen.
hope this helps!


SO! You've seen these little things I do sometimes and you want to know the process!


It's genuinely super simple, so here goes! Apologies by the way if anything is unclear or glossed over. A lot of this is personal taste and such so I hope this can be a nice boost to create something!

RESOURCES AND THINGS TO KNOW!
To preface this little guide already assumes you have basic knowledge of color distribution, lineless art, or breaking up art into proper layers for later processing! I am also assuming that your art program has access to scatter brushes and tiling textures. Personally I use Clip Studio Paint, but this can work on other apps. Anyways, here are some good sites for this:
EZGIF - Free, easy gif maker for assembling any kind of gif*! It also has stuff like converting those damn WEBP's back into png.
*PLEASE KNOW THAT YOU CANNOT MAKE GIFS THAT ARE PARTIALLY TRANSPARENT. YOU MUST USE A SOLID COLOR UNDER ANY PART THAT IS OVER BARE CANVAS
Transparent Textures - Free to use source for HQ transparent textures that tile! Amazing for finding a paper texture for these if you commit to the paper doll look. Best results for textures that are in white or black!
So! You have a finished, prepared piece that you want to glitterfy. Well I'm not covering that right now so you can scroll down to That part if you came just for the glitter. This next section is for...
PREPARING THE PAPER DOLL
To start, your piece should already be separated into respective layers in any order you'd like! We're about to use a ton of clipping masks so Make sure you know your program before starting! So, as my example we have my oc Roy, resized to around... 1500x1500 or the nearest equivalent Smaller is better because it brings out the texture! He looks a little ah...Flat, though right now?

I'm using this guy for a couple different reasons! Those being:
Roy has translucent bodyparts! Just so you will know what to do with characters who are translucent! I'll get to this in a moment so sit tight
He has a clear, defined, and distinct palette that is easy to pick a color to slap the glitter on! This is important because I personally find balance to be the most appealing part of the finished art.
He also just has a lot of doohickeys on his design.
This is where you need your transparent texture! You can use any kind of texture and I encourage experimentation and such, but I personally use a simple paper texture. What we are going to do is go through and clip our imported and tiled texture to each applicable layer! (Make sure to just Copy and Paste the layer you do NOT need to repeatedly go through this menu...)

And... When you are done, you should have something like this:

"But why don't I just clip the texture to the entire piece through a folder? Why go through the hassle of clipping to each individual layer?"
Well that's because of the next step, where we will be adding the shadows. If we don't clip each individual layer, your shadows will look like this example on the left which sort of just ruins the 3D effect and kinda just looks icky, as opposed to this, which is nicer and smoother.


Now I'm no lighting wiz! In fact I'm rather mediocre at best but some general tips for adding the shadows:
Try to keep your shadows going all in one direction mostly! It gives the effect of one light source and generally just looks better than if you shaded around ALL edges everywhere.
Try to only shade where there are parts overlapping that need the dimension! Overdoing it can make the piece look odd. It's especially helpful to separate any details like different shades of hair, layers of hair, etc so that you can put as much volume as you want.
Once the shadows are all added in you should have something that looks like this:

Which looks good! Now I'd sometimes stop here if I can't pinpoint how I'd like the glitter to sit or if I think the piece just doesn't need it, but we're moving on to the big important steps!
ADDING GLITTER
This part is entirely up to your taste! But I'll describe how I do my glitter stuff. Firstly I start out by identifying which color I want to pop out. For Roy here I chose the red parts! For your character it may be different. Experimentation is key!
This is also, however where you need that scatter brush I mentioned earlier. Personally I just use the default CSP spray brush, but again go wild!

Make a folder above your piece, set its blending mode to glow dodge (or add, or add glow depending on what options you have), and create three layers inside of this folder. Setting the folder to clip is optional right now but will be needed later.

Then, fill each glitter layer with your choice of particle in whatever color looks good! Yes, you can do gradients and other stuff on the particles too! World's your oyster.

^ Unclipped example of a glitter layer.
Glitter tips for the early 2000's webcore enthusiast:
Use different strokes and patterns for the glitter distribution! This helps it animate better by moving around. For example this time I went diagonally for the first, horizontally for the second, and then in loose circles for the third. Particle density and stuff is also completely up to you.
Use a color that would pop against the intended area! For Roy I used an orange-ish yellow since it compliments both blue and red.
So now we have the layers! This is where clipping is our best friend once again! You're just going to go in and clip the glitter to whatever layers you want it on. Entire folder, not just one of the layers!

Once that's all done, go through and toggle the respective glitter layer for the frame, saving individual copies when done. You should end up with 3 identical images with different glitter distribution.
"BUT WAIT! JONES, THE TRANSLUCENCY!!" I hear you call! Yes, this is where we handle that! If your character is NOT translucent, you can scroll past this section.
Open up your frames all in one canvas, stacked on top of eachother (no jittering or slight displacement! ON TOP of eachother!)

Our layout should look something like this...Note how the translucent parts are rather hard to see, well if you took your frames and put them in EZgif, they'd be gone entirely! That's because you physically cannot have a partially translucent gif due to technology limitations. So an easy little cleanup thing I did was:
1. SELECT THE CANVAS AROUND THE CHARACTER WITH THE MAGIC WAND TOOL. Do not have any expansion settings on or it probably won't look right in the end.

Make sure you do not miss any gaps! I personally missed the gap between the arm, leg, and lanyard and I had to redo this next step...
2. SELECT -> INVERT SELECTION


3. FILL SELECTION WITH THE DESIRED COLOR. IT MUST BE OPAQUE. I personally picked this cloudy gray color.

You can now save individual frames of your character with the fill so that they don't go bald when you move on to the next step! Again, you should have 3 frames.
FINISHING UP
This is nice and easy. Upload your three frames into EZGIF and wait for it to process. It'll look like this if you're in the right place.

Once things have loaded, make sure to change the settings to the following:
FRAME DELAY: 0 (this is how fast the frames move.)
DON'T STACK FRAMES: ENABLED
You can play around with this but I generally leave everything else alone because you don't need it. Just hit the make a gif button and you're all done!

Aaaand that's it! If you've read this far...Firstly thank you for dealing with my rambliness and horrible explanation skills. Secondly, I hope that this can come in handy for anyone interested! Would love to see if anyone puts this to use. n_n

Whipped this up real quick to show my palette basics. Here’s my coloring tutorial post: https://kandyarts.tumblr.com/post/628614256321036288/yalright-punks-i-made-a-fun-lil-coloring-tutorial


Yalright punks I made a fun lil coloring tutorial! Plz note that I don’t know shit about color theory and this is just stuff I taught myself over the years