Whipped This Up Real Quick To Show My Palette Basics. Here’s My Coloring Tutorial Post: Https://kandyarts.tumblr.com/post/628614256321036288/yalright-punks-i-made-a-fun-lil-coloring-tutorial

Whipped this up real quick to show my palette basics. Here’s my coloring tutorial post: https://kandyarts.tumblr.com/post/628614256321036288/yalright-punks-i-made-a-fun-lil-coloring-tutorial

More Posts from Ardouradvice and Others
STOP DOING THIS IN INJURY FICS!!
Bleeding:
Blood is warm. if blood is cold, you’re really fucking feverish or the person is dead. it’s only sticky after it coagulates.
It smells! like iron, obv, but very metallic. heavy blood loss has a really potent smell, someone will notice.
Unless in a state of shock or fight-flight mode, a character will know they’re bleeding. stop with the ‘i didn’t even feel it’ yeah you did. drowsiness, confusion, pale complexion, nausea, clumsiness, and memory loss are symptoms to include.
blood flow ebbs. sometimes it’s really gushin’, other times it’s a trickle. could be the same wound at different points.
it’s slow. use this to your advantage! more sad writer times hehehe.
Stab wounds:
I have been mildly impaled with rebar on an occasion, so let me explain from experience. being stabbed is bizarre af. your body is soft. you can squish it, feel it jiggle when you move. whatever just stabbed you? not jiggly. it feels stiff and numb after the pain fades. often, stab wounds lead to nerve damage. hands, arms, feet, neck, all have more motor nerve clusters than the torso. fingers may go numb or useless if a tendon is nicked.
also, bleeding takes FOREVER to stop, as mentioned above.
if the wound has an exit wound, like a bullet clean through or a spear through the whole limb, DONT REMOVE THE OBJECT. character will die. leave it, bandage around it. could be a good opportunity for some touchy touchy :)
whump writers - good opportunity for caretaker angst and fluff w/ trying to manhandle whumpee into a good position to access both sites
Concussion:
despite the amnesia and confusion, people ain’t that articulate. even if they’re mumbling about how much they love (person) - if that’s ur trope - or a secret, it’s gonna make no sense. garbled nonsense, no full sentences, just a coupla words here and there.
if the concussion is mild, they’re gonna feel fine. until….bam! out like a light. kinda funny to witness, but also a good time for some caretaking fluff.
Fever:
you die at 110F. no 'oh no his fever is 120F!! ahhh!“ no his fever is 0F because he’s fucking dead. you lose consciousness around 103, sometimes less if it’s a child. brain damage occurs at over 104.
ACTUAL SYMPTOMS:
sluggishness
seizures (severe)
inability to speak clearly
feeling chilly/shivering
nausea
pain
delirium
symptoms increase as fever rises. slow build that secret sickness! feverish people can be irritable, maybe a bit of sass followed by some hurt/comfort. never hurt anybody.
ALSO about fevers - they absolutely can cause hallucinations. Sometimes these alter memory and future memory processing. they're scary shit guys.
fevers are a big deal! bad shit can happen! milk that till its dry (chill out) and get some good hurt/comfort whumpee shit.
keep writing u sadistic nerds xox love you
ALSO I FORGOT LEMME ADD ON:
YOU DIE AT 85F
sorry I forgot. at that point for a sustained period of time you're too cold to survive.
pt 2
also please stop traumadumping in the notes/tags, that's not the point of this post. it's really upsetting to see on my feed, so i'm muting the notifs for this post. if you have a question about this post, dm me, but i don't want a constant influx of traumatic stories. xox
Can I get an outline for reference of how you draw bodies please? ^^ if you can and want to


[text in the first image: fat rolls are cute as fuck put them every where]
I don't really think I'm the best person to ask... I don't think of anatomy often HAHA. this is more my chibi style? but it's the exact same just smaller heads hands n feet w/ my normal style so it . is analogous.
best tip! make every line curve slightly outward. cus it's cute. also add a little fat roll to the back as a treat. for me. for me. for me.


pssssst hey. hey. free and expansive database of folk and fairy tales. you can thank me later
Things That May Be Causing Your Writer's Block- and How to Beat Them
I don't like the term 'Writer's Block' - not because it isn't real, but because the term is so vague that it's useless. Hundreds of issues all get lumped together under this one umbrella, making writer's block seem like this all-powerful boogeyman that's impossible to beat. Worse yet, it leaves people giving and receiving advice that is completely ineffective because people often don't realize they're talking about entirely different issues.
In my experience, the key to beating writer's block is figuring out what the block even is, so I put together a list of Actual Reasons why you may be struggling to write:
(note that any case of writer's block is usually a mix of two or more)
Perfectionism (most common)
What it looks like:
You write one sentence and spend the next hour googling "synonyms for ___"
Write. Erase. Write. Rewrite. Erase.
Should I even start writing this scene when I haven't figured out this one specific detail yet?
I hate everything I write
Cringing while writing
My first draft must be perfect, or else I'm a terrible writer
Things that can help:
Give yourself permission to suck
Keep in mind that nothing you write is going to be perfect, especially your first draft
Think of writing your first/early drafts not as writing, but sketching out a loose foundation to build upon later
People write multiple drafts for a reason: write now, edit later
Stop googling synonyms and save that for editing
Write with a pen to reduce temptation to erase
Embrace leaving blank spaces in your writing when you can't think of the right word, name, or detail
It's okay if your writing sucks. We all suck at some point. Embrace the growth mindset, and focus on getting words on a page
Lack of inspiration (easiest to fix)
What it looks like:
Head empty, no ideas
What do I even write about???
I don't have a plot, I just have an image
Want to write but no story to write
Things that can help:
Google writing prompts
If writing prompts aren't your thing, instead try thinking about what kind of tropes/genres/story elements you would like to try out
Instead of thinking about the story you would like to write, think about the story you would like to read, and write that
It's okay if you don't have a fully fleshed out story idea. Even if it's just an image or a line of dialogue, it's okay to write that. A story may or may not come out of it, but at least you got the creative juices flowing
Stop writing. Step away from your desk and let yourself naturally get inspired. Go for a walk, read a book, travel, play video games, research history, etc. Don't force ideas, but do open up your mind to them
If you're like me, world-building may come more naturally than plotting. Design the world first and let the story come later
Boredom/Understimulation (lost the flow)
What it looks like:
I know I should be writing but uugggghhhh I just can'tttttt
Writing words feels like pulling teeth
I started writing, but then I got bored/distracted
I enjoy the idea of writing, but the actual process makes me want to throw my laptop out the window
Things that can help:
Introduce stimulation: snacks, beverages, gum, music such as lo-fi, blankets, decorate your writing space, get a clickity-clackity keyboard, etc.
Add variety: write in a new location, try a new idea/different story for a day or so, switch up how you write (pen and paper vs. computer) or try voice recording or text-to-speech
Gamify writing: create an arbitrary challenge, such as trying to see how many words you can write in a set time and try to beat your high score
Find a writing buddy or join a writer's group
Give yourself a reward for every writing milestone, even if it's just writing a paragraph
Ask yourself whether this project you're working on is something you really want to be doing, and be honest with your answer
Intimidation/Procrastination (often related to perfectionism, but not always)
What it looks like:
I was feeling really motivated to write, but then I opened my laptop
I don't even know where to start
I love writing, but I can never seem to get started
I'll write tomorrow. I mean next week. Next month? Next month, I swear (doesn't write next month)
Can't find the time or energy
Unreasonable expectations (I should be able to write 10,000 words a day, right????)
Feeling discouraged and wondering why I'm even trying
Things that can help:
Follow the 2 min rule (or the 1 paragraph rule, which works better for me): whenever you sit down to write, tell yourself that you are only going to write for 2 minutes. If you feel like continuing once the 2 mins are up, go for it! Otherwise, stop. Force yourself to start but DO NOT force yourself to continue unless you feel like it. The more often you do this, the easier it will be to get started
Make getting started as easy as possible (i.e. minimize barriers: if getting up to get a notebook is stopping you from getting started, then write in the notes app of your phone)
Commit to a routine that will work for you. Baby steps are important here. Go with something that feels reasonable: every day, every other day, once a week, twice a week, and use cues to help you remember to start. If you chose a set time to write, just make sure that it's a time that feels natural to you- i.e. don't force yourself to writing at 9am every morning if you're not a morning person
Find a friend or a writing buddy you can trust and talk it out or share a piece of work you're proud of. Sometimes we just get a bit bogged down by criticism- either internal or external- and need a few words of encouragement
The Problem's Not You, It's Your Story (or Outline (or Process))
What it looks like:
I have no problems writing other scenes, it's just this scene
I started writing, but now I have no idea where I'm going
I don't think I'm doing this right
What's an outline?
Drowning in documents
This. Doesn't. Make. Sense. How do I get from this plot point to this one?!?!?! (this ColeyDoesThings quote lives in my head rent free cause BOY have I been there)
Things That Can Help:
Go back to the drawing board. Really try to get at the root of why a scene or story isn't working
A part of growing as a writer is learning when to kill your darlings. Sometimes you're trying to force an idea or scene that just doesn't work and you need to let it go
If you don't have an outline, write one
If you have an outline and it isn't working, rewrite it, or look up different ways to structure it
You may be trying to write as a pantser when you're really a plotter or vice versa. Experiment with different writing processes and see what feels most natural
Study story structures, starting with the three act structure. Even if you don't use them, you should know them
Check out Ellen Brock on YouTube. She's a professional novel editor who has a lot of advice on writing strategies for different types of writers
Also check out Savage Books on YouTube (another professional story editor) for advice on story structure and dialogue. Seriously, I cannot recommend this guy enough
Executive Dysfunction, Usually From ADHD/Autism
What it looks like:
Everything in boredom/understimulation
Everything in intimidation/procrastination
You have been diagnosed with and/or have symptoms of ADHD/Autism
Things that can help:
If you haven't already, seek a diagnosis or professional treatment
Hire an ADHD coach or other specialist that can help you work with your brain (I use Shimmer; feel free to DM me for a referral)
Seek out neurodiverse and neurodiverse writing communities for advice and support
Try body doubling! There's lot's of free online body doubling websites out there for you to try. If social anxiety is a barrier, start out with writing streams such as katecavanaughwrites on Twitch
Be aware of any sensory barriers that may be getting in the way of you writing (such as an uncomfortable desk chair, harsh lighting, bad sounds)
And Lastly, Burnout, Depression, or Other Mental Illness
What it looks like:
You have symptoms of burnout or depression
Struggling with all things, not just writing
It's more than a lack of motivation- the spark is just dead
Things that can help:
Forget writing for now. Focus on healing first.
Seek professional help
If you feel like it, use writing as a way to explore your feelings. It can take the form of journaling, poetry, an abstract reflection of your thoughts, narrative essays, or exploring what you're feeling through your fictional characters. The last two helped me rediscover my love of writing after I thought years of depression had killed it for good. Just don't force yourself to do so, and stop if it takes you to a darker place instead of feeling cathartic
Someone has probably already asked you this but do you have any tips on studying/understanding perspective? I keep trying to find resources to learn but none of them really stick or are actually useful
so I'm hoping that your issue isn't just figuring out the difference between 1-point, 2-point, and 3-point perspective and how it works, because there are tons and tons of resources available for that, and I'm guessing what people tend to get tripped up on is what you're supposed to be doing with your grid.
I'm definitely far from being an expert on understanding perspective, but I'll share some of the things that helped ME finally Get It.


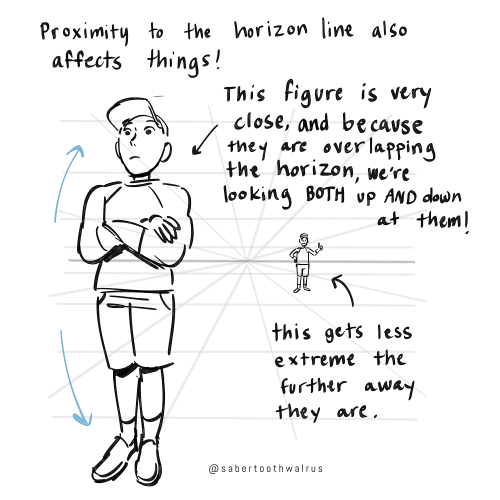
Things like eye level and different camera angles can be a GREAT tool to use when doing a comic or storyboard between multiple characters of different heights!! I actually drew an example of this exact thing for a friend about a month ago (I used adventure time characters bc they're easy to draw and have a good height variety):
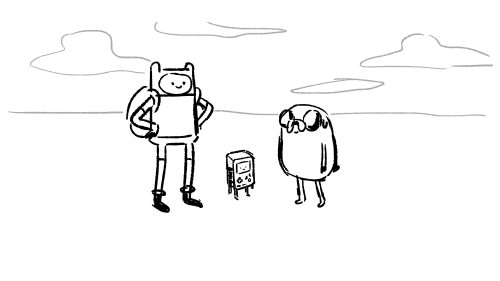
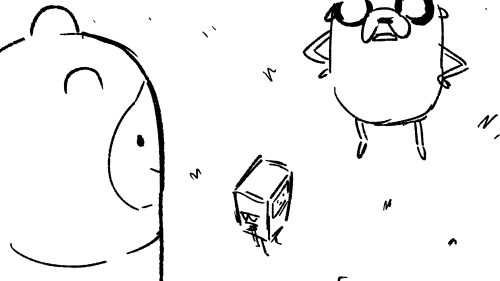


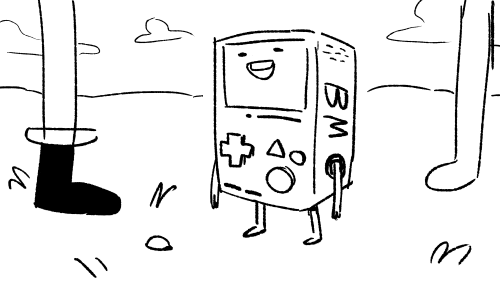
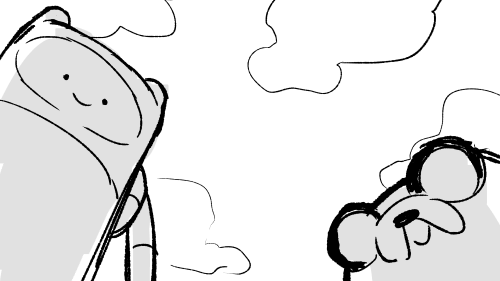
You can use camera angles like this to add variety to your shots, and even use it to help convey something emotional (using a down-shot on a character to show that they FEEL small, use an up-shot on a character to make them look more intimidating, etc etc)
hope this helps!
⭐ So you want to learn pixel art? ⭐
🔹 Part 1 of ??? - The Basics!
Edit: Now available in Google Doc format if you don't have a Tumblr account 🥰
Hello, my name is Tofu and I'm a professional pixel artist. I have been supporting myself with freelance pixel art since 2020, when I was let go from my job during the pandemic.


My progress, from 2017 to 2024. IMO the only thing that really matters is time and effort, not some kind of natural talent for art.
This guide will not be comprehensive, as nobody should be expected to read allat. Instead I will lean heavily on my own experience, and share what worked for me, so take everything with a grain of salt. This is a guide, not a tutorial. Cheers!
🔹 Do I need money?
NO!!! Pixel art is one of the most accessible mediums out there.
I still use a mouse because I prefer it to a tablet! You won't be at any disadvantage here if you can't afford the best hardware or software.
Because our canvases are typically very small, you don't need a good PC to run a good brush engine or anything like that.
✨Did you know? One of the most skilled and beloved pixel artists uses MS PAINT! Wow!!
🔹 What software should I use?
Here are some of the most popular programs I see my friends and peers using. Stars show how much I recommend the software for beginners! ⭐
💰 Paid options:
⭐⭐⭐ Aseprite (for PC) - $19.99
This is what I and many other pixel artists use. You may find when applying to jobs that they require some knowledge of Aseprite. Since it has become so popular, companies like that you can swap raw files between artists.
Aseprite is amazingly customizable, with custom skins, scripts and extensions on Itch.io, both free and paid.
If you have ever used any art software before, it has most of the same features and should feel fairly familiar to use. It features a robust animation suite and a tilemap feature, which have saved me thousands of hours of labour in my work. The software is also being updated all the time, and the developers listen to the users. I really recommend Aseprite!
⭐ Photoshop (for PC) - Monthly $$
A decent option for those who already are used to the PS interface. Requires some setup to get it ready for pixel-perfect art, but there are plenty of tutorials for doing so.
Animation is also much more tedious on PS which you may want to consider before investing time!
⭐⭐ ProMotion NG (for PC) - $19.00
An advanced and powerful software which has many features Aseprite does not, including Colour Cycling and animated tiles.
⭐⭐⭐ Pixquare (for iOS) - $7.99 - $19.99 (30% off with code 'tofu'!!)
Probably the best app available for iPad users, in active development, with new features added all the time.

Look! My buddy Jon recommends it highly, and uses it often.
One cool thing about Pixquare is that it takes Aseprite raw files! Many of my friends use it to work on the same project, both in their office and on the go.
⭐ Procreate (for iOS) - $12.99
If you have access to Procreate already, it's a decent option to get used to doing pixel art. It does however require some setup. Artist Pixebo is famously using Procreate, and they have tutorials of their own if you want to learn.
⭐⭐ ReSprite iOS and Android. (free trial, but:) $19.99 premium or $$ monthly
ReSprite is VERY similar in terms of UI to Aseprite, so I can recommend it. They just launched their Android release!
🆓 Free options:
⭐⭐⭐ Libresprite (for PC)
Libresprite is an alternative to Aseprite. It is very, very similar, to the point where documentation for Aseprite will be helpful to Libresprite users.
⭐⭐ Pixilart (for PC and mobile)
A free in-browser app, and also a mobile app! It is tied to the website Pixilart, where artists upload and share their work. A good option for those also looking to get involved in a community.
⭐⭐ Dotpict (for mobile)
Dotpict is similar to Pixilart, with a mobile app tied to a website, but it's a Japanese service. Did you know that in Japanese, pixel art is called 'Dot Art'? Dotpict can be a great way to connect with a different community of pixel artists! They also have prompts and challenges often.
🔹 So I got my software, now what?
◽Nice! Now it's time for the basics of pixel art.
❗ WAIT ❗ Before this section, I want to add a little disclaimer. All of these rules/guidelines can be broken at will, and some 'no-nos' can look amazing when done intentionally.
The pixel-art fundamentals can be exceedingly helpful to new artists, who may feel lost or overwhelmed by choice. But if you feel they restrict you too harshly, don't force yourself! At the end of the day it's your art, and you shouldn't try to contort yourself into what people think a pixel artist 'should be'. What matters is your own artistic expression. 💕👍
◽Phew! With that out of the way...
🔸"The Rules"
There are few hard 'rules' of pixel art, mostly about scaling and exporting. Some of these things will frequently trip up newbies if they aren't aware, and are easy to overlook.
🔹Scaling method
There are a couple ways of scaling your art. The default in most art programs, and the entire internet, is Bi-linear scaling, which usually works out fine for most purposes. But as pixel artists, we need a different method.


Both are scaled up x10. See the difference?
On the left is scaled using Bilinear, and on the right is using Nearest-Neighbor. We love seeing those pixels stay crisp and clean, so we use nearest-neighbor.
(Most pixel-art programs have nearest-neighbor enabled by default! So this may not apply to you, but it's important to know.)
🔹Mixels
Mixels are when there are different (mixed) pixel sizes in the same image.

Here I have scaled up my art- the left is 200%, and the right is 150%. Yuck!
As we can see, the "pixel" sizes end up different. We generally try to scale our work by multiples of 100 - 200%, 300% etc. rather than 150%. At larger scales however, the minute differences in pixel sizes are hardly noticeable!
Mixels are also sometimes seen when an artist scales up their work, then continues drawing on it with a 1 pixel brush.

Many would say that this is not great looking! This type of pixels can be indicative of a beginner artist. But there are plenty of creative pixel artists out there who mixels intentionally, making something modern and cool.
🔹Saving Your Files
We usually save our still images as .PNGs as they don’t create any JPEG artifacts or loss of quality. It's a little hard to see here, but there are some artifacts, and it looks a little blurry. It also makes the art very hard to work with if we are importing a JPEG.

For animations .GIF is good, but be careful of the 256 colour limit. Try to avoid using too many blending mode layers or gradients when working with animations. If you aren’t careful, your animation could flash afterwards, as the .GIF tries to reduce colours wherever it can. It doesn’t look great!

Here's an old piece from 2021 where I experienced .GIF lossiness, because I used gradients and transparency, resulting in way too many colours.
🔹Pixel Art Fundamentals - Techniques and Jargon
❗❗Confused about Jaggies? Anti-Aliasing? Banding? Dithering? THIS THREAD is for you❗❗ << it's a link, click it!!
As far as I'm concerned, this is THE tutorial of all time for understanding pixel art. These are techniques created and named by the community of people who actually put the list together, some of the best pixel artists alive currently. Please read it!!
🔸How To Learn
Okay, so you have your software, and you're all ready to start. But maybe you need some more guidance? Try these tutorials and resources! It can be helpful to work along with a tutorial until you build your confidence up.
⭐⭐ Pixel Logic (A Digital Book) - $10 A very comprehensive visual guide book by a very skilled and established artist in the industry. I own a copy myself.
⭐⭐⭐ StudioMiniBoss - free A collection of visual tutorials, by the artist that worked on Celeste! When starting out, if I got stuck, I would go and scour his tutorials and see how he did it.
⭐ Lospec Tutorials - free A very large collection of various tutorials from all over the internet. There is a lot to sift through here if you have the time.
⭐⭐⭐ Cyangmou's Tutorials - free (tipping optional) Cyangmou is one of the most respected and accomplished modern pixel artists, and he has amassed a HUGE collection of free and incredibly well-educated visual tutorials. He also hosts an educational stream every week on Twitch called 'pixelart for beginners'.
⭐⭐⭐ Youtube Tutorials - free There are hundreds, if not thousands of tutorials on YouTube, but it can be tricky to find the good ones. My personal recommendations are MortMort, Brandon, and AdamCYounis- these guys really know what they're talking about!
🔸 How to choose a canvas size
When looking at pixel art turorials, we may see people suggest things like 16x16, 32x32 and 64x64. These are standard sizes for pixel art games with tiles. However, if you're just making a drawing, you don't necessarily need to use a standard canvas size like that.
What I like to think about when choosing a canvas size for my illustrations is 'what features do I think it is important to represent?' And make my canvas as small as possible, while still leaving room for my most important elements.
Imagine I have characters in a scene like this:

I made my canvas as small as possible (232 x 314), but just big enough to represent the features and have them be recognizable (it's Good Omens fanart 😤)!! If I had made it any bigger, I would be working on it for ever, due to how much more foliage I would have to render.
If you want to do an illustration and you're not sure, just start at somewhere around 100x100 - 200x200 and go from there.
It's perfectly okay to crop your canvas, or scale it up, or crunch your art down at any point if you think you need a different size. I do it all the time! It only takes a bit of cleanup to get you back to where you were.
🔸Where To Post
Outside of just regular socials, Twitter, Tumblr, Deviantart, Instagram etc, there are a few places that lean more towards pixel art that you might not have heard of.
⭐ Lospec Lospec is a low-res focused art website. Some pieces get given a 'monthly masterpiece' award. Not incredibly active, but I believe there are more features being added often.
⭐⭐ Pixilart Pixilart is a very popular pixel art community, with an app tied to it. The community tends to lean on the young side, so this is a low-pressure place to post with an relaxed vibe.
⭐⭐ Pixeljoint Pixeljoint is one of the big, old-school pixel art websites. You can only upload your art unscaled (1x) because there is a built-in zoom viewer. It has a bit of a reputation for being elitist (back in the 00s it was), but in my experience it's not like that any more. This is a fine place for a pixel artist to post if they are really interested in learning, and the history. The Hall of Fame has some of the most famous / impressive pixel art pieces that paved the way for the work we are doing today.
⭐⭐⭐ Cafe Dot Cafe Dot is my art server so I'm a little biased here. 🍵 It was created during the recent social media turbulence. We wanted a place to post art with no algorithms, and no NFT or AI chuds. We have a heavy no-self-promotion rule, and are more interested in community than skill or exclusivity. The other thing is that we have some kind of verification system- you must apply to be a Creator before you can post in the Art feed, or use voice. This helps combat the people who just want to self-promo and dip, or cause trouble, as well as weed out AI/NFT people. Until then, you are still welcome to post in any of the threads or channels. There is a lot to do in Cafe Dot. I host events weekly, so check the threads!
⭐⭐/r/pixelart The pixel art subreddit is pretty active! I've also heard some of my friends found work through posting here, so it's worth a try if you're looking. However, it is still Reddit- so if you're sensitive to rude people, or criticism you didn't ask for, you may want to avoid this one. Lol
🔸 Where To Find Work
You need money? I got you! As someone who mostly gets scouted on social media, I can share a few tips with you:
Put your email / portfolio in your bio Recruiters don't have all that much time to find artists, make it as easy as possible for someone to find your important information!
Clean up your profile If your profile feed is all full of memes, most people will just tab out rather than sift through. Doesn't apply as much to Tumblr if you have an art tag people can look at.
Post regularly, and repost Activity beats everything in the social media game. It's like rolling the dice, and the more you post the more chances you have. You have to have no shame, it's all business baby
Outside of just posting regularly and hoping people reach out to you, it can be hard to know where to look. Here are a few places you can sign up to and post around on.
/r/INAT INAT (I Need A Team) is a subreddit for finding a team to work with. You can post your portfolio here, or browse for people who need artists.
/r/GameDevClassifieds Same as above, but specifically for game-related projects.
Remote Game Jobs / Work With Indies Like Indeed but for game jobs. Browse them often, or get email notifications.
VGen VGen is a website specifically for commissions. You need a code from another verified artist before you can upgrade your account and sell, so ask around on social media or ask your friends. Once your account is upgraded, you can make a 'menu' of services people can purchase, and they send you an offer which you are able to accept, decline, or counter.
The evil websites of doom: Fiverr and Upwork I don't recommend them!! They take a big cut of your profit, and the sites are teeming with NFT and AI people hoping to make a quick buck. The site is also extremely oversaturated and competitive, resulting in a race to the bottom (the cheapest, the fastest, doing the most for the least). Imagine the kind of clients who go to these websites, looking for the cheapest option. But if you're really desperate...
🔸 Community
I do really recommend getting involved in a community. Finding like-minded friends can help you stay motivated to keep drawing. One day, those friends you met when you were just starting out may become your peers in the industry. Making friends is a game changer!
Discord servers Nowadays, the forums of old are mostly abandoned, and people split off into many different servers. Cafe Dot, Pixel Art Discord (PAD), and if you can stomach scrolling past all the AI slop, you can browse Discord servers here.
Twitch Streams Twitch has kind of a bad reputation for being home to some of the more edgy gamers online, but the pixel art community is extremely welcoming and inclusive. Some of the people I met on Twitch are my friends to this day, and we've even worked together on different projects! Browse pixel art streams here, or follow some I recommend: NickWoz, JDZombi, CupOhJoe, GrayLure, LumpyTouch, FrankiePixelShow, MortMort, Sodor, NateyCakes, NyuraKim, ShinySeabass, I could go on for ever really... There are a lot of good eggs on Pixel Art Twitch.
🔸 Other Helpful Websites
Palettes Lospec has a huge collection of user-made palettes, for any artist who has trouble choosing their colours, or just wants to try something fun. Rejected Palettes is full of palettes that didn't quite make it onto Lospec, ran by people who believe there are no bad colours.
The Spriters Resource TSR is an incredible website where users can upload spritesheets and tilesets from games. You can browse for your favourite childhood game, and see how they made it! This website has helped me so much in understanding how game assets come together in a scene.
VGMaps Similar to the above, except there are entire maps laid out how they would be played. This is incredible if you have to do level design, or for mocking up a scene for fun.
Game UI Database Not pixel-art specific, but UI is a very challenging part of graphics, so this site can be a game-changer for finding good references!
Retronator A digital newspaper for pixel-art lovers! New game releases, tutorials, and artworks!
Itch.io A website where people can upload, games, assets, tools... An amazing hub for game devs and game fans alike. A few of my favourite tools: Tiled, PICO-8, Pixel Composer, Juice FX, Magic Pencil for Aseprite
🔸 The End?
This is just part 1 for now, so please drop me a follow to see any more guides I release in the future. I plan on doing some writeups on how I choose colours, how to practise, and more!
I'm not an expert by any means, but everything I did to get to where I am is outlined in this guide. Pixel art is my passion, my job and my hobby! I want pixel art to be recognized everywhere as an art-form, a medium of its own outside of game-art or computer graphics!
This guide took me a long time, and took a lot of research and experience. Consider following me or supporting me if you are feeling generous.
And good luck to all the fledgling pixel artists, I hope you'll continue and have fun. I hope my guide helped you, and don't hesitate to send me an ask if you have any questions! 💕
My other tutorials (so far): How to draw Simple Grass for a game Hue Shifting
I was wondering how achieve such a wonderful textured finish on your pieces? They are wonderful and I love their resemblance to aged photographs and the speckles of colors in the backgrounds. Your art is mesmerizing :)
you can see some of the texture brush sets i use in my #info_asks tag but i have some more (procreate) tips aside from just brushes
also hi i made this whole thing and then stupidly hit ctrl z to erase ONE word and i lost the entire bottom half of the post and all my image descriptions so fuck you tumblr i had to make this twice
to get a faded photo or old digital screen look, consider duplicating the canvas (once all the layers are merged) and using a gaussian blur tool on the new duplicated layer. then set that to low opacity to add a misty sort of look. looks nice in combination with some chromatic abberation and a small bloom effect. then a subtle noise filter on top:

for faded print effects, it's really worthwhile to learn how to use layer masks. you can use a layer mask to non-destructively 'weather' blocks of colour or lineart, without erasing the layer itself. the weathered ink/block print effect here was made using layer masks which means that if i just hide the mask, the lineart becomes solid black again and easy to alter or colour in:

for old paper effects you can just set a paper texture on multiply over the art sure, but you can also combine it with the blur & bloom thing, a really subtle drop shadow and canvas tilt, and highlights to make it look like an aged photograph of a card. this originally had a transparent bg but i'll post it here with a white bg so that the drop shadow is more obvious. the scuffed edges of the card (left) were hand drawn, simple white stucco brush. the bigger patch of scuffed ink (top right) was a texture stamp.

for block print looks you can move the colour layer out of alignment by a few pixels - but only after you're absolutely sure you're done with it, otherwise you'll get something like this -

i forgot to erase out her eye before i moved the red layer so now her eye defeats the 'look' of a misaligned print. the black lineart and red layer were also given the same layer mask treatment as described above to make them look faded or like the ink didn't stick down right to the paper
you can do this with multiple colour layers too. if the colour layers are separated and set to multiply (as in this cmyk example), it'll leave halos and edges around each shape which mimic old comic book print

just to show what you can do WITHOUT any special brushes, here's a piece of one of my mez tarot cards from before i got any extra brushsets at all. for this one, i added a green tint over everything to mimic a sun-bleached or faded print (my actual goal wasn't 'medieval illustration' but actually 'trading card from the 60s that got left on someone's windowsill for decades'). the background texture is the procreate noise brush. the texture under the green lion drawing is the procreate concrete brush (to make it look painted onto a wall). the lettering and lineart is procreate's 6B pencil. but to properly aim for The Look of it being a printed physical object, i also used a perspective blur so that the edges are out of focus, and metallic gold highlights which don't match the lighting of the actual illustration and appear to be catching some other external light. that texture was made from the procreate noise brush

it's pretty simple compared to my later stuff but i still really like the effect
in terms of colours, you need to keep them unified so that they all appear to be acting under the same external light source, like if someone is holding up a torch to a painting then the painting colours will be glazed with firelight even if there's no painted fire. a really easy way to do this is to slap a multiply layer over everything in one shade - grey-yellow for a weathered paper look, or greenish blue for sunbleached photos. this unifies all the colours of the drawing. or you can apply a gradient map at a low opacity so that there's only a subtle change. or just do it by hand - if you want everything to be slightly tinted yellow, just pick the colours you normally would, but move the colour wheel towards yellow to get a yellowfied version of the base colour. easy
it's really important to consider how fading and weathering can affect printed colour. white paper yellows, black fades. you will rarely see pure black or pure white. which means you can use pure black or pure white to add external effects like the white scuff marks on the hierophant card. if the whole drawing is yellowed from age but there's some white somewhere, it's an easy shorthand to show that the scuff mark or whatever was not originally part of the drawing (great way to add some nasty stains lol)
How do you legs
Curves vs. straights baby !

I try to always think of the flow of the legs in relation to the overall posture, so getting those curves and straights into play is really handy.

I've added an extra colored line here (the green one) that I tend to do with poses that are leaning heavily, so the line of action becomes more clear and less broken up by the hip. This works best for standing poses (and is obviously not anatomically correct, it's just my preferred way of drawing bodies).
In sitting poses, the straights help to emphasize contact with the ground.

Hi pigs "whale yuri Wednesday" with wings!!! I think the colors in your art are very cute nd i was wondering if you have a method with picking them? I struggle a lot with color picking when i dont have smth to work off of!
Also not an ask but you should post more about your original art/reblog it!! ocs too!! :]
well!! i don't have a specific method most of the time I'm eyeballing all of that!! but i can give some general tips on how i personally pick colours...
also: thank you 🫶🫶 ... i do not make art very often so most of the time i feel like there is nothing to post about!! but i will try to reblog my own art more often!! i have been working a lot on one oc of mine so perhaps you will see more of it :]
- i tend to first put all the colours side by side to get a sense of how they'll all look together!!
- usually i start with a very light or very dark colour that i like, and build off of that.


- after i choose a color to work off of, i tend to pick another colour that's similar to the first colour. (black and white can go well with basically every colour if you're stuck!)
i personally try to keep the colours distinct enough that you can tell it's another colour. this isn't totally necessary, it's mostly because i use a lineless style and my shapes won't be distinguishable if i don't make it clear which colour is which. for example with fhese two images - it's easier to tell between the colours on the right than the colours on the left.


specific processes here:
in the top left corner here, i chose the black, then the dark blue/dark purple, then the purple, then the light purple. they're all in the same area of the colour wheel but each one gradually progresses in brightness and moves into another area of the colour wheel.

same with the top right corner - i started with the white and chose a shade of orange that was easy to see against it. then a similar shade of yellow to pair with the orange, and then i wanted a highlight colour to stand out. since the general pattern of this colour set is bright/warm colours, we can choose another bright or warm colour that's different in brightness or shade - in this case i chose a bright green, but a bright red would have also gone nicely with this.
the bottom left and right is mostly the same as above, but finding a colour palette like the bottom right can be trickier. i started with a combination of white, cyan, and purple but thought that it looked a bit boring. so i picked a colour that wasn't blue or purple but a bright(er) red so that it stood out. could have also used bright orange/yellow/pink instead, but i think the red gives it an interesting contrast. i like to think that it's all about contrast
i tend to make colour palettes at random just for fun, so i think that practice or just putting colours together to see what looks good can also help!! some more examples below of just. colour palettes or colours that work well together

and yeah! to be honest i don't really know what i am doing but i like messing around with groups of colours. do what you want, lay down some colours that you like and most importantly have fun 👍👍👍
-
 ardouradvice reblogged this · 6 months ago
 -
 tarochinomochi reblogged this · 1 year ago
 -
 hannahmariaart123 liked this · 2 years ago
 -
 eglanasy liked this · 2 years ago
 -
 theduck5 liked this · 2 years ago
 -
 badfungi liked this · 2 years ago
 -
 sevenknightingales liked this · 3 years ago
 -
 thekaoticfoxi23 liked this · 3 years ago
 -
 nevermoonday liked this · 3 years ago
 -
 its-worm-time liked this · 3 years ago
 -
 vexick liked this · 3 years ago
 -
 laevi-somnus liked this · 3 years ago
 -
 littlestarcafe liked this · 3 years ago
 -
 lunarssong liked this · 3 years ago
 -
 chaoseraphim liked this · 3 years ago
 -
 ooooarthell reblogged this · 3 years ago
 -
 salthat liked this · 3 years ago
 -
 enterthestarlair liked this · 3 years ago
 -
 carolina-star liked this · 3 years ago
 -
 zeroblogshere reblogged this · 3 years ago
 -
 modernoracleofdelphi liked this · 3 years ago
 -
 haruka808 liked this · 3 years ago
 -
 strawberrynightmere liked this · 3 years ago
 -
 trainsreblogblog reblogged this · 3 years ago
 -
 eggplantable liked this · 3 years ago
 -
 one-eyed-imp liked this · 3 years ago
 -
 princeofallhallows liked this · 3 years ago
 -
 udanx liked this · 3 years ago
 -
 cooliopumpkin reblogged this · 3 years ago
 -
cooliopumpkin liked this · 3 years ago
-
 pastacat985 liked this · 3 years ago
 -
 abandonedabyss liked this · 3 years ago
 -
 viennashole reblogged this · 3 years ago
 -
 cinnamonrollz08 liked this · 3 years ago
 -
 lastdreadpirate liked this · 3 years ago
 -
 rapscallionfeline liked this · 3 years ago
 -
 gh0stdu2t liked this · 3 years ago
 -
 voidthaumaturge liked this · 4 years ago
 -
 wonderland-inferno liked this · 4 years ago
 -
 iispancakes liked this · 4 years ago
 -
 blackberry-venom liked this · 4 years ago
 -
 cl0wnb0yyy liked this · 4 years ago
 -
 oldaccounticanrgetridpf liked this · 4 years ago
 -
 deadstrides liked this · 4 years ago

sideblog for @letardoursprout so i have somewhere to collect all the tutorials/advice that i likeicon by lovelyshiz. header by hexh-pixel
66 posts