Someone Has Probably Already Asked You This But Do You Have Any Tips On Studying/understanding Perspective?
Someone has probably already asked you this but do you have any tips on studying/understanding perspective? I keep trying to find resources to learn but none of them really stick or are actually useful
so I'm hoping that your issue isn't just figuring out the difference between 1-point, 2-point, and 3-point perspective and how it works, because there are tons and tons of resources available for that, and I'm guessing what people tend to get tripped up on is what you're supposed to be doing with your grid.
I'm definitely far from being an expert on understanding perspective, but I'll share some of the things that helped ME finally Get It.


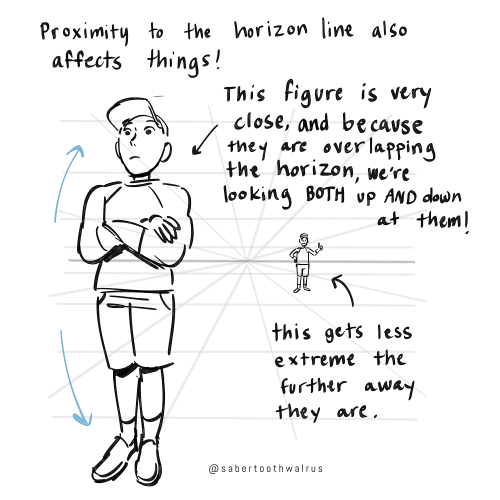
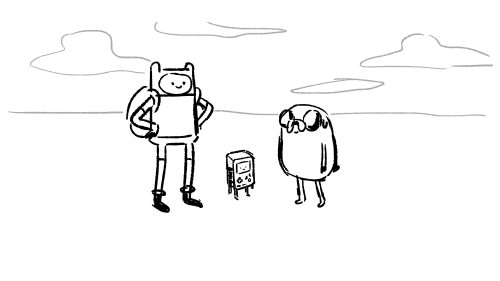
Things like eye level and different camera angles can be a GREAT tool to use when doing a comic or storyboard between multiple characters of different heights!! I actually drew an example of this exact thing for a friend about a month ago (I used adventure time characters bc they're easy to draw and have a good height variety):
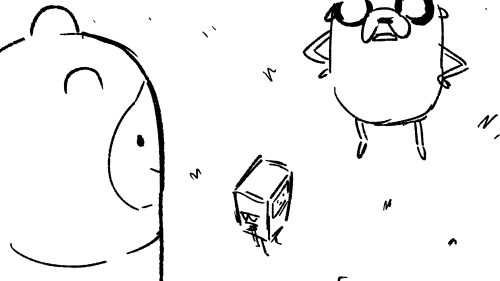


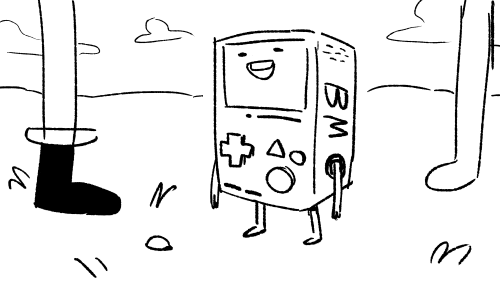
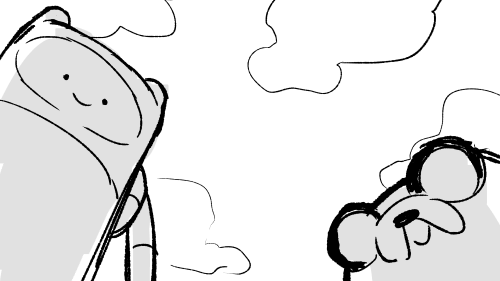
You can use camera angles like this to add variety to your shots, and even use it to help convey something emotional (using a down-shot on a character to show that they FEEL small, use an up-shot on a character to make them look more intimidating, etc etc)
hope this helps!
More Posts from Ardouradvice and Others
i love your art so much!! would you be alright sharing some info about your process for art? i'm in love with all of it especially your more recent painterly stuff :D if i could eat your art to gain its power i would
Thank you so much!!! :DDD and ofc! I'll try and articulate whatever I do (I truly just See What Looks Good tbh) below the cut :]
I'll use my most recent work as an example :]

So I start off with the sketch of course, for this I'll usually have the general idea of what I'm doing planned out in my mind, but if I can't figure out the pose/layout or whatever I'll usually scour pinterest for references/inspiration

Then COLOUR SHIT. Ok, I couldn't get a version of this without shading bcus I sadly merged the layers already </3 but basically once I have the base colour(s) down I'll mess with the layer's colour settings until it works with the lighting I'm doing and then I'll start shading. I'd say there's a more refined process but tbh I kinda just pick a section (skin, hair, clothes, etc...) and go ham.


After that, rendering! (And small details [the first pic]) tbh I have no idea what rendering is/how to do it? But my definition is 20 layers of airbrushing at low opacity until it looks good 👍 (for this piece that was alot of dark blues, reds and purples. In general I try to use the dreaded Colour Theory to make things look nice and cohesive [complimentary colours and the like]) this section is very much trial and error, I'll also mess with the settings and colours for everything I've done so far ALOT, as well as go back and fix little things I did forever ago

Then the background/any final details! (Usually if I'm doing a more complicated background I'll work on that at the same pace as every thing else [sketch, colour, render] but for pieces like this where it's simple, I'll do that whenever)
But yeah! Hopefully that's helpful (?) In some way. My process is all over the place and I usually break my own order of doing things and start like rendering half way through colouring half the time?? Anyway thank you!!! It feels very awesome to know people like my art and wanna see how I do stuff :DDD


I've had this little idea in my head for a while now, so I decided to sit down and plot it out.
Disclaimer: This isn't meant to be some sort of One-Worksheet-Fits-All situation. This is meant to be a visual representation of some type of story planning you could be doing in order to develop a plot!
Lay down groundwork! (Backstory integral to the beginning of your story.) Build hinges. (Events that hinge on other events and fall down like dominoes) Suspend structures. (Withhold just enough information to make the reader curious, and keep them guessing.)
And hey, is this helps... maybe sit down and write a story! :)
I love your art so much!! It's inspiring me to get back into pixel art (I gave up quickly). A huge problem I had was I didn't know what size was best to set my canvas for specific projects. I always ended up overestimating and making it too big and then it looked less like pixel art and more like grainy digital art. Do you have a rough guide you stick to for landscapes/bedrooms/cities VS. things like animals and characters?
aw thank you i'm happy to hear that! i hope u stick with it ♥
with landscapes/bedrooms/cities i use 275x155. this provides a fair amount of detail while still keeping it pixely, plus it resizes to wallpaper size. for vertical i just reverse it at 155x275.
i've also recently started to use 215x215 (same amount of pixels as above) so that i can resize my art to easily fit both wallpapers, and mobile videos... since tiktok and instagram reels are everything nowadays 😒
for characters and animals, generally i will base the size of the canvas around how i stylize eyes.


so i'll draw the eyes first, then just draw everything else around that.


i also have a smaller resolution style with 2px dot eyes that i use for adding characters to landscapes, since my landscape resolution is too small for my regular style unless the character is close to the screen.
hope this helps!


I was asked by a friend yesterday if I could offer basic tips about comic paneling. As it turns out, I have a lot to say on the matter! I tried breaking down the art of paneling using the principles of art and design, and I hope it helps you out!
EDIT: uh uh there are a lot of people reblogging this, so i figure i may as well append this now while i can lol
This whole thing was very much cranked out in a few hours so I had a visual to talk about with a friend! If this gives you a base understanding of paneling, that's awesome! Continue to pull in studies from the comics you see and what other artists do well and don't do well! You can tell paneling is doing well when the action is flowing around in its intended reading format.
Here's the link to the globalcomix article from which I pulled the images about panel staggering! Someone sent in a reblog that it wasn't totally clear that the 7th slide mostly covers what NOT to do in regards to staggering, and that is my mistake!
I saw in a tag that someone was surprised I used MamaYuyu too, and I don't blame them lol. If I had given myself more than a couple hours maybe I would have added something else on, I just really admire MamaYuyu's paneling personally.
uh uh, final append: I am by no means a renowned master of paneling, so if you find anything off base here, by all means, counter it with your own knowledge and ways you can build upon from here! Art is always a sum knowledge of everything we find. 💪
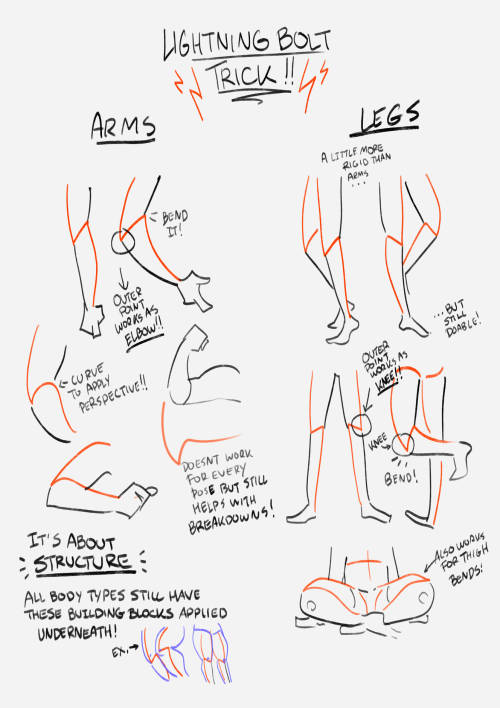
this showed up in my FB memories, the lightning bolt trick! I don't sketch out the lightning bolt much nowadays but it's still super helpful when I need to lay out tricky arms and leg poses. And I still apply the logic of it, especially with how I draw arms :' ) Biggest thing it helps with is shape breakdown and visualization, we gotta use whatever works to break down shapes into simpler concepts for our brains 👏💓
Apparently a lot of people get dialogue punctuation wrong despite having an otherwise solid grasp of grammar, possibly because they’re used to writing essays rather than prose. I don’t wanna be the asshole who complains about writing errors and then doesn’t offer to help, so here are the basics summarized as simply as I could manage on my phone (“dialogue tag” just refers to phrases like “he said,” “she whispered,” “they asked”):
“For most dialogue, use a comma after the sentence and don’t capitalize the next word after the quotation mark,” she said.
“But what if you’re using a question mark rather than a period?” they asked.
“When using a dialogue tag, you never capitalize the word after the quotation mark unless it’s a proper noun!” she snapped.
“When breaking up a single sentence with a dialogue tag,” she said, “use commas.”
“This is a single sentence,” she said. “Now, this is a second stand-alone sentence, so there’s no comma after ‘she said.’”
“There’s no dialogue tag after this sentence, so end it with a period rather than a comma.” She frowned, suddenly concerned that the entire post was as unasked for as it was sanctimonious.


-
 frap-p liked this · 4 days ago
 -
 scentedandroidlair liked this · 4 days ago
 -
 shystarlightkingdom liked this · 4 days ago
 -
 local-kryptid liked this · 4 days ago
 -
 soapandseaglass liked this · 4 days ago
 -
 carouselingcircus liked this · 5 days ago
 -
 soulcialdent liked this · 5 days ago
 -
 instantrebelgothtoad liked this · 5 days ago
 -
 silverheartart1001-blog liked this · 5 days ago
 -
 tree-mans liked this · 6 days ago
 -
 noodle-armed-artist liked this · 6 days ago
 -
 topainttheclouds reblogged this · 6 days ago
 -
 eternalparadisearchive reblogged this · 6 days ago
 -
 bibs-ahoy reblogged this · 1 week ago
 -
 birdapocalypseuniverse liked this · 1 week ago
 -
 bisexual-werewolf liked this · 1 week ago
 -
 astranite reblogged this · 1 week ago
 -
 importantdestinydefendor liked this · 1 week ago
 -
 goldstargloww reblogged this · 1 week ago
 -
 smashbro2002 liked this · 1 week ago
 -
 tired-reader-writer reblogged this · 1 week ago
 -
goldstargloww liked this · 1 week ago
-
 candycoatedrox reblogged this · 1 week ago
 -
candycoatedrox liked this · 1 week ago
-
 queerest-beetle reblogged this · 1 week ago
 -
queerest-beetle liked this · 1 week ago
-
 beetroot-merchant reblogged this · 1 week ago
 -
 cl0udyski3s liked this · 1 week ago
 -
 dafne-reyes liked this · 1 week ago
 -
 reneethegreatandpowerful liked this · 1 week ago
 -
 btm-txt liked this · 1 week ago
 -
 adorable-bookworm liked this · 1 week ago
 -
 jdmcc880 liked this · 1 week ago
 -
 monimolimnion liked this · 1 week ago
 -
 craftables-and-such reblogged this · 1 week ago
 -
 reach-at-the-glorious-gold reblogged this · 1 week ago
 -
reach-at-the-glorious-gold liked this · 1 week ago
-
 shayberri789 reblogged this · 1 week ago
 -
 totallyawesome123 reblogged this · 1 week ago
 -
totallyawesome123 liked this · 1 week ago
-
 dudeamuse liked this · 1 week ago
 -
 sciencesartlab reblogged this · 1 week ago
 -
 carolinemp3 liked this · 2 weeks ago
 -
 joanofdescension reblogged this · 2 weeks ago
 -
joanofdescension liked this · 2 weeks ago
-
 assassuub reblogged this · 2 weeks ago
 -
 itemreceived liked this · 2 weeks ago
 -
 alokiasaltwater liked this · 2 weeks ago
 -
 nadireedperez liked this · 2 weeks ago

sideblog for @letardoursprout so i have somewhere to collect all the tutorials/advice that i likeicon by lovelyshiz. header by hexh-pixel
66 posts