I Watched One (1) Video On How To Draw Hands That Changed My Life Forever. Like. I Can Suddenly Draw
i watched one (1) video on how to draw hands that changed my life forever. like. i can suddenly draw hands again

these were all drawn without reference btw. i can just. Understand Hands now (for the most part, im sure theres definitely inaccuracies). im a little baffled
More Posts from Ardouradvice and Others
your art is so cool- oh my golly, do you have any drawing tips? and colouring tips? ❤🙏 (happy pride month btw)
I wrote a lot for this one X]] it's under the cut

First I'd just flat something out. I really just eyeball most color schemes, so I'm super sorry I don't have the most tips on that X[ The flats on this piece are mostly analogous. They're colors next to each other on the wheel, dark blue and cyan are next to each other, so they look all pretty together. Usually I like using complementary though, opposites, cus contrast is soooo pretty. I actually change it to that right after flats X]

than I either use a few multiply or screen or overlay layers on top! as a treat! or just like... eyeball some more colors. I like using colors from other places on the piece, so it looks cohesive. This is where I'll usually merge all my layers down to a single layer [including sketch, flats, shading, and background],,, I don't recommend it but this is just part of my process now X]

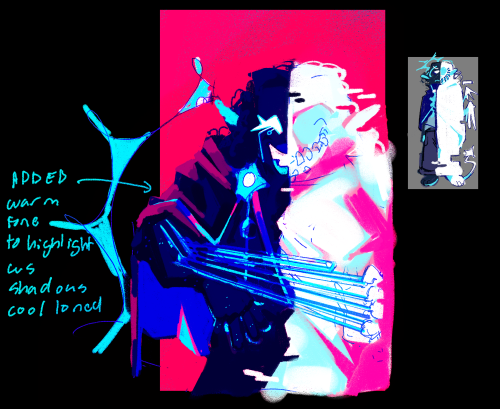
Next thing I do is just like,,, eyeball where I want More? He looked a bit boring being only blue, so I wanted to add more color; I chose red because the background is that lovely cherry pink, taking colors from other parts of the piece yippie! This is also just eyeballed too though...I just pick what I think looks pretty, sorry X[


than I just start rendering? I kinda just turn my brain off when I do I really don't know how to explain how I render, and looking at examples of the bullshit I deal with you probably don't want to render like me either HAHA [drew even more references X))]

and than it's done!!! yippie! I put it under a layer of chromatic aberation too cus I enjoy the affect X]] not shown here this is just the finished like. render render. w/out the extra bits. And happy pride month! completly forgor woof HGHG
Dear downydig,
Any secret knowledge on how to do fluid and dynamic poses? (Btw, I love ur art!! So comfy and cozy!!!)
Sincerely, Paper-Starz
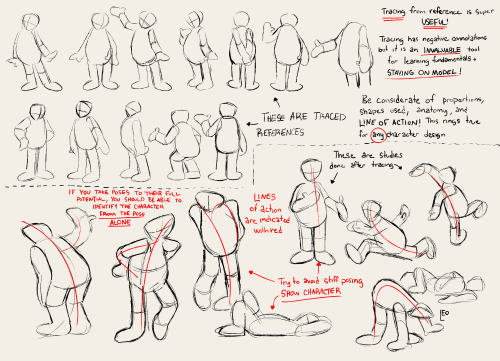
Hello hello! I have some advice! I did a thing on lines of action and the benefits of tracing in learning models a LONG time ago… the advice still holds up! Use shapes like ‘s’ curves, ‘c’ curves, and even sharper ‘U’s to give a fun fluid motion! Limbs and spine are the main help here, but the head sometimes comes into play ✌️
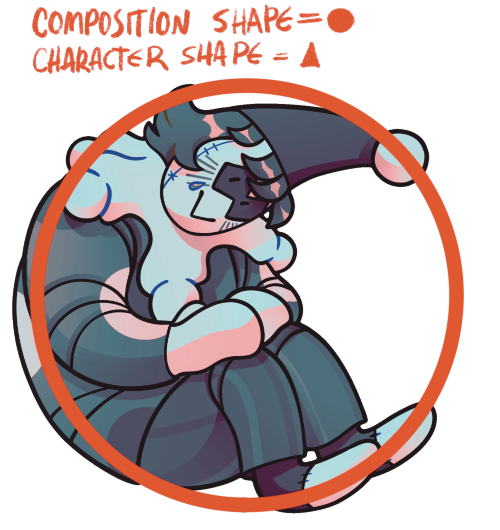
I have a little more to add, however! One of these pictures is my oc and the other is a king fu panda character but it’s still useful! When creating a pose, you can also use silhouette! Bonus points if the shape of the silhouette is different than the shapes that compose the character (in a way that matches the personality of course!)

I love your art so much!! It's inspiring me to get back into pixel art (I gave up quickly). A huge problem I had was I didn't know what size was best to set my canvas for specific projects. I always ended up overestimating and making it too big and then it looked less like pixel art and more like grainy digital art. Do you have a rough guide you stick to for landscapes/bedrooms/cities VS. things like animals and characters?
aw thank you i'm happy to hear that! i hope u stick with it ♥
with landscapes/bedrooms/cities i use 275x155. this provides a fair amount of detail while still keeping it pixely, plus it resizes to wallpaper size. for vertical i just reverse it at 155x275.
i've also recently started to use 215x215 (same amount of pixels as above) so that i can resize my art to easily fit both wallpapers, and mobile videos... since tiktok and instagram reels are everything nowadays 😒
for characters and animals, generally i will base the size of the canvas around how i stylize eyes.


so i'll draw the eyes first, then just draw everything else around that.


i also have a smaller resolution style with 2px dot eyes that i use for adding characters to landscapes, since my landscape resolution is too small for my regular style unless the character is close to the screen.
hope this helps!
any shading tips?
AH I LOVE SHADING AND RENDERING let me see what i can dig up from my brain for you
i say....... single colour blend mode layer is a good starting point for shading but i'd also manually pick colours to make the shadow more dynamic, if that makes sense..


left has a yellow-y hard light layer as its only shading, and right has the hard light layer alongside some colours i added myself
also, i like to mess with the saturation and hue when i add the extra colours.. it adds depth (life??) to the shadows that you wouldnt get with a flat colour


IN ADDITION TO THIS desaturating your colours makes them look lighter, and hightening the saturation makes them seem darker! i play with this a lot it's fun
not shown here is also using completely different colours than the one you're shading, like green/teal for blue, or red for purple! this is especially helpful when shading grays and whites
basically get funky with your colours and try shit until you find a formula that works for you!!!! this is just what i do and im a self-taught nerd so
Apparently a lot of people get dialogue punctuation wrong despite having an otherwise solid grasp of grammar, possibly because they’re used to writing essays rather than prose. I don’t wanna be the asshole who complains about writing errors and then doesn’t offer to help, so here are the basics summarized as simply as I could manage on my phone (“dialogue tag” just refers to phrases like “he said,” “she whispered,” “they asked”):
“For most dialogue, use a comma after the sentence and don’t capitalize the next word after the quotation mark,” she said.
“But what if you’re using a question mark rather than a period?” they asked.
“When using a dialogue tag, you never capitalize the word after the quotation mark unless it’s a proper noun!” she snapped.
“When breaking up a single sentence with a dialogue tag,” she said, “use commas.”
“This is a single sentence,” she said. “Now, this is a second stand-alone sentence, so there’s no comma after ‘she said.’”
“There’s no dialogue tag after this sentence, so end it with a period rather than a comma.” She frowned, suddenly concerned that the entire post was as unasked for as it was sanctimonious.


Hover Notes or ‘Floating Boxes’in Ao3
This is a fun option if you use, for example, phrases in other languages in your story. I often do, and this is a nice way to give translations without having to scroll to the end of the text, or putting them in the starting notes where people have to keep checking back – or where they spoiler the story!
HOWEVER. The drawback is that the floating boxes only work when a ‘mouse’ is ‘hovered’ over the marked text. They do NOT show up on tablet or phone screens, so you’ll still need to put a list of translations in the notes for readers using those devices.
Let’s have an example.
“Qu’est ce que tu veux?”
Now if you speak French, you might know that means “What do you want?”
But not all of your readers will know that. So, you offer them a translation. And since the boxes don’t appear unless you hover directly above them, I usually add a Beginning Note to the chapter that reads something like this;
‘Hover over italicised foreign language text for translations! (Mobile and tablet users please see the Ending Notes)’
In HTML mode in Ao3, (if you try this in Rich Text mode you will get a horrible mess so don’t) the line with this example would appear as:
<p>“<em>Qu’est ce que tu veux?</em>”</p>
To add the floating box with the translation, you would select the words to be translated (that is, Qu’est ce que tu veux?) and paste in the following HTML.
<span title=“What do you want?”>Qu’est ce que tu veux?</span>
The whole line will now read:
<p>“<em> <span title=“What do you want?”>Qu’est ce que tu veux?</span> </em>”</p>
Review your work, hover over the part that requires translating, and you should see the following:

And you’re done!
I tend to set up a Word doc with all the <span> lines I want to use created in it, and then when the time comes, just copy/paste them into Ao3. Saves lots of time!
Writing References: Character Development
50 Questions ⚜ "Well-Rounded Character" Worksheet
Basics: How to Write a Character ⚜ A Story-Worthy Hero
Basics: Character-Building ⚜ Character Creation
Key Characters ⚜ Literary Characters ⚜ Morally Grey Characters
Personality Traits
5 Personality Traits (OCEAN) ⚜ 16 Personality Traits (16PF)
600+ Personality Traits
East vs. West Personalities ⚜ Trait Theories
Tips/Editing
Character Issues
Character Tropes for Inspiration
Tips from Rick Riordan
Writing Notes
Allegorical Characters
Binge ED
Childhood Bilingualism ⚜ Children's Dialogue ⚜ On Children
Culture ⚜ Culture: Two Views ⚜ Culture Shock
Emotional Intelligence ⚜ Genius (Giftedness)
Emotions ⚜ Anger ⚜ Fear ⚜ Happiness ⚜ Sadness
Facial Expressions
Fantasy Creatures
Happy/Excited Body Language ⚜ Laughter & Humor
Hate ⚜ Love
Health ⚜ Frameworks of Health
Identifying Character Descriptions
Jargon ⚜ Logical Fallacies ⚜ Memory
Mutism ⚜ Shyness
Parenting Styles
Psychological Reactions to Unfair Behavior
Rhetoric ⚜ The Rhetorical Triangle
Swearing & Taboo Expressions
Thinking ⚜ Thinking Styles ⚜ Thought Distortions
Uncommon Words: Body ⚜ Emotions
Voice & Accent
Writing References: Plot ⚜ World-building

-
 rachelbigpeep liked this · 1 week ago
 -
 quirkygoldfish liked this · 1 week ago
 -
 love-wing reblogged this · 1 week ago
 -
 sleepysaltuna liked this · 1 week ago
 -
 ka-du-trur reblogged this · 2 weeks ago
 -
 wallsmacada reblogged this · 2 weeks ago
 -
wallsmacada liked this · 2 weeks ago
-
 lioilion reblogged this · 2 weeks ago
 -
lioilion liked this · 2 weeks ago
-
 catbird-creature reblogged this · 2 weeks ago
 -
 tohfan666 liked this · 2 weeks ago
 -
 oliverqueenlance liked this · 2 weeks ago
 -
 petalstripe liked this · 2 weeks ago
 -
 mothmute liked this · 2 weeks ago
 -
 franklyalarmed liked this · 2 weeks ago
 -
 lemonfrosting liked this · 2 weeks ago
 -
 lore-vigenere reblogged this · 2 weeks ago
 -
lore-vigenere liked this · 2 weeks ago
-
 lancelotmylove liked this · 2 weeks ago
 -
 somewhereovertherainbowtables liked this · 2 weeks ago
 -
somewhereovertherainbowtables reblogged this · 2 weeks ago
-
 prodigaldaughteralice reblogged this · 2 weeks ago
 -
 mehritz reblogged this · 2 weeks ago
 -
 exactly-one-million-rats reblogged this · 2 weeks ago
 -
 gnarlyreject liked this · 2 weeks ago
 -
 tr-6 liked this · 2 weeks ago
 -
 lerngud reblogged this · 2 weeks ago
 -
 psottor reblogged this · 2 weeks ago
 -
 oaktreegardengnome liked this · 2 weeks ago
 -
 razerathane liked this · 2 weeks ago
 -
 omegajor liked this · 2 weeks ago
 -
 starredhalo liked this · 2 weeks ago
 -
 fridakahloflower reblogged this · 2 weeks ago
 -
 an-apathetic-moth liked this · 2 weeks ago
 -
 redwormonastring liked this · 2 weeks ago
 -
 thelastqueenofspades reblogged this · 2 weeks ago
 -
thelastqueenofspades liked this · 2 weeks ago
-
 changelingirl liked this · 2 weeks ago
 -
 codiakm liked this · 2 weeks ago
 -
 none-person-left-beast liked this · 2 weeks ago
 -
 naughty-elf-fun liked this · 2 weeks ago
 -
 examishbookwyrm reblogged this · 2 weeks ago
 -
 clown-egg-and-other-things reblogged this · 3 weeks ago
 -
 infamous-odysseus liked this · 3 weeks ago
 -
 imann liked this · 3 weeks ago
 -
 the-marshmallow liked this · 3 weeks ago
 -
 snekbytez liked this · 3 weeks ago

sideblog for @letardoursprout so i have somewhere to collect all the tutorials/advice that i likeicon by lovelyshiz. header by hexh-pixel
66 posts