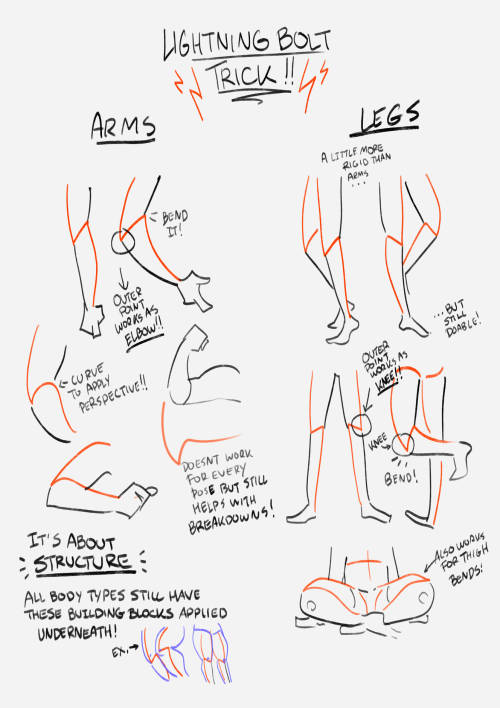
This Showed Up In My FB Memories, The Lightning Bolt Trick! I Don't Sketch Out The Lightning Bolt Much
this showed up in my FB memories, the lightning bolt trick! I don't sketch out the lightning bolt much nowadays but it's still super helpful when I need to lay out tricky arms and leg poses. And I still apply the logic of it, especially with how I draw arms :' ) Biggest thing it helps with is shape breakdown and visualization, we gotta use whatever works to break down shapes into simpler concepts for our brains 👏💓
More Posts from Ardouradvice and Others
your art is so cool- oh my golly, do you have any drawing tips? and colouring tips? ❤🙏 (happy pride month btw)
I wrote a lot for this one X]] it's under the cut

First I'd just flat something out. I really just eyeball most color schemes, so I'm super sorry I don't have the most tips on that X[ The flats on this piece are mostly analogous. They're colors next to each other on the wheel, dark blue and cyan are next to each other, so they look all pretty together. Usually I like using complementary though, opposites, cus contrast is soooo pretty. I actually change it to that right after flats X]

than I either use a few multiply or screen or overlay layers on top! as a treat! or just like... eyeball some more colors. I like using colors from other places on the piece, so it looks cohesive. This is where I'll usually merge all my layers down to a single layer [including sketch, flats, shading, and background],,, I don't recommend it but this is just part of my process now X]

Next thing I do is just like,,, eyeball where I want More? He looked a bit boring being only blue, so I wanted to add more color; I chose red because the background is that lovely cherry pink, taking colors from other parts of the piece yippie! This is also just eyeballed too though...I just pick what I think looks pretty, sorry X[


than I just start rendering? I kinda just turn my brain off when I do I really don't know how to explain how I render, and looking at examples of the bullshit I deal with you probably don't want to render like me either HAHA [drew even more references X))]

and than it's done!!! yippie! I put it under a layer of chromatic aberation too cus I enjoy the affect X]] not shown here this is just the finished like. render render. w/out the extra bits. And happy pride month! completly forgor woof HGHG
I want to start drawing landscape. Do you have any tips?
Took me a while to answer this (sorry anon)! Drawing landscapes for me are mostly just a matter of doing a few 'art studies' and a bit of imitating life. Here's a brief rundown of my process. I find that I learn best when I see a picture or a reference that really tickles my fancy, like these ones! First image for it's colors, and the second for it's composition.


And then I pull up the dreaded white canvas on start on a rough idea or just start dribbling out the basics: composition, a bit of color, general shapes, etc. If you have a hard time doing general landscapes, don't worry! Imagine breaking it down like this: You layer on some general colors and shapes; don't be afraid to make mistakes, you can always go back to it! Be loose and organic with it at first, we're not striving for detail yet, and just let that brush move freely. And once you got the shapes down, you can go back and forth in the canvas to start detailing. I find that it's best if you really look into how some things are "made". Like for example, how that patch of grass in your reference is made: 'is it layered? does it have some shiny bits in it that I wanna highlight? are the blades of grass sharp enough to individually detail or more clumped up together to just put in a sorta grassy blob?'. Also, don't be afraid to experiment a bit. Try putting some highlights around the edges to make it pop out more, or try putting small changes in the color you're working with; something that's close but still different, so that it compliments each other! Then it's just a matter of going forward with it; see what you like and what you wanna keep and imitate, see what you want to change or maybe just leave out on. Keep on detailing and going until you're happy with it!

This is a really brief rundown and explanation of a process that can be entire unique to each and everyone of us, and takes a bit of time and practice to pull off. But I believe in you! We all start from somewhere, sometime down the line; and that can start right now if you want it to! Goodluck to any artists out there who wanna try out landscapes. It's a fun and comforting process of organic and loose art that breathes in a lot of life in some people, especially me. Twitter | Prints | Ko-Fi | Patreon
Someone has probably already asked you this but do you have any tips on studying/understanding perspective? I keep trying to find resources to learn but none of them really stick or are actually useful
so I'm hoping that your issue isn't just figuring out the difference between 1-point, 2-point, and 3-point perspective and how it works, because there are tons and tons of resources available for that, and I'm guessing what people tend to get tripped up on is what you're supposed to be doing with your grid.
I'm definitely far from being an expert on understanding perspective, but I'll share some of the things that helped ME finally Get It.


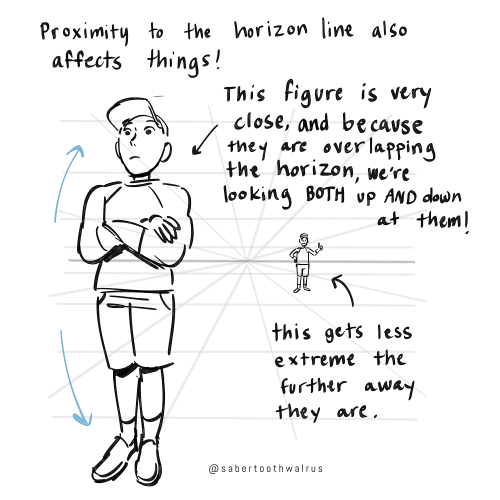
Things like eye level and different camera angles can be a GREAT tool to use when doing a comic or storyboard between multiple characters of different heights!! I actually drew an example of this exact thing for a friend about a month ago (I used adventure time characters bc they're easy to draw and have a good height variety):
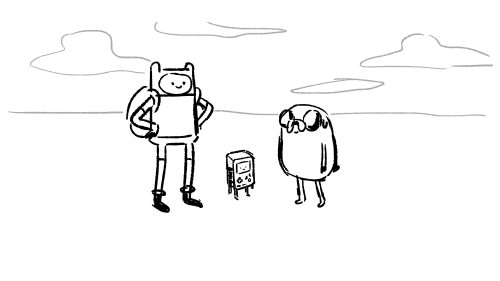
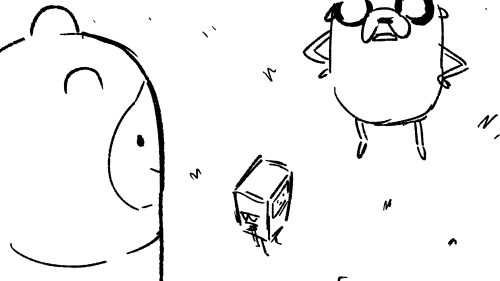


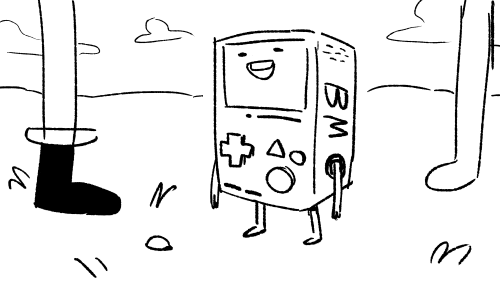
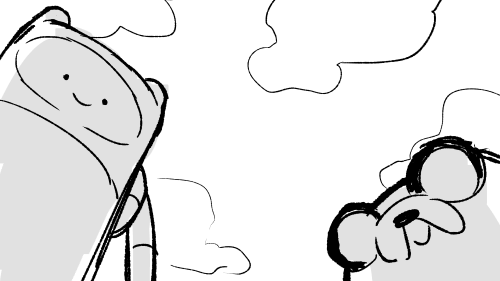
You can use camera angles like this to add variety to your shots, and even use it to help convey something emotional (using a down-shot on a character to show that they FEEL small, use an up-shot on a character to make them look more intimidating, etc etc)
hope this helps!
Roles on a Pirate Ship
[by Mark Cookman / Tribality 1, 2, 3] @we-are-pirate, @we-are-scarlet-corsair

Officer Roles on a Pirate Ship
If you are running a game with pirates in it, then you should know what the job entails. It’s not all boarding ships, counting booty, and drinking rum like you might think. A great deal of hard work is required to run a sailing ship with a law-abiding crew, let alone one populated by pirates. In this essay we are going to examine the five principle officers on board a pirate ship, their duties, and their responsibilities. This is part one of a three part lesson. In the next lesson we will examine the duties and responsibilities of other officers and crew members with special duties. In the final lesson, we will look at one very special group of crew members that are almost always overlooked. Read on to learn what pirates expected of their primary officers.
The principal officers of a pirate ship were the captain, the quartermaster, the pilot, the boatswain, and the master gunner. On some ships these positions were all elected by an equal vote of the crew and on others the captain picked the crew members he wanted to serve in the positions. The captain on a pirate vessel was almost always elected by an equal vote of the crew. On a privateer vessel this was not very often the case. Privateer captains were often the owners of the ship or were given commission by their monarch to take a vessel to sea. So it follows with the other officers. If the captain was elected, then generally all of the officers were elected. If the captain was appointed or held his position by means of ownership, then generally he picked the officers. In either case, an officer on a pirate ship served at the whim of the crew. Even a man picked by the captain would be booted down to a simple crewman if he could not do his job. For the most part though, a person elevated to serve as one of the principle officers did so for life. The title of this article refers to the fact that most often the authorities that captured, tried, and hung pirates concentrated on the five principle officers of the ship. These officers were generally the most intelligent and skilled crewmen on board the pirate vessel. They were people that everyone else on board the ship admired for their ability to do their job. Diligent action is the mother of respect on board a ship.
Captain
The captain, however he came to his position, was chosen for his leadership, bravery, and cunning. The captain was responsible for the ship and everything aboard her; every item and every man. He was responsible for the overall decisions affecting the ship and her crew. The captain decided where to sail and what to attack. He was the voice of his crew to all beyond the ship. He often led his crew in battle. In terms of daily duties, the captain kept a log of the voyage, managed the affairs of the ship through the officers, and generally served a four to six hour shift at the helm. The captain stayed in power by being successful. As long as there are prizes to plunder, rum to drink, and food to eat, the captain will not be voted out or mutinied against. It is when things get lean that the captain must worry about crew voting him unfit for command.
Quartermaster
The quartermaster (or first mate on a privateer vessel) was the number two man on the ship. He was responsible for enforcing the ship’s articles and administering punishment when necessary. The quartermaster was the trustee of the ship and her crew. He directly represented the crew to the captain. It was his responsibility to serve as a counterbalance to the captain in decisions that might be hazardous to the ship or the crew. A wise captain made no decisions that his first mate didn’t support. The quartermaster took responsibility for prize vessels and picked the treasure that the crew would take from a prize. He was also responsible for counting the booty and splitting the shares. Each day would find him working with his subordinate officers the boatswain, the master gunner, and the master at arms to effectively run the ship. The first mate also served a turn at the helm, generally a four to six hour shift.
Pilot
The pilot was the number three man on the ship and often the most educated. He served as the ship’s navigator and was generally the best all around sailor aboard the ship. He was responsible for plotting the ship’s course and maintaining that course. The pilot maintained all of the ship’s charts and maps as well as the tools of navigation. He was charged with keeping a daily log of every event relating to the sailing of the ship. He recorded the depth, the currents, the wind patterns, the ship’s location, the locations of reefs and sandbars, and the state of the rigging. He reported directly to the captain. The pilot oversaw the work of the sail-master and almost always had at least one assistant (a pilot’s mate) to help him with his duties. The pilot and his mate both served separate shifts at the helm in addition to taking readings from the moon and stars to plot and maintain the course.
Boatswain
The boatswain was the number four man on the ship and often the most feared by the crew. He was in charge of the provisions for the ship. He maintained the stores of food, water, rum, gunpowder, shot, sails, rope, wood, and tar required to keep the ship and crew fit for action. The boatswain also directed the loading of cargo into the hold to maintain the proper ballast to ensure level sailing. He was in charge of keeping the watches on the ship and maintaining discipline among the deck crew. He was responsible for the ship’s longboats and for picking a crew to man the sweeps when the longboats were used. The boatswain was charged with maintaining the ship’s seaworthy status. He oversaw the duties of both the carpenter and the cook. The boatswain generally had a mate to help him with his responsibilities. In general, his duties were to make certain that all the work of running the ship was done. He reported to the quartermaster. The Boatswain was often the most feared man on the ship because his obligations often made him uncompromising. It was his responsibility to keep everything “ship-shape”. Leniency was something the quartermaster might give to the crew, but it was not something the boatswain was in the position to give. Day and night, the boatswain would drive the crew to do whatever work was required. He maintained the watch log and reported any problems to the quartermaster.
Master Gunner
The master gunner was the number five man on the ship. He was responsible for the care and cleaning of all firearms, culverin (deck guns), and cannons on board the ship. He was also responsible for training the crew in the use of both firearms and ship’s weaponry. The master gunner picked and ran the gunnery crew. He reported to the quartermaster, but was responsible to the entire ship to make certain that the cannons hit the declared target. He was also responsible for maintaining the inventory of powder and shot for all of the guns on the ship. The master gunner was the only crew member besides the captain and the quartermaster entrusted to carry a key to the ship’s powder magazine. Additionally, the master gunner often led or picked hunting parties when they were called for. His day to day duties mainly consisted of drilling the gunnery crew and maintaining the guns.

The Next in Line to Hang – More Roles on a Pirate Ship
In this second part of a three part lesson dealing with the crew positions aboard a pirate vessel, we are going to look at the responsibilities of the Sail-master, the Carpenter, the Cook, the Surgeon, and the Master at Arms. These were all lower officer positions and were either voted upon or assigned by the captain as discussed in the first part of this lesson. The sailors who served in these positions were skilled laborers and, as such, their skills were always very much in demand on a ship. They were almost always offered a greater share of the treasure because of their skills. These were definitely crew members that a pirate ship could not function without.
Sail-master
The Sail-master was the most experienced crewman in the rigging and usually one of the best sailors on the ship. He was responsible for maintaining the sails and the rigging. The Sail-master knew every knot, line, rope, block and tackle in the rigging as well as how to repair them all. He was also responsible for training and running the sail crew as well as overseeing the making and patching of sails. The Sail-master took orders from and reported to the pilot.
Carpenter
The Carpenter was a skilled wood worker, often with some shipwright experience, who did all of the woodworking required by the crew. He was primarily responsible for repairing damage to the wooden portions of the ship and for plugging leaks that got too bad. (Ye should understand right now, before ye go to sea, that all ships leak, mates. It’s just when they really leak badly that you have to worry about it.) The Carpenter was also responsible for the construction of barrels and crates, as needed, to store cargo, as well as maintaining the tools of his trade. He took orders from and reported to the Boatswain.
Cook
The Cook was one of the most important of the lower officers. He was in charge of all matters relating to food on the ship. He made certain there was enough food, water, and rum on board for the planned cruise. He cooked the meals and suggested rationing when it was necessary. The Cook butchered the meat brought back by hunting parties and was the only man trusted to light a fire below decks. He maintained the necessary tools for both cooking and butchering. The Cook took orders from and reported to the Boatswain.
Surgeon
The Surgeon was likely one of the toughest men on the ship. He served as the barber/doctor/emergency surgeon for the entire crew. He was equally capable of shaving your beard and cutting off your damaged leg. The Surgeon dealt with not only the sick and the wounded, but also the dead. He, like the other lower officers, was responsible for maintaining the necessary tools of his trade. The Surgeon took his orders from and reported to the Quartermaster. It was rare for a ship to have a real doctor and it was common for the carpenter or the cook to fill this role as needed.
Master at Arms
The Master at Arms was often the most skilled warrior on the crew. He was responsible for training the crew in hand to hand combat. He also led the ship’s boarding parties and hunting parties when they were necessary. The Master at Arms position was not a separate position on every vessel and often these responsibilities fell to the Quartermaster. When the Master at Arms position was filled on a ship, he took orders from and reported to the Quartermaster.
These 5 core positions represent the Non-Commissioned Officers of a pirate or privateer ship. These men all commanded other men on work details and so their words carried great sway with the crew. It was often from among these men that the next captain was chosen when a captain lost his position through a vote of no confidence. Thus, these were the men that the captain had to keep loyal to him to stay in command of the ship.
And Hang the Musikers, Too – Even More Roles on a Pirate Ship
In this article, we will be looking at the makeup of the crew itself. Remember that the only rule with pirates is that there are no rules; no two crews of any two pirate ships were exactly the same. Even so, we can narrow down some roles common to pirate/privateer crews based upon the jobs that must be done aboard ship. Most simply put, pirate crews are a mixture of brutes, gunners, swabbies, and musikers. Let’s examine each category in turn.
Brutes
A great deal of hard work and heavy hauling is involved in just sailing a tall-masted ship. In strong winds the canvas sails must be man-handled by a deck crew that is stronger. Loading and unloading supplies, most especially cannons or chests of gold, requires a number of strong backs. This is why every ship has its share of brutes – big, strong men capable of handling themselves no matter the work or the fight. In addition to the tasks already mentioned, brutes would be key men in hunting parties, ship boarding, and raiding groups as well. Keep in mind that not all brutes need to be hulking bruisers. A wiry-tough and dexterous hunter, skilled with both blades and long rifle, could be a brute as well. Brutes, no matter their size, do not shrink from a hard task. Men of this sort make up perhaps as much as ½ of a pirate crew, but they will be mixed among the gunners and swabbies, not a stand alone corp. Most of the men on a pirate or privateer ship were probably gunners.
Gunners
Depending upon the size of their shot, each cannon required a crew of either 3 or 4 men to load and fire it. So a sloop carrying 4 small guns per side would require a minimum of 24 men to fully maintain them and that does not include the officers directing the cannon fire. On a large ship, like Blackbeard’s Queen Anne’s Revenge, a full gun crew would be 160 men dedicated only to firing the cannons. (It is important to note here that Blackbeard had a total crew compliment of 125 on board the Queen Anne’s Revenge.) These crewmen would have to be available 24/7 to do their job whenever required, but otherwise might have no duties on the ship. There was double-duty in most crews though. Most pirate ships didn’t keep a full compliment of gunners like warships of the time did because fewer crew members meant fewer shares and that meant more money for everyone when the treasure was split. Gunners could make up between 1/3 to 2/3 of a crew.
Swabbies
Swabbies, or actual trained sailors, are the crew members responsible for handling the rigging and the sails to keep the ship moving. These are the guys and gals who climb the ratlines into the rigging and walk the spars that jut from the masts. Swabbies sometimes fight from the highest position that they can get to on their own ship and then leap into the rigging of the enemy vessel when boarding. Often dexterous fighters, swabbies are known for leaping into the fray, but sometimes they hide in the rigging as deadly snipers. It might be surprising to discover that skilled sailors usually comprised less than 1/3 of the total crew compliment of the ship.
Musikers
It is difficult to prove that “musikers”, or musicians as we call them, were ever a stand-alone part of a pirate crew. However, two excellent examples from the pirate period demonstrate that they have been a common part of most ships of war, pirate and privateer ships included. The first example is from the early Seventeenth century. In Captain John Smith’s advice concerning how to conduct a one-on-one naval engagement he remarks when preparing to board one should, “… sound Drums and Trumpets, and Saint George for England.” The second example comes from the early Eighteenth century. In the articles of Captain Bartholomew Roberts it is stated: “The Musikers to have Rest on the Sabbath Day, but the other six Days and Nights, none without special Favour.” When thinking about the musicians on board a ship in the 16th to 18th centuries, one must not think of a band. That would be far too organized a concept. There is no way to know how many crew members may have been musicians, but one assumes that the number is not large.
It is likely that ships of this period had crew members who owned musical instruments as varied as brass horns, mouth harps, fiddles, bag pipes and accordions. Furthermore, sailors could gather numerous instruments from the various ports of call their ship made. Examples here are numerous: cowhide and goatskin drums from Africa, dried gourd maracas from Cuba, bamboo drums and flutes from Hispaniola, and even tambourines from Morocco. Pause a moment and consider the combined sounds of all of the instruments mentioned here. Now you know why a band is not the idea you want to have. The musicians were popular with the crew, as they were entertainment as well as a valuable battle element. The musicians played during meal times and during work breaks allowing the crew some entertainment to break the monotony of long hours of tiring work. This boost in moral was welcome at anytime, but was perhaps the most effective when used in battle.
From stories of Bartholomew Roberts crew and others, we know that when a ship with musicians approached another ship with the intention to fight, the effects of the music could be terrifying to the enemy. The musicians would play marches and other martial music. There were drum rolls, trumpet and bugle calls, and perhaps even a piper given the nationality of the crew. Add to this the noise of the ship’s cook beating upon his pots and pans and the crew stamping their feet or beating their weapons against the ship. Finally top this off with the sounds of shouting, screaming, and shooting, both pistols and rifles as well as cannons and deck guns. Your imagination can supply you with the details of the scene. The intended result is achieved: the morale aboard the pirate vessel is raised to a fevered pitch while the morale of their intended prize is shaken. So do not forget that pirates and privateers know the value of bardic inspiration when you run those encounters.
Dear downydig,
Any secret knowledge on how to do fluid and dynamic poses? (Btw, I love ur art!! So comfy and cozy!!!)
Sincerely, Paper-Starz
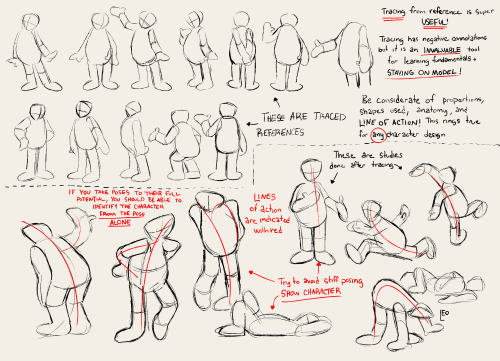
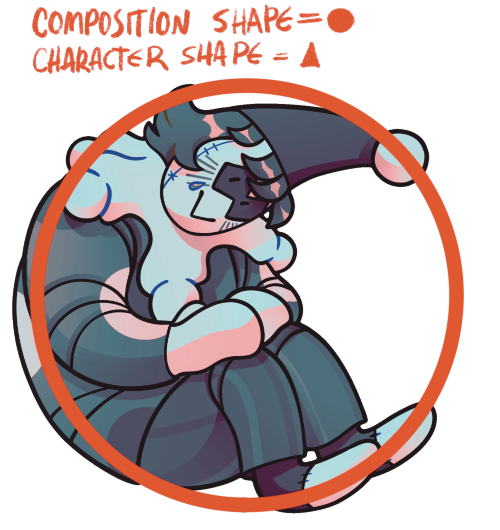
Hello hello! I have some advice! I did a thing on lines of action and the benefits of tracing in learning models a LONG time ago… the advice still holds up! Use shapes like ‘s’ curves, ‘c’ curves, and even sharper ‘U’s to give a fun fluid motion! Limbs and spine are the main help here, but the head sometimes comes into play ✌️
I have a little more to add, however! One of these pictures is my oc and the other is a king fu panda character but it’s still useful! When creating a pose, you can also use silhouette! Bonus points if the shape of the silhouette is different than the shapes that compose the character (in a way that matches the personality of course!)

hot artists don't gatekeep
I've been resource gathering for YEARS so now I am going to share my dragons hoard
Floorplanner. Design and furnish a house for you to use for having a consistent background in your comic or anything! Free, you need an account, easy to use, and you can save multiple houses.
Comparing Heights. Input the heights of characters to see what the different is between them. Great for keeping consistency. Free.
Magma. Draw online with friends in real time. Great for practice or hanging out. Free, paid plan available, account preferred.
Smithsonian Open Access. Loads of free images. Free.
SketchDaily. Lots of pose references, massive library, is set on a timer so you can practice quick figure drawing. Free.
SculptGL. A sculpting tool which I am yet to master, but you should be able to make whatever 3d object you like with it. free.
Pexels. Free stock images. And the search engine is actually pretty good at pulling up what you want.
Figurosity. Great pose references, diverse body types, lots of "how to draw" videos directly on the site, the models are 3d and you can rotate the angle, but you can't make custom poses or edit body proportions. Free, account option, paid plans available.
Line of Action. More drawing references, this one also has a focus on expressions, hands/feet, animals, landscapes. Free.
Animal Photo. You pose a 3d skull model and select an animal species, and they give you a bunch of photo references for that animal at that angle. Super handy. Free.
Height Weight Chart. You ever see an OC listed as having a certain weight but then they look Wildly different than the number suggests? Well here's a site to avoid that! It shows real people at different weights and heights to give you a better idea of what these abstract numbers all look like. Free to use.
⭐ So you want to learn pixel art? ⭐
🔹 Part 1 of ??? - The Basics!
Edit: Now available in Google Doc format if you don't have a Tumblr account 🥰
Hello, my name is Tofu and I'm a professional pixel artist. I have been supporting myself with freelance pixel art since 2020, when I was let go from my job during the pandemic.


My progress, from 2017 to 2024. IMO the only thing that really matters is time and effort, not some kind of natural talent for art.
This guide will not be comprehensive, as nobody should be expected to read allat. Instead I will lean heavily on my own experience, and share what worked for me, so take everything with a grain of salt. This is a guide, not a tutorial. Cheers!
🔹 Do I need money?
NO!!! Pixel art is one of the most accessible mediums out there.
I still use a mouse because I prefer it to a tablet! You won't be at any disadvantage here if you can't afford the best hardware or software.
Because our canvases are typically very small, you don't need a good PC to run a good brush engine or anything like that.
✨Did you know? One of the most skilled and beloved pixel artists uses MS PAINT! Wow!!
🔹 What software should I use?
Here are some of the most popular programs I see my friends and peers using. Stars show how much I recommend the software for beginners! ⭐
💰 Paid options:
⭐⭐⭐ Aseprite (for PC) - $19.99
This is what I and many other pixel artists use. You may find when applying to jobs that they require some knowledge of Aseprite. Since it has become so popular, companies like that you can swap raw files between artists.
Aseprite is amazingly customizable, with custom skins, scripts and extensions on Itch.io, both free and paid.
If you have ever used any art software before, it has most of the same features and should feel fairly familiar to use. It features a robust animation suite and a tilemap feature, which have saved me thousands of hours of labour in my work. The software is also being updated all the time, and the developers listen to the users. I really recommend Aseprite!
⭐ Photoshop (for PC) - Monthly $$
A decent option for those who already are used to the PS interface. Requires some setup to get it ready for pixel-perfect art, but there are plenty of tutorials for doing so.
Animation is also much more tedious on PS which you may want to consider before investing time!
⭐⭐ ProMotion NG (for PC) - $19.00
An advanced and powerful software which has many features Aseprite does not, including Colour Cycling and animated tiles.
⭐⭐⭐ Pixquare (for iOS) - $7.99 - $19.99 (30% off with code 'tofu'!!)
Probably the best app available for iPad users, in active development, with new features added all the time.

Look! My buddy Jon recommends it highly, and uses it often.
One cool thing about Pixquare is that it takes Aseprite raw files! Many of my friends use it to work on the same project, both in their office and on the go.
⭐ Procreate (for iOS) - $12.99
If you have access to Procreate already, it's a decent option to get used to doing pixel art. It does however require some setup. Artist Pixebo is famously using Procreate, and they have tutorials of their own if you want to learn.
⭐⭐ ReSprite iOS and Android. (free trial, but:) $19.99 premium or $$ monthly
ReSprite is VERY similar in terms of UI to Aseprite, so I can recommend it. They just launched their Android release!
🆓 Free options:
⭐⭐⭐ Libresprite (for PC)
Libresprite is an alternative to Aseprite. It is very, very similar, to the point where documentation for Aseprite will be helpful to Libresprite users.
⭐⭐ Pixilart (for PC and mobile)
A free in-browser app, and also a mobile app! It is tied to the website Pixilart, where artists upload and share their work. A good option for those also looking to get involved in a community.
⭐⭐ Dotpict (for mobile)
Dotpict is similar to Pixilart, with a mobile app tied to a website, but it's a Japanese service. Did you know that in Japanese, pixel art is called 'Dot Art'? Dotpict can be a great way to connect with a different community of pixel artists! They also have prompts and challenges often.
🔹 So I got my software, now what?
◽Nice! Now it's time for the basics of pixel art.
❗ WAIT ❗ Before this section, I want to add a little disclaimer. All of these rules/guidelines can be broken at will, and some 'no-nos' can look amazing when done intentionally.
The pixel-art fundamentals can be exceedingly helpful to new artists, who may feel lost or overwhelmed by choice. But if you feel they restrict you too harshly, don't force yourself! At the end of the day it's your art, and you shouldn't try to contort yourself into what people think a pixel artist 'should be'. What matters is your own artistic expression. 💕👍
◽Phew! With that out of the way...
🔸"The Rules"
There are few hard 'rules' of pixel art, mostly about scaling and exporting. Some of these things will frequently trip up newbies if they aren't aware, and are easy to overlook.
🔹Scaling method
There are a couple ways of scaling your art. The default in most art programs, and the entire internet, is Bi-linear scaling, which usually works out fine for most purposes. But as pixel artists, we need a different method.


Both are scaled up x10. See the difference?
On the left is scaled using Bilinear, and on the right is using Nearest-Neighbor. We love seeing those pixels stay crisp and clean, so we use nearest-neighbor.
(Most pixel-art programs have nearest-neighbor enabled by default! So this may not apply to you, but it's important to know.)
🔹Mixels
Mixels are when there are different (mixed) pixel sizes in the same image.

Here I have scaled up my art- the left is 200%, and the right is 150%. Yuck!
As we can see, the "pixel" sizes end up different. We generally try to scale our work by multiples of 100 - 200%, 300% etc. rather than 150%. At larger scales however, the minute differences in pixel sizes are hardly noticeable!
Mixels are also sometimes seen when an artist scales up their work, then continues drawing on it with a 1 pixel brush.

Many would say that this is not great looking! This type of pixels can be indicative of a beginner artist. But there are plenty of creative pixel artists out there who mixels intentionally, making something modern and cool.
🔹Saving Your Files
We usually save our still images as .PNGs as they don’t create any JPEG artifacts or loss of quality. It's a little hard to see here, but there are some artifacts, and it looks a little blurry. It also makes the art very hard to work with if we are importing a JPEG.

For animations .GIF is good, but be careful of the 256 colour limit. Try to avoid using too many blending mode layers or gradients when working with animations. If you aren’t careful, your animation could flash afterwards, as the .GIF tries to reduce colours wherever it can. It doesn’t look great!

Here's an old piece from 2021 where I experienced .GIF lossiness, because I used gradients and transparency, resulting in way too many colours.
🔹Pixel Art Fundamentals - Techniques and Jargon
❗❗Confused about Jaggies? Anti-Aliasing? Banding? Dithering? THIS THREAD is for you❗❗ << it's a link, click it!!
As far as I'm concerned, this is THE tutorial of all time for understanding pixel art. These are techniques created and named by the community of people who actually put the list together, some of the best pixel artists alive currently. Please read it!!
🔸How To Learn
Okay, so you have your software, and you're all ready to start. But maybe you need some more guidance? Try these tutorials and resources! It can be helpful to work along with a tutorial until you build your confidence up.
⭐⭐ Pixel Logic (A Digital Book) - $10 A very comprehensive visual guide book by a very skilled and established artist in the industry. I own a copy myself.
⭐⭐⭐ StudioMiniBoss - free A collection of visual tutorials, by the artist that worked on Celeste! When starting out, if I got stuck, I would go and scour his tutorials and see how he did it.
⭐ Lospec Tutorials - free A very large collection of various tutorials from all over the internet. There is a lot to sift through here if you have the time.
⭐⭐⭐ Cyangmou's Tutorials - free (tipping optional) Cyangmou is one of the most respected and accomplished modern pixel artists, and he has amassed a HUGE collection of free and incredibly well-educated visual tutorials. He also hosts an educational stream every week on Twitch called 'pixelart for beginners'.
⭐⭐⭐ Youtube Tutorials - free There are hundreds, if not thousands of tutorials on YouTube, but it can be tricky to find the good ones. My personal recommendations are MortMort, Brandon, and AdamCYounis- these guys really know what they're talking about!
🔸 How to choose a canvas size
When looking at pixel art turorials, we may see people suggest things like 16x16, 32x32 and 64x64. These are standard sizes for pixel art games with tiles. However, if you're just making a drawing, you don't necessarily need to use a standard canvas size like that.
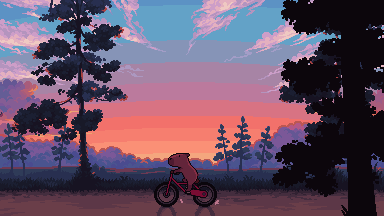
What I like to think about when choosing a canvas size for my illustrations is 'what features do I think it is important to represent?' And make my canvas as small as possible, while still leaving room for my most important elements.
Imagine I have characters in a scene like this:

I made my canvas as small as possible (232 x 314), but just big enough to represent the features and have them be recognizable (it's Good Omens fanart 😤)!! If I had made it any bigger, I would be working on it for ever, due to how much more foliage I would have to render.
If you want to do an illustration and you're not sure, just start at somewhere around 100x100 - 200x200 and go from there.
It's perfectly okay to crop your canvas, or scale it up, or crunch your art down at any point if you think you need a different size. I do it all the time! It only takes a bit of cleanup to get you back to where you were.
🔸Where To Post
Outside of just regular socials, Twitter, Tumblr, Deviantart, Instagram etc, there are a few places that lean more towards pixel art that you might not have heard of.
⭐ Lospec Lospec is a low-res focused art website. Some pieces get given a 'monthly masterpiece' award. Not incredibly active, but I believe there are more features being added often.
⭐⭐ Pixilart Pixilart is a very popular pixel art community, with an app tied to it. The community tends to lean on the young side, so this is a low-pressure place to post with an relaxed vibe.
⭐⭐ Pixeljoint Pixeljoint is one of the big, old-school pixel art websites. You can only upload your art unscaled (1x) because there is a built-in zoom viewer. It has a bit of a reputation for being elitist (back in the 00s it was), but in my experience it's not like that any more. This is a fine place for a pixel artist to post if they are really interested in learning, and the history. The Hall of Fame has some of the most famous / impressive pixel art pieces that paved the way for the work we are doing today.
⭐⭐⭐ Cafe Dot Cafe Dot is my art server so I'm a little biased here. 🍵 It was created during the recent social media turbulence. We wanted a place to post art with no algorithms, and no NFT or AI chuds. We have a heavy no-self-promotion rule, and are more interested in community than skill or exclusivity. The other thing is that we have some kind of verification system- you must apply to be a Creator before you can post in the Art feed, or use voice. This helps combat the people who just want to self-promo and dip, or cause trouble, as well as weed out AI/NFT people. Until then, you are still welcome to post in any of the threads or channels. There is a lot to do in Cafe Dot. I host events weekly, so check the threads!
⭐⭐/r/pixelart The pixel art subreddit is pretty active! I've also heard some of my friends found work through posting here, so it's worth a try if you're looking. However, it is still Reddit- so if you're sensitive to rude people, or criticism you didn't ask for, you may want to avoid this one. Lol
🔸 Where To Find Work
You need money? I got you! As someone who mostly gets scouted on social media, I can share a few tips with you:
Put your email / portfolio in your bio Recruiters don't have all that much time to find artists, make it as easy as possible for someone to find your important information!
Clean up your profile If your profile feed is all full of memes, most people will just tab out rather than sift through. Doesn't apply as much to Tumblr if you have an art tag people can look at.
Post regularly, and repost Activity beats everything in the social media game. It's like rolling the dice, and the more you post the more chances you have. You have to have no shame, it's all business baby
Outside of just posting regularly and hoping people reach out to you, it can be hard to know where to look. Here are a few places you can sign up to and post around on.
/r/INAT INAT (I Need A Team) is a subreddit for finding a team to work with. You can post your portfolio here, or browse for people who need artists.
/r/GameDevClassifieds Same as above, but specifically for game-related projects.
Remote Game Jobs / Work With Indies Like Indeed but for game jobs. Browse them often, or get email notifications.
VGen VGen is a website specifically for commissions. You need a code from another verified artist before you can upgrade your account and sell, so ask around on social media or ask your friends. Once your account is upgraded, you can make a 'menu' of services people can purchase, and they send you an offer which you are able to accept, decline, or counter.
The evil websites of doom: Fiverr and Upwork I don't recommend them!! They take a big cut of your profit, and the sites are teeming with NFT and AI people hoping to make a quick buck. The site is also extremely oversaturated and competitive, resulting in a race to the bottom (the cheapest, the fastest, doing the most for the least). Imagine the kind of clients who go to these websites, looking for the cheapest option. But if you're really desperate...
🔸 Community
I do really recommend getting involved in a community. Finding like-minded friends can help you stay motivated to keep drawing. One day, those friends you met when you were just starting out may become your peers in the industry. Making friends is a game changer!
Discord servers Nowadays, the forums of old are mostly abandoned, and people split off into many different servers. Cafe Dot, Pixel Art Discord (PAD), and if you can stomach scrolling past all the AI slop, you can browse Discord servers here.
Twitch Streams Twitch has kind of a bad reputation for being home to some of the more edgy gamers online, but the pixel art community is extremely welcoming and inclusive. Some of the people I met on Twitch are my friends to this day, and we've even worked together on different projects! Browse pixel art streams here, or follow some I recommend: NickWoz, JDZombi, CupOhJoe, GrayLure, LumpyTouch, FrankiePixelShow, MortMort, Sodor, NateyCakes, NyuraKim, ShinySeabass, I could go on for ever really... There are a lot of good eggs on Pixel Art Twitch.
🔸 Other Helpful Websites
Palettes Lospec has a huge collection of user-made palettes, for any artist who has trouble choosing their colours, or just wants to try something fun. Rejected Palettes is full of palettes that didn't quite make it onto Lospec, ran by people who believe there are no bad colours.
The Spriters Resource TSR is an incredible website where users can upload spritesheets and tilesets from games. You can browse for your favourite childhood game, and see how they made it! This website has helped me so much in understanding how game assets come together in a scene.
VGMaps Similar to the above, except there are entire maps laid out how they would be played. This is incredible if you have to do level design, or for mocking up a scene for fun.
Game UI Database Not pixel-art specific, but UI is a very challenging part of graphics, so this site can be a game-changer for finding good references!
Retronator A digital newspaper for pixel-art lovers! New game releases, tutorials, and artworks!
Itch.io A website where people can upload, games, assets, tools... An amazing hub for game devs and game fans alike. A few of my favourite tools: Tiled, PICO-8, Pixel Composer, Juice FX, Magic Pencil for Aseprite
🔸 The End?
This is just part 1 for now, so please drop me a follow to see any more guides I release in the future. I plan on doing some writeups on how I choose colours, how to practise, and more!
I'm not an expert by any means, but everything I did to get to where I am is outlined in this guide. Pixel art is my passion, my job and my hobby! I want pixel art to be recognized everywhere as an art-form, a medium of its own outside of game-art or computer graphics!
This guide took me a long time, and took a lot of research and experience. Consider following me or supporting me if you are feeling generous.
And good luck to all the fledgling pixel artists, I hope you'll continue and have fun. I hope my guide helped you, and don't hesitate to send me an ask if you have any questions! 💕
My other tutorials (so far): How to draw Simple Grass for a game Hue Shifting
okay hey real question: what are good ways to describe fat characters?
I see a lot of 'have more fat characters' and I'm Here For It but as someone who is skinny and in a world where most existing literature makes characters fat only as a joke or an indication of some variety of moral badness, I'm not really sure how to describe them in a way that's not objectifying or insulting. like, I've grown up on poetic descriptions of thin characters ('long slim fingers' and 'willow figure' etc etc) but I haven't read flattering descriptions of fat characters and I don't know where to start. I've seen a lot of 'how to describe poc' or 'how to describe disabled characters' or whatever and I've seen art ref posts for drawing fat characters, but no posts about how to write them well. so. open call for advice or for examples you've found and like??

Oh my gosh. I just found this website that walks you though creating a believable society. It breaks each facet down into individual questions and makes it so simple! It seems really helpful for worldbuilding!
-
 starsunsblog liked this · 1 week ago
 -
 abigill-raydream liked this · 1 week ago
 -
 d-blue02 reblogged this · 2 weeks ago
 -
d-blue02 liked this · 2 weeks ago
-
 carouselingcircus liked this · 2 weeks ago
 -
 space-specs reblogged this · 2 weeks ago
 -
 lullambr liked this · 2 weeks ago
 -
 the-random-chronicles liked this · 2 weeks ago
 -
 sainttempest liked this · 2 weeks ago
 -
 crustysoapbubbles reblogged this · 2 weeks ago
 -
crustysoapbubbles liked this · 2 weeks ago
-
 captainnemis liked this · 2 weeks ago
 -
 kikithewitch05 liked this · 3 weeks ago
 -
 selenedeer liked this · 3 weeks ago
 -
 thedevilsunderstudy liked this · 3 weeks ago
 -
 noxernia reblogged this · 3 weeks ago
 -
 urbow liked this · 3 weeks ago
 -
 onionrimgs liked this · 3 weeks ago
 -
 wreillyart liked this · 3 weeks ago
 -
 puppypalette liked this · 3 weeks ago
 -
 thegoblinwizard reblogged this · 3 weeks ago
 -
thegoblinwizard liked this · 3 weeks ago
-
 opalizeddinodream liked this · 3 weeks ago
 -
 alokiasaltwater liked this · 3 weeks ago
 -
 lionfries liked this · 3 weeks ago
 -
 coffeecupresearchmode reblogged this · 3 weeks ago
 -
 immortalthings liked this · 3 weeks ago
 -
 amberfrill reblogged this · 3 weeks ago
 -
amberfrill liked this · 3 weeks ago
-
 arttipsandothersaved reblogged this · 3 weeks ago
 -
 aqua-the-smiter liked this · 3 weeks ago
 -
 lambsoul liked this · 3 weeks ago
 -
 ardimutt liked this · 3 weeks ago
 -
 misanthropicxloser liked this · 3 weeks ago
 -
 a-harmless-oreo liked this · 3 weeks ago
 -
 persantical liked this · 3 weeks ago
 -
 universalldeergalaxy liked this · 3 weeks ago
 -
 symb10sis liked this · 3 weeks ago
 -
 bo0g13m4n liked this · 3 weeks ago
 -
 aspenartist liked this · 3 weeks ago
 -
 moodside-swing reblogged this · 3 weeks ago
 -
 cat-copnt liked this · 4 weeks ago
 -
 nychthemeron-rants liked this · 4 weeks ago
 -
 ifdragonscouldtalk liked this · 4 weeks ago
 -
 socialisttails liked this · 4 weeks ago
 -
 i-write-sin-not-tragedy reblogged this · 4 weeks ago
 -
 cosmic-cloudd9 liked this · 4 weeks ago
 -
 yeehaw-razor-dirt-man liked this · 4 weeks ago
 -
 mortalcoils liked this · 4 weeks ago

sideblog for @letardoursprout so i have somewhere to collect all the tutorials/advice that i likeicon by lovelyshiz. header by hexh-pixel
66 posts