Bird Wing/Tail Database
Bird Wing/Tail Database
If you ever need references for bird wings/tails I cannot recommend this collection enough! It has images of the dorsal/ventral sides of wings from a wide variety of species.

More Posts from Ardouradvice and Others
Good Traits Gone Bad
Exploring good traits gone bad in a novel can add depth and complexity to your characters. Here are a few examples of good traits that can take a negative turn:
1. Empathy turning into manipulation: A character with a strong sense of empathy may use it to manipulate others' emotions and gain an advantage.
2. Confidence becoming arrogance: Excessive confidence can lead to arrogance, where a character belittles others and dismisses their opinions.
3. Ambition turning into obsession: A character's ambition can transform into an unhealthy obsession, causing them to prioritize success at any cost, including sacrificing relationships and moral values.
4. Loyalty becoming blind devotion: Initially loyal, a character may become blindly devoted to a cause or person, disregarding their own well-being and critical thinking.
5. Courage turning into recklessness: A character's courage can morph into reckless behavior, endangering themselves and others due to an overestimation of their abilities.
6. Determination becoming stubbornness: Excessive determination can lead to stubbornness, where a character refuses to consider alternative perspectives or change their course of action, even when it's detrimental.
7. Optimism becoming naivety: Unwavering optimism can transform into naivety, causing a character to overlook dangers or be easily deceived.
8. Protectiveness turning into possessiveness: A character's protective nature can evolve into possessiveness, where they become overly controlling and jealous in relationships.
9. Altruism becoming self-neglect: A character's selflessness may lead to neglecting their own needs and well-being, to the point of self-sacrifice and burnout.
10. Honesty becoming brutal bluntness: A character's commitment to honesty can turn into brutal bluntness, hurting others with harsh and tactless remarks.
These examples demonstrate how even admirable traits can have negative consequences when taken to extremes or used improperly. By exploring the complexities of these traits, you can create compelling and multi-dimensional characters in your novel.
Happy writing!


Yalright punks I made a fun lil coloring tutorial! Plz note that I don’t know shit about color theory and this is just stuff I taught myself over the years
Hi pigs "whale yuri Wednesday" with wings!!! I think the colors in your art are very cute nd i was wondering if you have a method with picking them? I struggle a lot with color picking when i dont have smth to work off of!
Also not an ask but you should post more about your original art/reblog it!! ocs too!! :]
well!! i don't have a specific method most of the time I'm eyeballing all of that!! but i can give some general tips on how i personally pick colours...
also: thank you 🫶🫶 ... i do not make art very often so most of the time i feel like there is nothing to post about!! but i will try to reblog my own art more often!! i have been working a lot on one oc of mine so perhaps you will see more of it :]
- i tend to first put all the colours side by side to get a sense of how they'll all look together!!
- usually i start with a very light or very dark colour that i like, and build off of that.


- after i choose a color to work off of, i tend to pick another colour that's similar to the first colour. (black and white can go well with basically every colour if you're stuck!)
i personally try to keep the colours distinct enough that you can tell it's another colour. this isn't totally necessary, it's mostly because i use a lineless style and my shapes won't be distinguishable if i don't make it clear which colour is which. for example with fhese two images - it's easier to tell between the colours on the right than the colours on the left.


specific processes here:
in the top left corner here, i chose the black, then the dark blue/dark purple, then the purple, then the light purple. they're all in the same area of the colour wheel but each one gradually progresses in brightness and moves into another area of the colour wheel.

same with the top right corner - i started with the white and chose a shade of orange that was easy to see against it. then a similar shade of yellow to pair with the orange, and then i wanted a highlight colour to stand out. since the general pattern of this colour set is bright/warm colours, we can choose another bright or warm colour that's different in brightness or shade - in this case i chose a bright green, but a bright red would have also gone nicely with this.
the bottom left and right is mostly the same as above, but finding a colour palette like the bottom right can be trickier. i started with a combination of white, cyan, and purple but thought that it looked a bit boring. so i picked a colour that wasn't blue or purple but a bright(er) red so that it stood out. could have also used bright orange/yellow/pink instead, but i think the red gives it an interesting contrast. i like to think that it's all about contrast
i tend to make colour palettes at random just for fun, so i think that practice or just putting colours together to see what looks good can also help!! some more examples below of just. colour palettes or colours that work well together

and yeah! to be honest i don't really know what i am doing but i like messing around with groups of colours. do what you want, lay down some colours that you like and most importantly have fun 👍👍👍
any shading tips?
AH I LOVE SHADING AND RENDERING let me see what i can dig up from my brain for you
i say....... single colour blend mode layer is a good starting point for shading but i'd also manually pick colours to make the shadow more dynamic, if that makes sense..


left has a yellow-y hard light layer as its only shading, and right has the hard light layer alongside some colours i added myself
also, i like to mess with the saturation and hue when i add the extra colours.. it adds depth (life??) to the shadows that you wouldnt get with a flat colour


IN ADDITION TO THIS desaturating your colours makes them look lighter, and hightening the saturation makes them seem darker! i play with this a lot it's fun
not shown here is also using completely different colours than the one you're shading, like green/teal for blue, or red for purple! this is especially helpful when shading grays and whites
basically get funky with your colours and try shit until you find a formula that works for you!!!! this is just what i do and im a self-taught nerd so
i love your art so much!! would you be alright sharing some info about your process for art? i'm in love with all of it especially your more recent painterly stuff :D if i could eat your art to gain its power i would
Thank you so much!!! :DDD and ofc! I'll try and articulate whatever I do (I truly just See What Looks Good tbh) below the cut :]
I'll use my most recent work as an example :]

So I start off with the sketch of course, for this I'll usually have the general idea of what I'm doing planned out in my mind, but if I can't figure out the pose/layout or whatever I'll usually scour pinterest for references/inspiration

Then COLOUR SHIT. Ok, I couldn't get a version of this without shading bcus I sadly merged the layers already </3 but basically once I have the base colour(s) down I'll mess with the layer's colour settings until it works with the lighting I'm doing and then I'll start shading. I'd say there's a more refined process but tbh I kinda just pick a section (skin, hair, clothes, etc...) and go ham.


After that, rendering! (And small details [the first pic]) tbh I have no idea what rendering is/how to do it? But my definition is 20 layers of airbrushing at low opacity until it looks good 👍 (for this piece that was alot of dark blues, reds and purples. In general I try to use the dreaded Colour Theory to make things look nice and cohesive [complimentary colours and the like]) this section is very much trial and error, I'll also mess with the settings and colours for everything I've done so far ALOT, as well as go back and fix little things I did forever ago

Then the background/any final details! (Usually if I'm doing a more complicated background I'll work on that at the same pace as every thing else [sketch, colour, render] but for pieces like this where it's simple, I'll do that whenever)
But yeah! Hopefully that's helpful (?) In some way. My process is all over the place and I usually break my own order of doing things and start like rendering half way through colouring half the time?? Anyway thank you!!! It feels very awesome to know people like my art and wanna see how I do stuff :DDD
Dear downydig,
Any secret knowledge on how to do fluid and dynamic poses? (Btw, I love ur art!! So comfy and cozy!!!)
Sincerely, Paper-Starz
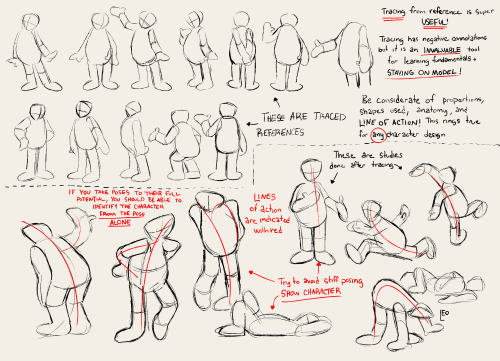
Hello hello! I have some advice! I did a thing on lines of action and the benefits of tracing in learning models a LONG time ago… the advice still holds up! Use shapes like ‘s’ curves, ‘c’ curves, and even sharper ‘U’s to give a fun fluid motion! Limbs and spine are the main help here, but the head sometimes comes into play ✌️
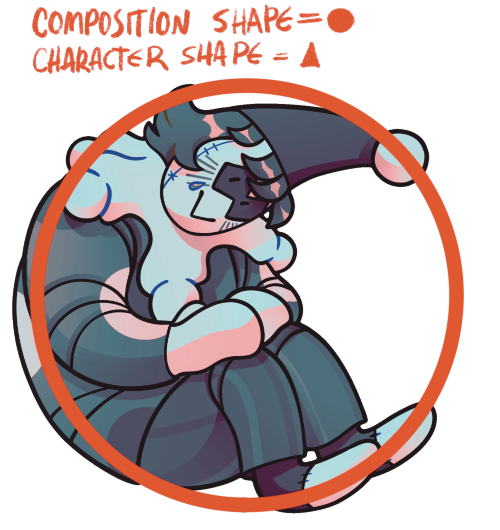
I have a little more to add, however! One of these pictures is my oc and the other is a king fu panda character but it’s still useful! When creating a pose, you can also use silhouette! Bonus points if the shape of the silhouette is different than the shapes that compose the character (in a way that matches the personality of course!)


Whipped this up real quick to show my palette basics. Here’s my coloring tutorial post: https://kandyarts.tumblr.com/post/628614256321036288/yalright-punks-i-made-a-fun-lil-coloring-tutorial


was watching one of yr speed-paints and im so confused on how yr chopstick pen blends colours?????? i’ve been using the brush for a whileeeee and it does not blend the same beautiful way do you use any custom settings?
that's because it doesn't blend!!
my favourite activity is picking a random spot on the colour wheel that's close to the colour i'm trying to render and just praying it looks good for either lighting or shading. i also take advantage of the brush's slight transparency to create the blended look (i have the brush set to around 70% opacity) AND i also colourpick in the area where two colours overlap and go back over it with the brush so it looks smoother
a visual will probably help explain ,,
little doodle of darrell as a treat C: i also make the brush itself way bigger when it's time to render and take advantage of having opacity by pressure turned on! that way it's easier to cover more space at once and the low opacity helps blend better
i hope this makes sense i realize i have a very odd way of doing these things and i've never really taken a step back to actually analyze my process before


brush settings for your purposes (whatever those may be) C:
-
 bewilderthewayyoushould reblogged this · 2 weeks ago
 -
 eeriedragone liked this · 2 weeks ago
 -
 local-transan reblogged this · 2 weeks ago
 -
 snowberriesromanoff reblogged this · 2 weeks ago
 -
 notthepinkkirby reblogged this · 2 weeks ago
 -
 randomyetnot reblogged this · 2 weeks ago
 -
 kawaxya reblogged this · 2 weeks ago
 -
 birsima liked this · 2 weeks ago
 -
 quietskitty reblogged this · 2 weeks ago
 -
 aroshi-wish liked this · 2 weeks ago
 -
 depressed-insomniac liked this · 2 weeks ago
 -
 ecologicallyniche liked this · 2 weeks ago
 -
 omegajor liked this · 2 weeks ago
 -
 imbucketfish liked this · 2 weeks ago
 -
 horrastorie reblogged this · 2 weeks ago
 -
horrastorie liked this · 2 weeks ago
-
 zalein reblogged this · 3 weeks ago
 -
zalein liked this · 3 weeks ago
-
 watchinthestarz reblogged this · 3 weeks ago
 -
 viktuurishipper96 liked this · 3 weeks ago
 -
 evetheindecisive reblogged this · 3 weeks ago
 -
evetheindecisive liked this · 3 weeks ago
-
 inevitablyuncertain reblogged this · 3 weeks ago
 -
 defectivebread liked this · 3 weeks ago
 -
 temporalvagabond liked this · 3 weeks ago
 -
 hallow-graves liked this · 3 weeks ago
 -
 shylycreativekitten liked this · 3 weeks ago
 -
 themaninthewoods liked this · 3 weeks ago
 -
 gatorboi liked this · 3 weeks ago
 -
 momolinia reblogged this · 3 weeks ago
 -
momolinia liked this · 3 weeks ago
-
 dragons-under-the-bookcase liked this · 3 weeks ago
 -
 jaywings liked this · 3 weeks ago
 -
 calico-cows reblogged this · 3 weeks ago
 -
calico-cows liked this · 3 weeks ago
-
 ammafe liked this · 3 weeks ago
 -
 learninghoovess liked this · 3 weeks ago
 -
 stardustrabbitsgallery liked this · 3 weeks ago
 -
 petty-p-ai-nter reblogged this · 3 weeks ago
 -
 thatglitchedartist reblogged this · 3 weeks ago
 -
 komicxre reblogged this · 3 weeks ago
 -
komicxre liked this · 3 weeks ago
-
 winged777 liked this · 3 weeks ago
 -
 limnologylover reblogged this · 3 weeks ago
 -
birsima reblogged this · 3 weeks ago
-
 captain-chapish liked this · 3 weeks ago
 -
 norfre reblogged this · 3 weeks ago
 -
norfre liked this · 3 weeks ago
-
 dykeofalltrades reblogged this · 3 weeks ago
 -
 starfishelope reblogged this · 3 weeks ago

sideblog for @letardoursprout so i have somewhere to collect all the tutorials/advice that i likeicon by lovelyshiz. header by hexh-pixel
66 posts