NO ESTAMOS EN GUERRA


´´We are in WAR Against a powerful enemy Relentless That does not respect anything or anyone Who is willing to use violence and crime without any limits. Even when it means the loss of human lives Who are willing to burn hospitals, subway stations and supermarkets With the sole purpose of producing as much damage as possible to all Chileans They are at WAR with all Chileans of good will that we want to live in democracy, with freedom and in peace.“
- President Sebastian Piñera; 21-10-19 -
NO ESTAMOS EN GUERRA
that our own president has declared such words against his own country denotes the disconnection of this government with his people.
WE DEMAND BASIC HUMAN RIGHTS, WE DEMAND DIGNIFY LIFE
WE DEMAND TO BE HEARD, WE DEMAND NO MORE LIES
summary of what’s happening in Chile
More Posts from Dubiasdead and Others
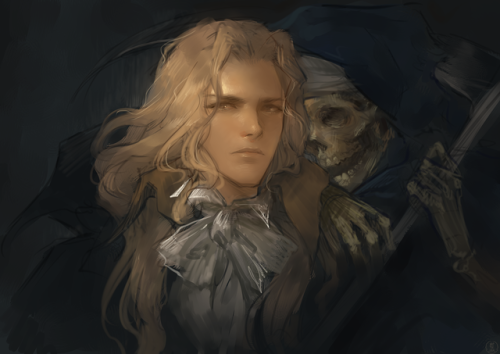
Castlevania painting(/v/ drawthread request)
What ARE Vanishing Points?
So I feel like a lot of confusion with drawing in perspective is because people are not taught the absolute basics properly? So let’s do that.
Let’s say we have a cube.
Now, a cube we know is made out of 6 squares or rectangles, and every edge is at a 90 degree angle.
so every opposite edge of a cube is exactly parallel, right?
but let’s say we draw a cube using only parallel lines:

this looks a little weird, you know? Like if i try think of this as an object in 3d space and i look at it for too long, the faces start to look really warped - with like the back looking bigger than the front as if its been made out of weird wonky trapeziums

so what’s going on here? if all those edges are exactly parallel, why does it look weird?
lets take a look at this photo of a railway track

Now we know that the rails on a track are always going to be parallel, they have to be the same distance apart so the train can stay on the track yeah?
But we can very clearly see that these tracks are converging to a single point in the photo.
So what does this tell us, exactly? That our view of the world is naturally warped, and that lines that are physically parallel when drawn in perspective will converge to a single point.
Now, I could call this image “one point perspective” - but that’s not really true,

if these lines are also parallel, then they must also converge to a single point in perspective, right? so lets add another point

clip studio paint automatically adjusts the horizon line to fit the new points you add to your perspective…. notice how the horizon line actually fits the photo better now?

our new point is a very very long way away, so we don’t notice a lot of difference in the angle between lines, but the point that i’m trying to make here is:
Drawing with perspective guides is not about choosing one, two, three point perspective etc. those are just quick ways to set up a certain viewing angle
What you are doing when you use these guides is making your parallel lines converge to a point.
So, if you want to draw a big ol’ cube that’s aligned to be parallel with these railroad tracks, then you can do that with the same point as the tracks - because it’s parallel. It’s on the same axis!

but what if you want to draw a cube that’s rotated, and isn’t parallel to the tracks?
well that’s not too difficult to do if you know that every point represents one set of parallel lines.
If these lines aren’t parallel to the ones you already have, then clearly you just need new points.
We’re not planning to tilt this cube up into the air, or rotate it onto its side, so we’re going to leave the vertical axis alone, and just move our horizontal points to a different place on the horizon line

But speaking of the vertical axis - the only points that will be on your horizon line are the ones that are flat on the ground. But you can still have points that are not on the horizon line!

This is important to remember because if you’re trying to draw something like a slope or stairs, something that has an incline, it’s not going to be level with your horizon.
Let’s draw some stairs as an example.

This is actually pretty simple - first draw where your slope starts and ends by drawing a big L shape.
this will give you some parallel corners, which you can then connect to make a new point for your slope

And with this you can then find the centre and divide that up into equal parts to make your stairs (http://lesbianlinkle.tumblr.com/post/176704472820)


So lets go back to our original cube, with the knowledge that our parallel lines should all converge to a point and draw it again

well, doesn’t that look better!
but also, now you know how to make a cube lean against its buddy like this

because we just make new points for the new parallel lines

Anyway I hope that clears some things up, and makes perspective easier to understand!
Also if these tutorials have been helpful and you’d like to support me, I do have a patreon & a ko-fi you can donate to :^)

*Hope your day is going swell~

yesterday i reblogged a drawing resource that included how to draw hijabs - and it honestly wasn’t the best advice i’ve seen out there
now, i’m not an artist. but what i saw was a video that included hijab styles most of us don’t really wear and incorrect terminology surrounding niqabs and burqas (yes, there is a difference between the two)
so, i went searching and found a tutorial that i felt was better! these drawing guides and examples come from @/winchestermeg on twitter, and i think they’re really great 💕


this has more relevant examples and correct terminologies, and is drawn by a muslim woman
enjoy, artists of tumblr!
also with all due respect the main reason the left loses so much is that y’all refuse to compromise on the language and messaging you use to speak to voters. i swear if you rebranded “defund the police” as “invest in community safety from the ground up” most white suburban moderates would be like “that sounds great” and i know that because that’s how i’ve literally reframed it to white suburban moderates who think “defund the police” means we’re going to live in a scary lawless mad max world


Hips Tutorial by bokuman
Support the artist on Patreon!


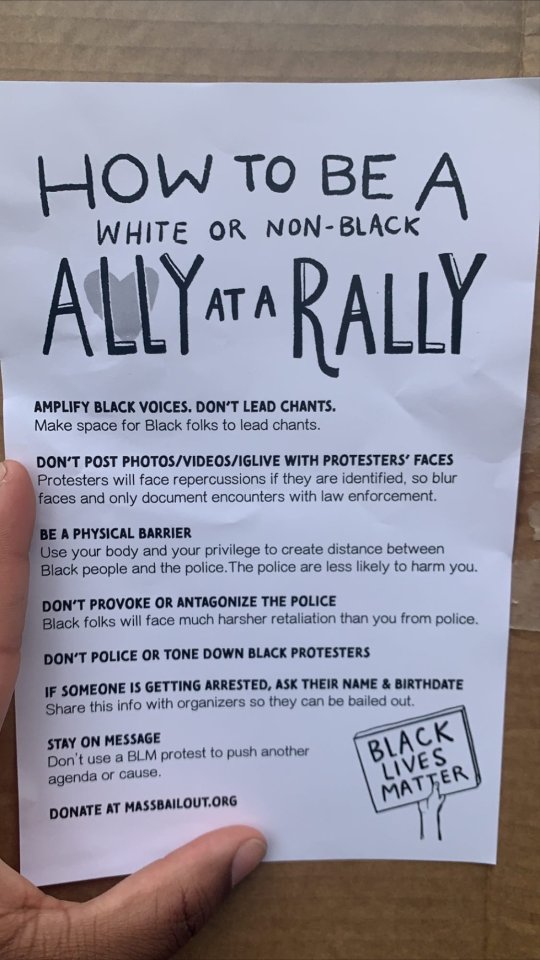
How to be a white or non-black ally at a rally
via @laurielovelugo
[SuperheroesInColor faceb / instag / twitter / tumblr / pinterest / support ]
-
 anna6egb2 liked this · 6 months ago
 -
 annal80pf liked this · 6 months ago
 -
 3lectr1city liked this · 1 year ago
 -
 piecloundx liked this · 1 year ago
 -
 skvll-b0dy liked this · 1 year ago
 -
 salty-sweaters liked this · 1 year ago
 -
 defiance-of-endless liked this · 1 year ago
 -
 saljoyy liked this · 1 year ago
 -
 robaczku liked this · 1 year ago
 -
 mariylle-blog liked this · 1 year ago
 -
 pepehorus liked this · 1 year ago
 -
 acatsecretly liked this · 1 year ago
 -
 goldenuggets liked this · 1 year ago
 -
 bigbonbonya liked this · 1 year ago
 -
 sirmedicknight reblogged this · 1 year ago
 -
 santapinguinica reblogged this · 1 year ago
 -
santapinguinica liked this · 1 year ago
-
 catsteeth4747 liked this · 1 year ago
 -
 oogsterboogster liked this · 1 year ago
 -
 norii-gato liked this · 1 year ago
 -
 dogs-meat-grinder liked this · 2 years ago
 -
 redc0-0kie liked this · 2 years ago
 -
 verboseandverytired liked this · 2 years ago
 -
 scorbunny33 liked this · 2 years ago
 -
 weebywatches liked this · 2 years ago
 -
 mayiiiyi liked this · 2 years ago
 -
 billygoatunicorn liked this · 2 years ago
 -
 theanxiousfunbun liked this · 2 years ago
 -
 littlebatty liked this · 2 years ago
 -
 licorissss liked this · 2 years ago
 -
 magdascake liked this · 2 years ago
 -
 v0mitbugz liked this · 2 years ago
 -
the-rat-king-atesomething liked this · 2 years ago
-
 tr4shbug liked this · 2 years ago
 -
 nexious117 liked this · 2 years ago
 -
 yakissobabiba liked this · 2 years ago
 -
 halfbakedpack reblogged this · 2 years ago
 -
halfbakedpack liked this · 2 years ago