What ARE Vanishing Points?
What ARE Vanishing Points?
So I feel like a lot of confusion with drawing in perspective is because people are not taught the absolute basics properly? So let’s do that.
Let’s say we have a cube.
Now, a cube we know is made out of 6 squares or rectangles, and every edge is at a 90 degree angle.
so every opposite edge of a cube is exactly parallel, right?
but let’s say we draw a cube using only parallel lines:

this looks a little weird, you know? Like if i try think of this as an object in 3d space and i look at it for too long, the faces start to look really warped - with like the back looking bigger than the front as if its been made out of weird wonky trapeziums

so what’s going on here? if all those edges are exactly parallel, why does it look weird?
lets take a look at this photo of a railway track

Now we know that the rails on a track are always going to be parallel, they have to be the same distance apart so the train can stay on the track yeah?
But we can very clearly see that these tracks are converging to a single point in the photo.
So what does this tell us, exactly? That our view of the world is naturally warped, and that lines that are physically parallel when drawn in perspective will converge to a single point.
Now, I could call this image “one point perspective” - but that’s not really true,

if these lines are also parallel, then they must also converge to a single point in perspective, right? so lets add another point

clip studio paint automatically adjusts the horizon line to fit the new points you add to your perspective…. notice how the horizon line actually fits the photo better now?

our new point is a very very long way away, so we don’t notice a lot of difference in the angle between lines, but the point that i’m trying to make here is:
Drawing with perspective guides is not about choosing one, two, three point perspective etc. those are just quick ways to set up a certain viewing angle
What you are doing when you use these guides is making your parallel lines converge to a point.
So, if you want to draw a big ol’ cube that’s aligned to be parallel with these railroad tracks, then you can do that with the same point as the tracks - because it’s parallel. It’s on the same axis!

but what if you want to draw a cube that’s rotated, and isn’t parallel to the tracks?
well that’s not too difficult to do if you know that every point represents one set of parallel lines.
If these lines aren’t parallel to the ones you already have, then clearly you just need new points.
We’re not planning to tilt this cube up into the air, or rotate it onto its side, so we’re going to leave the vertical axis alone, and just move our horizontal points to a different place on the horizon line

But speaking of the vertical axis - the only points that will be on your horizon line are the ones that are flat on the ground. But you can still have points that are not on the horizon line!

This is important to remember because if you’re trying to draw something like a slope or stairs, something that has an incline, it’s not going to be level with your horizon.
Let’s draw some stairs as an example.

This is actually pretty simple - first draw where your slope starts and ends by drawing a big L shape.
this will give you some parallel corners, which you can then connect to make a new point for your slope

And with this you can then find the centre and divide that up into equal parts to make your stairs (http://lesbianlinkle.tumblr.com/post/176704472820)


So lets go back to our original cube, with the knowledge that our parallel lines should all converge to a point and draw it again

well, doesn’t that look better!
but also, now you know how to make a cube lean against its buddy like this

because we just make new points for the new parallel lines

Anyway I hope that clears some things up, and makes perspective easier to understand!
Also if these tutorials have been helpful and you’d like to support me, I do have a patreon & a ko-fi you can donate to :^)
More Posts from Dubiasdead and Others


LINKS(aka tutorials by ppl who make better tutorials):
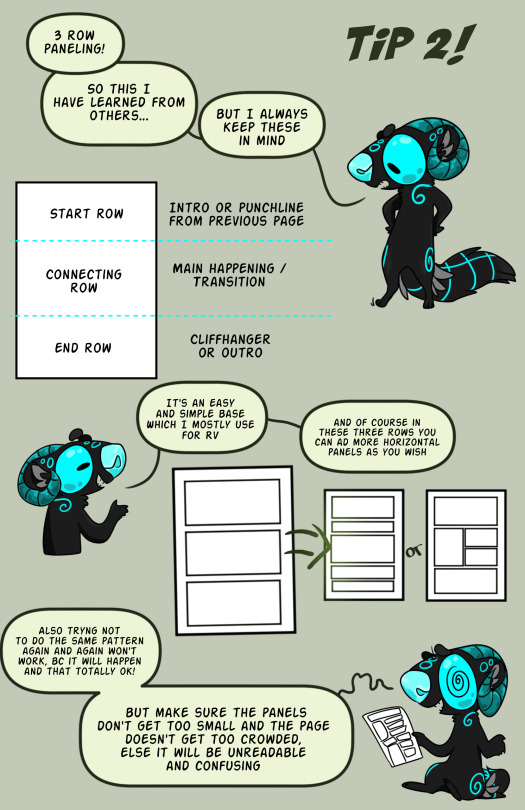
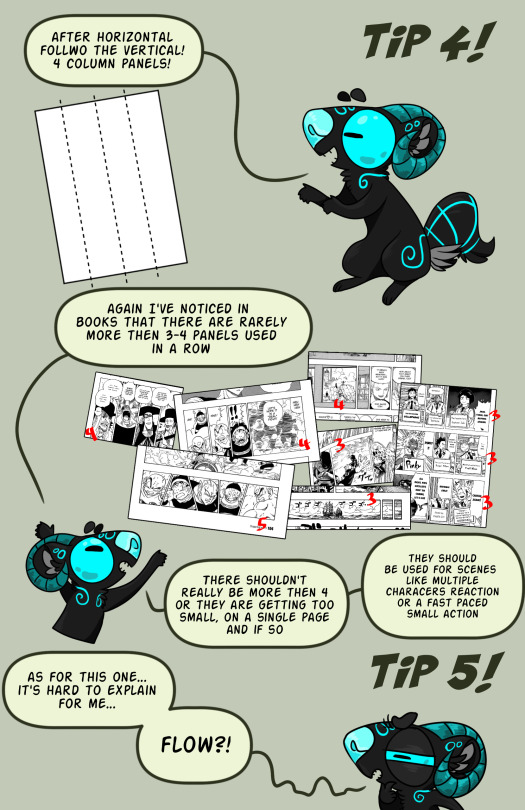
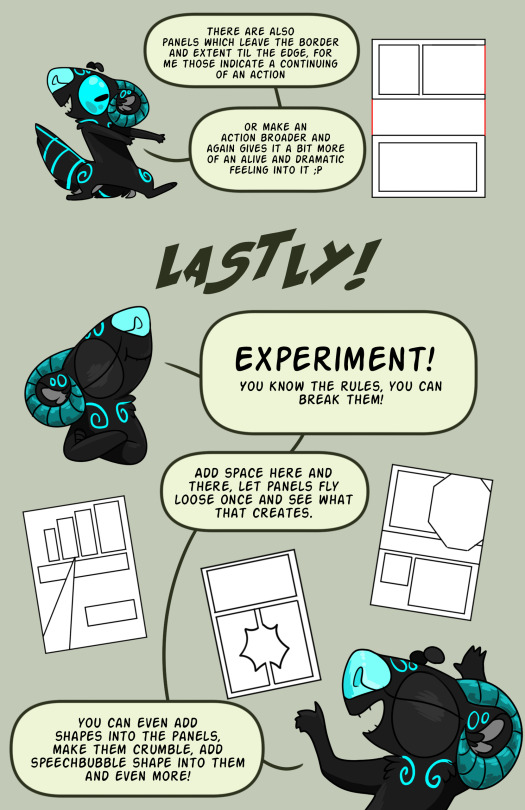
Paneling 1
Paneling 2 (text heavy)
Crossing the 180°
Simple comic panel Tutorial
Guide to comic panels (+OTHER LINKS)
Comic strip artists kit
LETTERING
Webcomic Guide by Tapastic users!
Lettering by ZombieSmile
How I draw comics (also by ZombieSmile)
an ask about comics part 1
Start a webcomic?
A thing about perspective
If you dig yourself mor einto it, you’ll find more and more helpful things, even for a style you might want in your comics and whatever more! But I should probably stop the link spam here….
But if you have any more questions, ether you want to know form me or if I know a tutorial, go ahead and ask!!
i’m starting to hate the frequency of pinterest as a google result more than i hate pinterest itself. listen, google, googly-mate, pinterest isn’t a fuckign source. I want the sites those pictures came from because those are the ones with information such as dates, which is the entire point of the thing I am googling.
Reblog if you're black tumblr.
You don’t have to be black, it just means you support us, you stand by us and you’re for us.

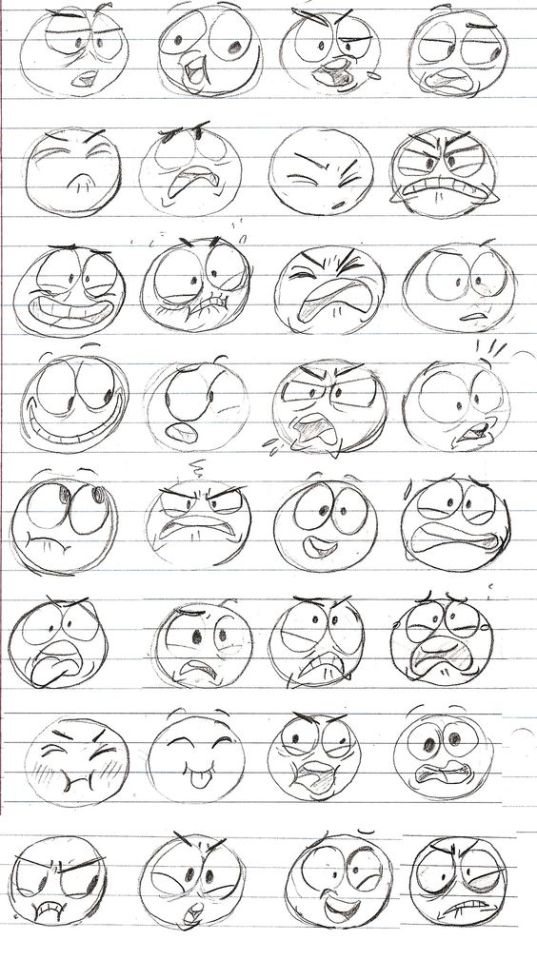
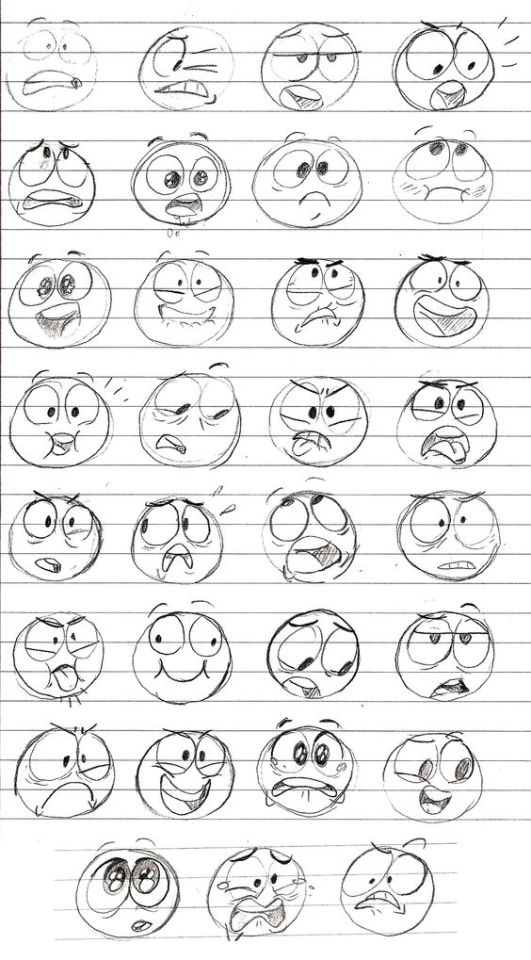
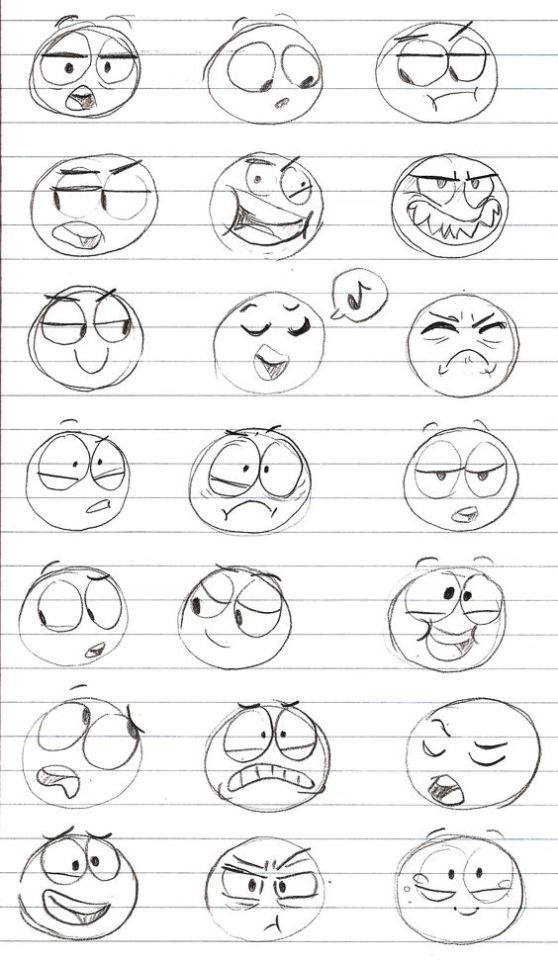
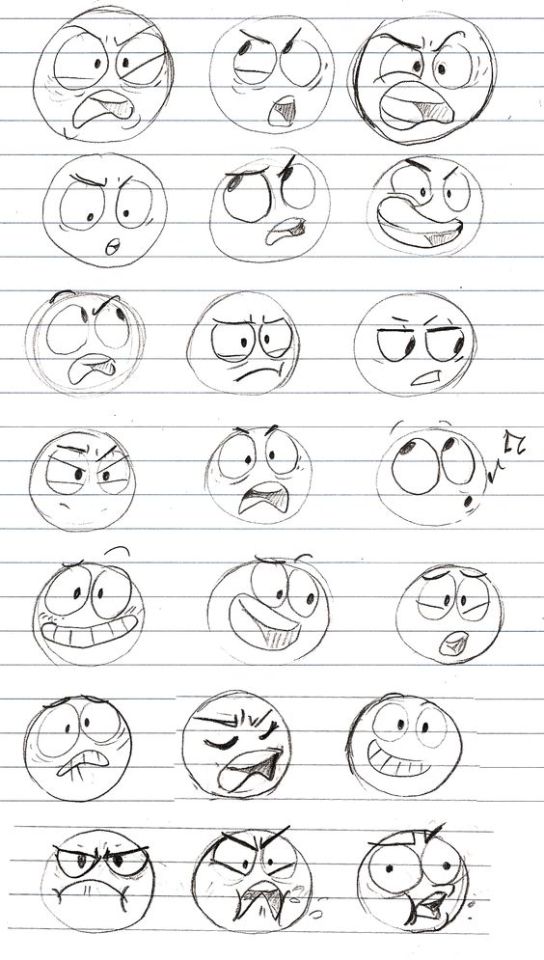


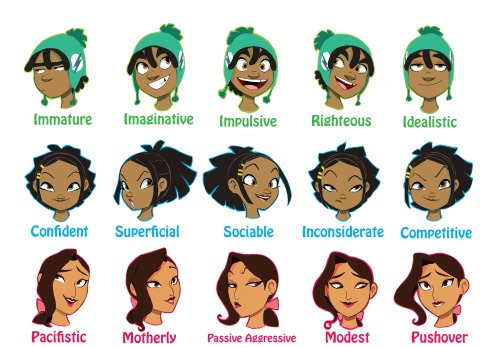
Facial Expressions Top Image Row 2 & 3 Row 4 Row 5: Left, Middle, Right Bottom Image (Source Unknown)

Wow so I just hit 2000 followers! I wanted to do something to celebrate, so I’m holding a *drumroll*


Thank y’all so much!! ;v; Text transcript under cut:
Keep reading
yesterday i reblogged a drawing resource that included how to draw hijabs - and it honestly wasn’t the best advice i’ve seen out there
now, i’m not an artist. but what i saw was a video that included hijab styles most of us don’t really wear and incorrect terminology surrounding niqabs and burqas (yes, there is a difference between the two)
so, i went searching and found a tutorial that i felt was better! these drawing guides and examples come from @/winchestermeg on twitter, and i think they’re really great 💕


this has more relevant examples and correct terminologies, and is drawn by a muslim woman
enjoy, artists of tumblr!


Today’s episode on the Powow Workshop (Formerly Stringbing Workshop), I introduce the animation breakdown, what it is, and how it can be used.
Please check out my patreon page and give it a support: https://www.patreon.com/StringBing
Gumroad (Buy exclusive tutorial material): https://gumroad.com/stringbing
Music: Boom de Boom - Aaron Lieberman FunkDown - MK2 Happy Mandolin - Media Right Productions


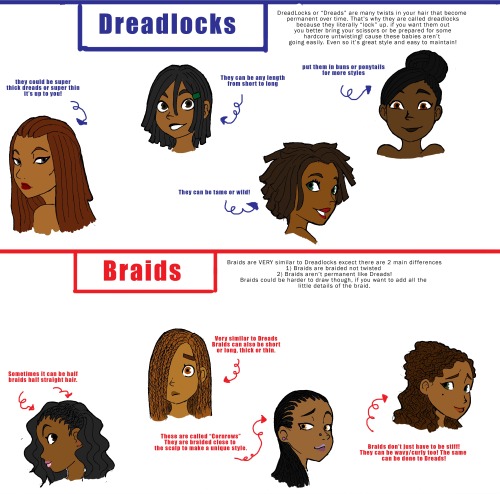


African-American Hair Styles in Depth Row 1 & 2 Row 3, 4, & 6 Row 5
-
 boredchaos liked this · 3 months ago
 -
 namelessmewmew liked this · 3 months ago
 -
 creativefandomtrash liked this · 3 months ago
 -
 snailwitdamail2 liked this · 3 months ago
 -
 mothzarellaman liked this · 3 months ago
 -
 blushflowerart reblogged this · 3 months ago
 -
blushflowerart liked this · 3 months ago
-
 big-pp-energy-ven liked this · 3 months ago
 -
 some-artist-thingie reblogged this · 3 months ago
 -
 theandroidshinx liked this · 3 months ago
 -
 mkplafy liked this · 3 months ago
 -
 lamarie-artsy reblogged this · 3 months ago
 -
 handercover liked this · 3 months ago
 -
 un-zoon liked this · 3 months ago
 -
 wolfyfox liked this · 3 months ago
 -
 bitter-like-coffee liked this · 3 months ago
 -
 angrybidoof reblogged this · 3 months ago
 -
angrybidoof liked this · 3 months ago
-
 casinocircus liked this · 3 months ago
 -
 thegreatdot liked this · 3 months ago
 -
 airdanteineblues liked this · 3 months ago
 -
 alexdrawings reblogged this · 3 months ago
 -
 curruidcoinhenn reblogged this · 3 months ago
 -
 justpickupthatpen reblogged this · 3 months ago
 -
 artref081 reblogged this · 3 months ago
 -
 jkeen100 liked this · 4 months ago
 -
 the-vampire-squid-from-hell liked this · 5 months ago
 -
 tootiredtocares-blog reblogged this · 5 months ago
 -
 puzzleglum reblogged this · 5 months ago
 -
puzzleglum liked this · 5 months ago
-
 giratinite liked this · 6 months ago
 -
 sashatheejade liked this · 6 months ago
 -
 chelsea-reference reblogged this · 7 months ago
 -
 cynicalraccoon reblogged this · 9 months ago
 -
 jasmine-tron liked this · 1 year ago
 -
 yami-mashida reblogged this · 1 year ago
 -
 thepoetjean-makes-stuff liked this · 1 year ago
 -
 holidayinrhodeisland liked this · 1 year ago
 -
 pinkabby2 liked this · 1 year ago
 -
 hinataelyontoph liked this · 1 year ago
 -
 pupcha liked this · 1 year ago
 -
 lemoppurple liked this · 1 year ago
 -
 speedypostcoffee liked this · 1 year ago
 -
 hydrangeahelper reblogged this · 1 year ago