Hips Tutorial by Bokuman


Hips Tutorial by bokuman
Support the artist on Patreon!
More Posts from Dubiasdead and Others
Question. Do you have any specific resources you used to learn art and painting, etc?? Your style and skill is so so good and I'd love to see how you Do It
oh, gosh. i dont think i could ever answer this question in a truly satisfying manner, but i’ll try my best to do it!
learning art in general has just been a road of trial and error for me! looots of trial and error. im a ‘self-taught’ artist & i’ve been drawing since i was a toddler, so i’ve accumulated certain skills just bc i’ve been doing it for so dang long
that being said, i’ll share some links in a moment! but first, some advice from me to you, anon. just.. go wild. try new things and dont set too many rules for yourself, yknow what i mean? nowadays i tend to use lots of weird textured brushes + work on only one layer (which i hear is quite bad for when youre working on commissions, but i paint for myself so i dont gotta worry about correcting things all the time), and as a person struggling w/ a pretty severe case of OCD, i find it so liberating to be Forced to not give a shit through that painting method. just have fun! allow yourself to be messy, to make mistakes, and remember that you can just paint over them later. some of your ‘mistakes’ might even end up being the things that make your drawing look more interesting/organic, in the end! the ‘happy little accidents’ mindset just makes the whole process much more enjoyable imo :]
ALSO, an important thing to me was finding the right brushes for painting. just dl a shit ton of the ones that look fun to you (or make your own if your drawing program allows it!) and make an effort to try out each and every one of them at least once!! the brushes certainly arent that important-- you could paint a masterpiece with a simple square brush-- but more often than not i find my style being subtly influenced by the brushes that i use at the moment. its a thing worth considering!
another thing i should note is that, while im mostly happy with my art nowadays, i AM still learning, and i dont think i’ll ever stop learning, so, like, check in in a couple of years for some better tips i guess asuhdfuashfusdf
anyways, here are some resources that are/were very helpful to me:
when i need to browse for general art tips/tutorials/cheat sheets/etc, i usually go here: [link 1], [link 2], [link 3], [link 4], [link 5],
now, here are some specific posts ive collected over the years that really made me rethink how i approach composition and the like in my, uh, more ‘serious’ paintings: [link 1], [link 2], [link 3], [link 4], [link 5]
this [link] video series is a Godsend, its got some very good advice AND its got nice editing too, my hellbrain was actually able to focus and learn smth from a video tutorial for once
heres a nice post about practice and improvement that you should deffo read before using all of these resources
i also find it very helpful to just.. look at art that inspires you/ that you find appealing Right before painting? that way all of the techniques you might pick up while staring at other peoples art will stay fresh in your mind, so you’ll be more likely to try em out. (setting a drawing that you really like as a phone/desktop bg works well too since youll inevitably stare at it quite often)
i also really like seeing other peoples process, so i tend to watch speedpaints/analyse process gifs & photosets a lot! seeing how messy and abstract most drawings are in the early stages of painting is really comforting/reassuring to me :] heres a couple for u: [link 1], [link 2], [link 3], [link 4], [link 5], [link 6], [link 7], [link 8], and finally, [link 9] and [link 10] (3, 9 and 10 are the ones that inspire me the most atm)
as a bonus, heres one from me as well! (usually i only post these on my patreon, but ik times are tough rn and any of your spare money could (and should) go to a far better cause) im putting it under a read more bc it contains blood and self-impalement, so beware! (bloodborne bosses, man) i might make a speedpaint in the future, too, so watch out for that!

How to help Amazônia:
You can donate to SOS Amazônia which is one among the 100 NGOs selected as “The Largest NGOs in Brazil”.
> > > ( ENGLISH: //doe.sosamazonia.org.br/en ) < < <

And remember: - 1 USD is 4,04 reais. - 1 EUR is 4,47 reais. If you donate only $2,50 USD (10 reais) you’re helping a lot.
If you donate only $2,30 EUR (10 reais) you’re helping a lot. About people saying “the minimum value is $10”: Even if you’re not from Brazil you can donate in REAL instead of donating in USD or EUR via Paypal, so… YES, you can donate less than 10 dollars or euros. (Just don’t change the currency to USD or EUR, Paypal converts your dollars/euros to reais.)

Please. Boost if possible, this is REALLY important.
Know what I’m salty about?
In all my art classes, I was never taught HOW to use the various tools of art.
Like yes, form, and shape and space and color theory and figure drawing is important, but so is KNOWING what different tools do.
I’m 29 and I JUST learned this past month that India Ink is fucking waterproof when it dries. Why is this important? Because I can line something in India Ink and then go over it with watercolors. And that has CHANGED the ENTIRE way I art and the ease I can create with.
tldr: Art Teachers: teach your students what different tools do. PLEASE.


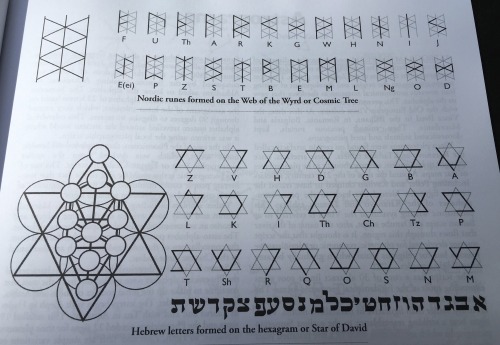
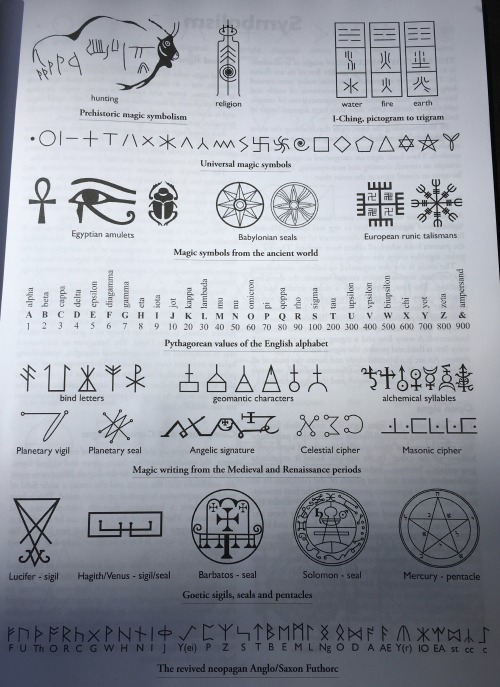


“Sigils, Ciphers and Scripts: History and Graphic Function of Magick Symbols” by M. B. Jackson (2013) - selected plates.
This book is highly recommended - it packs a very large amount of accurate information into its 64 pages.
“The world is language” - Terence McKenna.
At each level of experience there are various languages, codes and symbols that describe that level. The first step to improving your own state and that of others is to understand how these languages work. The next step is to start writing your own narratives, stories and texts in your language of choice.

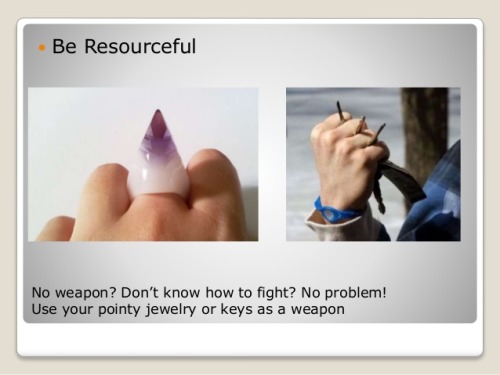
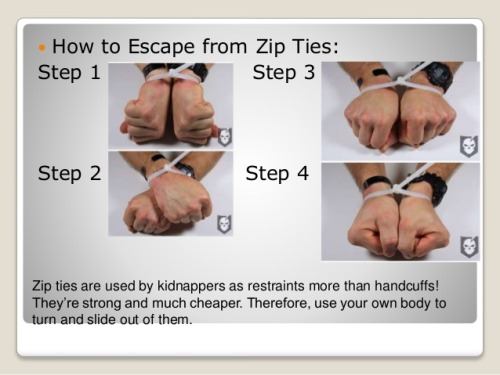


Step 1,2 3…. But, the best self defense is awareness.
The most popular feiyue shoes on: http://www.icnbuys.com/feiyue-shoes
follow back
What ARE Vanishing Points?
So I feel like a lot of confusion with drawing in perspective is because people are not taught the absolute basics properly? So let’s do that.
Let’s say we have a cube.
Now, a cube we know is made out of 6 squares or rectangles, and every edge is at a 90 degree angle.
so every opposite edge of a cube is exactly parallel, right?
but let’s say we draw a cube using only parallel lines:

this looks a little weird, you know? Like if i try think of this as an object in 3d space and i look at it for too long, the faces start to look really warped - with like the back looking bigger than the front as if its been made out of weird wonky trapeziums

so what’s going on here? if all those edges are exactly parallel, why does it look weird?
lets take a look at this photo of a railway track

Now we know that the rails on a track are always going to be parallel, they have to be the same distance apart so the train can stay on the track yeah?
But we can very clearly see that these tracks are converging to a single point in the photo.
So what does this tell us, exactly? That our view of the world is naturally warped, and that lines that are physically parallel when drawn in perspective will converge to a single point.
Now, I could call this image “one point perspective” - but that’s not really true,

if these lines are also parallel, then they must also converge to a single point in perspective, right? so lets add another point

clip studio paint automatically adjusts the horizon line to fit the new points you add to your perspective…. notice how the horizon line actually fits the photo better now?

our new point is a very very long way away, so we don’t notice a lot of difference in the angle between lines, but the point that i’m trying to make here is:
Drawing with perspective guides is not about choosing one, two, three point perspective etc. those are just quick ways to set up a certain viewing angle
What you are doing when you use these guides is making your parallel lines converge to a point.
So, if you want to draw a big ol’ cube that’s aligned to be parallel with these railroad tracks, then you can do that with the same point as the tracks - because it’s parallel. It’s on the same axis!

but what if you want to draw a cube that’s rotated, and isn’t parallel to the tracks?
well that’s not too difficult to do if you know that every point represents one set of parallel lines.
If these lines aren’t parallel to the ones you already have, then clearly you just need new points.
We’re not planning to tilt this cube up into the air, or rotate it onto its side, so we’re going to leave the vertical axis alone, and just move our horizontal points to a different place on the horizon line

But speaking of the vertical axis - the only points that will be on your horizon line are the ones that are flat on the ground. But you can still have points that are not on the horizon line!

This is important to remember because if you’re trying to draw something like a slope or stairs, something that has an incline, it’s not going to be level with your horizon.
Let’s draw some stairs as an example.

This is actually pretty simple - first draw where your slope starts and ends by drawing a big L shape.
this will give you some parallel corners, which you can then connect to make a new point for your slope

And with this you can then find the centre and divide that up into equal parts to make your stairs (http://lesbianlinkle.tumblr.com/post/176704472820)


So lets go back to our original cube, with the knowledge that our parallel lines should all converge to a point and draw it again

well, doesn’t that look better!
but also, now you know how to make a cube lean against its buddy like this

because we just make new points for the new parallel lines

Anyway I hope that clears some things up, and makes perspective easier to understand!
Also if these tutorials have been helpful and you’d like to support me, I do have a patreon & a ko-fi you can donate to :^)

Have a lazy Saturday
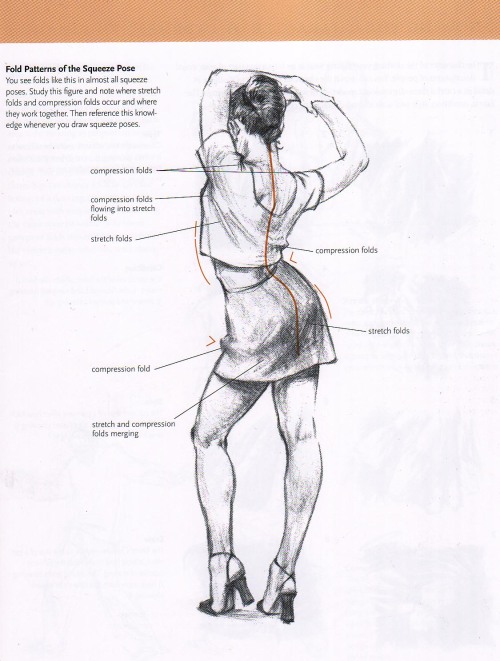
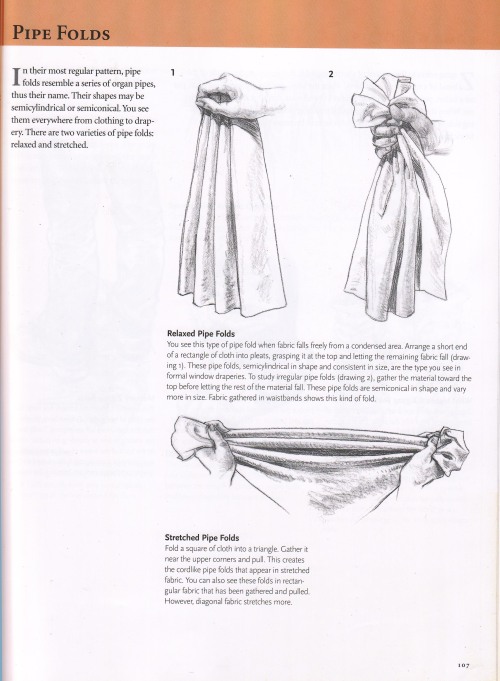
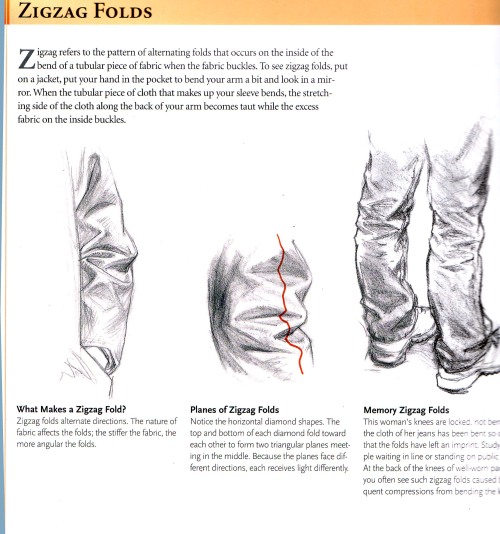
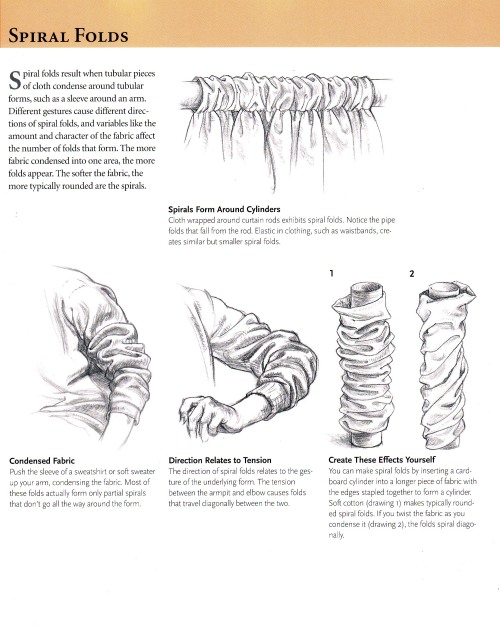
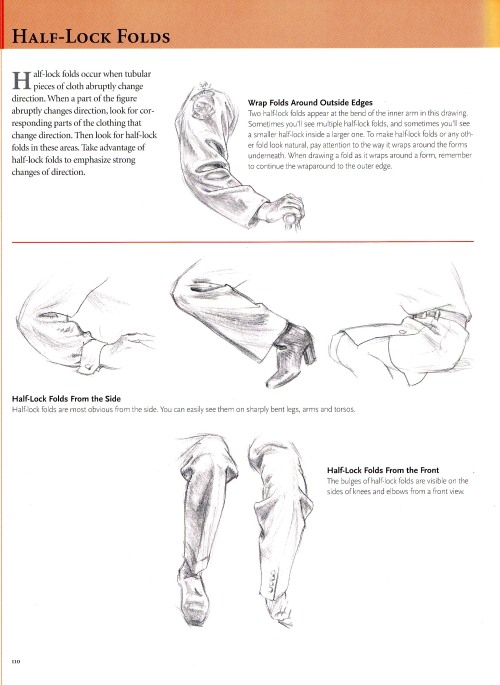
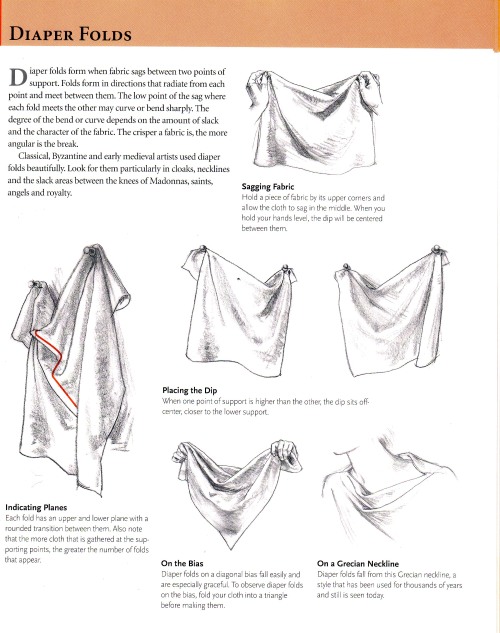
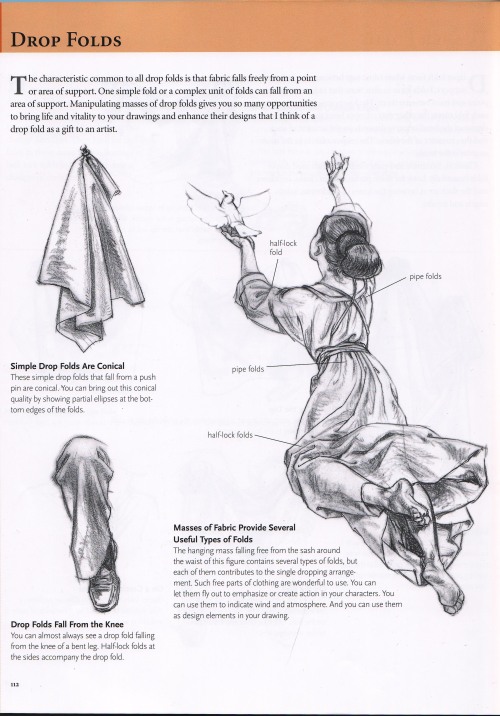
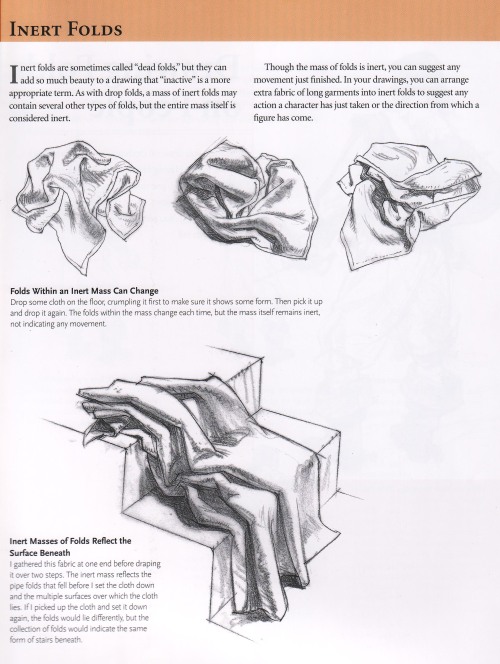
How to draw folds
Notes on how to draw folds back when I was teaching manga classes back in 2006. From the book “Drawing people” by Barbara Bradley.
http://www.amazon.com/Drawing-People-Portray-Clothed-Figure/dp/1581803591
This book has a very detailed description of 6 types of commonly seen folds and I think is one of the most educational resource on how to draw folds(Besides Vilppu and Bridgeman).
這是我以前教漫畫課程時給學生看的講義.來源是芭芭拉布莱德丽的"着装人物素描"<<上海人民美术出版社出版>>.
書裡講解了皺摺形成的兩個主要原理(拉扯與擠壓)以及因兩種作用力下形成的六種常見的皺褶類型.

The only way we can help
-
 crookednerddream liked this · 3 months ago
 -
 lestats-groupie liked this · 3 months ago
 -
 qqumka liked this · 3 months ago
 -
creampuff18 liked this · 4 months ago
-
 lmasterlong liked this · 4 months ago
 -
 loveasachoice liked this · 4 months ago
 -
 xxcuboidxx liked this · 5 months ago
 -
 tamobomb001 liked this · 5 months ago
 -
yellowmoth liked this · 6 months ago
-
 helloliriels liked this · 6 months ago
 -
 saith707 liked this · 7 months ago
 -
 haji-lin liked this · 11 months ago
 -
 artreferencesarchive reblogged this · 1 year ago
 -
 minihayalet320 liked this · 1 year ago
 -
 artrefsntutos reblogged this · 1 year ago
 -
 poppyglide liked this · 1 year ago
 -
 mar-chive reblogged this · 1 year ago
 -
fracturedsombra liked this · 2 years ago
-
 nopetorm64 liked this · 2 years ago
 -
 xqdormir liked this · 2 years ago
 -
 gwodricsworld liked this · 2 years ago
 -
 sylmitsu2 liked this · 2 years ago
 -
 floatinglilo reblogged this · 2 years ago
 -
 hydrangeahelper liked this · 2 years ago
 -
 sunnyqup reblogged this · 2 years ago
 -
 tinysoulz liked this · 2 years ago
 -
 tamethespaghetti liked this · 2 years ago
 -
 6jelene9 liked this · 3 years ago
 -
 mess-in-public liked this · 3 years ago
 -
 undertalenobody liked this · 3 years ago
 -
 lilthz-references reblogged this · 3 years ago
 -
 lxvesiickprince liked this · 3 years ago
 -
 tealeo reblogged this · 3 years ago
 -
 artdumppile reblogged this · 3 years ago
 -
 the-fancy-cookie liked this · 3 years ago
 -
 limikkin liked this · 3 years ago
 -
tutoriarts reblogged this · 3 years ago
-
artdumppile reblogged this · 3 years ago
-
 sylphy liked this · 3 years ago
 -
 05050301 liked this · 3 years ago
 -
 arundolyn liked this · 4 years ago
 -
crimsonviking95 liked this · 4 years ago
-
 jayonette reblogged this · 4 years ago