Do You Have Any Tips For Recreating The Deltarune Sprite Style?
Do you have any tips for recreating the Deltarune sprite style?
Hmm... I'm not entirely sure if I've got any 100% full proof tips for the style (nor will I pretend I'm an expert on the style), but I'll give what I can for ya! So, first up, for any given color on a sprite, I'd suggest only using two colors. One brighter highlight, and one darker base/tone. the shading in DR doesn't tend to get super complex, so most of the time having only two tones for a part should work super well. Bonus points if one or both of the colors are then reincorporated into other parts too, like using one section's highlight as a shade for another, or using the same shade for multiple colors.

Second, a few in-between pixels can help give depth to sprites. You ever see those one or two pixels in-between an outline and the base color, and it uses the same color as the shade? Well, those are in-betweens, and while UT and Lightworld style sprites don't tend to use them, the Darkworld sprite tends to have way more of them, and they help distinguish Darkworld sprites. Third, don't be afraid to use a different color than outright black for your character outlines. There are a lot of sprites that use pure black like Lightworld sprites or sprites for Darkners, but if you're making a darkworld sprite for a Lightner, than get a little creative. Use a very dark tint of whatever their main color is, and that'll help them feel like more of a lightner. It's not a hard-n-fast rule (Berdly uses a black outline despite being a lightner), but it's a tool that can be used.

Fourth, use plenty of ref material. Take other DR sprites, compare them to your work, see what might be different, how you could fix it, and just try your best. And finally, remember that DR's stlye isn't perfect, has plenty of imperfections, and that it's ok to go for designs that aren't super consistent. It's part of the charm in my opinion, because even if it's definitely improved since UT, the spritework is still obviously no Metal Slug or anything, and I kinda love it for it. If you've got differences or flaws between your sprite and the official style, just remember that the official DR sprites are also pretty inconsistent, so your problems might not even register as looking wrong. Sometimes it's even fun to embrace a sprite's initial mistake and then turn it into something amazing/fun. And so uh... yeah, there's my tips. Not really sure if it helped all that much, but I hope they do! If I'm being totally honest here, my style's actually more closely based upon the style of the Undertale mod Bits and Pieces, as it's what I originally was mimicking, and it just so happened to be conveniently similar to DR's style. These are a few character sprites that I made in the style of the mod, with these all being the winners of a contest the community had to get NPCs into the mod (and the final two are mine).

I'd also made some sprites in past that were for a game project I was helping out with. It never saw fruition, though the styled was obviously influenced by the Undertale style, but they were different and they were also... well, a little rougher considering I made them when I was just getting into pixel art. I still like them and I don't think I did too bad for at the time, but it definitely doesn't match my current style (plus, the project's kinda dead in the water anyways)


More Posts from Ardouradvice and Others


just saw another fic that completely misunderstood elementary schoolers. going to make a post as soon as my shift is done

Things That May Be Causing Your Writer's Block- and How to Beat Them
I don't like the term 'Writer's Block' - not because it isn't real, but because the term is so vague that it's useless. Hundreds of issues all get lumped together under this one umbrella, making writer's block seem like this all-powerful boogeyman that's impossible to beat. Worse yet, it leaves people giving and receiving advice that is completely ineffective because people often don't realize they're talking about entirely different issues.
In my experience, the key to beating writer's block is figuring out what the block even is, so I put together a list of Actual Reasons why you may be struggling to write:
(note that any case of writer's block is usually a mix of two or more)
Perfectionism (most common)
What it looks like:
You write one sentence and spend the next hour googling "synonyms for ___"
Write. Erase. Write. Rewrite. Erase.
Should I even start writing this scene when I haven't figured out this one specific detail yet?
I hate everything I write
Cringing while writing
My first draft must be perfect, or else I'm a terrible writer
Things that can help:
Give yourself permission to suck
Keep in mind that nothing you write is going to be perfect, especially your first draft
Think of writing your first/early drafts not as writing, but sketching out a loose foundation to build upon later
People write multiple drafts for a reason: write now, edit later
Stop googling synonyms and save that for editing
Write with a pen to reduce temptation to erase
Embrace leaving blank spaces in your writing when you can't think of the right word, name, or detail
It's okay if your writing sucks. We all suck at some point. Embrace the growth mindset, and focus on getting words on a page
Lack of inspiration (easiest to fix)
What it looks like:
Head empty, no ideas
What do I even write about???
I don't have a plot, I just have an image
Want to write but no story to write
Things that can help:
Google writing prompts
If writing prompts aren't your thing, instead try thinking about what kind of tropes/genres/story elements you would like to try out
Instead of thinking about the story you would like to write, think about the story you would like to read, and write that
It's okay if you don't have a fully fleshed out story idea. Even if it's just an image or a line of dialogue, it's okay to write that. A story may or may not come out of it, but at least you got the creative juices flowing
Stop writing. Step away from your desk and let yourself naturally get inspired. Go for a walk, read a book, travel, play video games, research history, etc. Don't force ideas, but do open up your mind to them
If you're like me, world-building may come more naturally than plotting. Design the world first and let the story come later
Boredom/Understimulation (lost the flow)
What it looks like:
I know I should be writing but uugggghhhh I just can'tttttt
Writing words feels like pulling teeth
I started writing, but then I got bored/distracted
I enjoy the idea of writing, but the actual process makes me want to throw my laptop out the window
Things that can help:
Introduce stimulation: snacks, beverages, gum, music such as lo-fi, blankets, decorate your writing space, get a clickity-clackity keyboard, etc.
Add variety: write in a new location, try a new idea/different story for a day or so, switch up how you write (pen and paper vs. computer) or try voice recording or text-to-speech
Gamify writing: create an arbitrary challenge, such as trying to see how many words you can write in a set time and try to beat your high score
Find a writing buddy or join a writer's group
Give yourself a reward for every writing milestone, even if it's just writing a paragraph
Ask yourself whether this project you're working on is something you really want to be doing, and be honest with your answer
Intimidation/Procrastination (often related to perfectionism, but not always)
What it looks like:
I was feeling really motivated to write, but then I opened my laptop
I don't even know where to start
I love writing, but I can never seem to get started
I'll write tomorrow. I mean next week. Next month? Next month, I swear (doesn't write next month)
Can't find the time or energy
Unreasonable expectations (I should be able to write 10,000 words a day, right????)
Feeling discouraged and wondering why I'm even trying
Things that can help:
Follow the 2 min rule (or the 1 paragraph rule, which works better for me): whenever you sit down to write, tell yourself that you are only going to write for 2 minutes. If you feel like continuing once the 2 mins are up, go for it! Otherwise, stop. Force yourself to start but DO NOT force yourself to continue unless you feel like it. The more often you do this, the easier it will be to get started
Make getting started as easy as possible (i.e. minimize barriers: if getting up to get a notebook is stopping you from getting started, then write in the notes app of your phone)
Commit to a routine that will work for you. Baby steps are important here. Go with something that feels reasonable: every day, every other day, once a week, twice a week, and use cues to help you remember to start. If you chose a set time to write, just make sure that it's a time that feels natural to you- i.e. don't force yourself to writing at 9am every morning if you're not a morning person
Find a friend or a writing buddy you can trust and talk it out or share a piece of work you're proud of. Sometimes we just get a bit bogged down by criticism- either internal or external- and need a few words of encouragement
The Problem's Not You, It's Your Story (or Outline (or Process))
What it looks like:
I have no problems writing other scenes, it's just this scene
I started writing, but now I have no idea where I'm going
I don't think I'm doing this right
What's an outline?
Drowning in documents
This. Doesn't. Make. Sense. How do I get from this plot point to this one?!?!?! (this ColeyDoesThings quote lives in my head rent free cause BOY have I been there)
Things That Can Help:
Go back to the drawing board. Really try to get at the root of why a scene or story isn't working
A part of growing as a writer is learning when to kill your darlings. Sometimes you're trying to force an idea or scene that just doesn't work and you need to let it go
If you don't have an outline, write one
If you have an outline and it isn't working, rewrite it, or look up different ways to structure it
You may be trying to write as a pantser when you're really a plotter or vice versa. Experiment with different writing processes and see what feels most natural
Study story structures, starting with the three act structure. Even if you don't use them, you should know them
Check out Ellen Brock on YouTube. She's a professional novel editor who has a lot of advice on writing strategies for different types of writers
Also check out Savage Books on YouTube (another professional story editor) for advice on story structure and dialogue. Seriously, I cannot recommend this guy enough
Executive Dysfunction, Usually From ADHD/Autism
What it looks like:
Everything in boredom/understimulation
Everything in intimidation/procrastination
You have been diagnosed with and/or have symptoms of ADHD/Autism
Things that can help:
If you haven't already, seek a diagnosis or professional treatment
Hire an ADHD coach or other specialist that can help you work with your brain (I use Shimmer; feel free to DM me for a referral)
Seek out neurodiverse and neurodiverse writing communities for advice and support
Try body doubling! There's lot's of free online body doubling websites out there for you to try. If social anxiety is a barrier, start out with writing streams such as katecavanaughwrites on Twitch
Be aware of any sensory barriers that may be getting in the way of you writing (such as an uncomfortable desk chair, harsh lighting, bad sounds)
And Lastly, Burnout, Depression, or Other Mental Illness
What it looks like:
You have symptoms of burnout or depression
Struggling with all things, not just writing
It's more than a lack of motivation- the spark is just dead
Things that can help:
Forget writing for now. Focus on healing first.
Seek professional help
If you feel like it, use writing as a way to explore your feelings. It can take the form of journaling, poetry, an abstract reflection of your thoughts, narrative essays, or exploring what you're feeling through your fictional characters. The last two helped me rediscover my love of writing after I thought years of depression had killed it for good. Just don't force yourself to do so, and stop if it takes you to a darker place instead of feeling cathartic
Oh my gosh. I just found this website that walks you though creating a believable society. It breaks each facet down into individual questions and makes it so simple! It seems really helpful for worldbuilding!
Dear downydig,
Any secret knowledge on how to do fluid and dynamic poses? (Btw, I love ur art!! So comfy and cozy!!!)
Sincerely, Paper-Starz
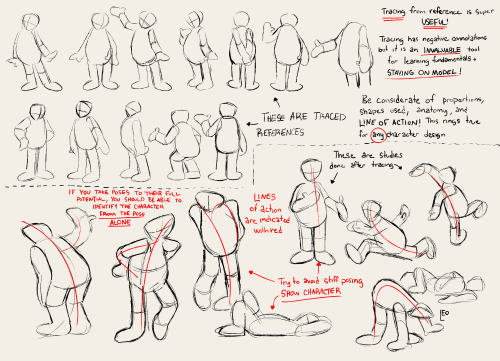
Hello hello! I have some advice! I did a thing on lines of action and the benefits of tracing in learning models a LONG time ago… the advice still holds up! Use shapes like ‘s’ curves, ‘c’ curves, and even sharper ‘U’s to give a fun fluid motion! Limbs and spine are the main help here, but the head sometimes comes into play ✌️
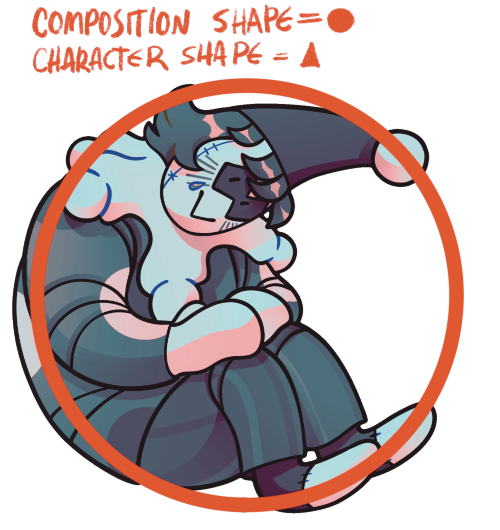
I have a little more to add, however! One of these pictures is my oc and the other is a king fu panda character but it’s still useful! When creating a pose, you can also use silhouette! Bonus points if the shape of the silhouette is different than the shapes that compose the character (in a way that matches the personality of course!)


SO! You've seen these little things I do sometimes and you want to know the process!


It's genuinely super simple, so here goes! Apologies by the way if anything is unclear or glossed over. A lot of this is personal taste and such so I hope this can be a nice boost to create something!

RESOURCES AND THINGS TO KNOW!
To preface this little guide already assumes you have basic knowledge of color distribution, lineless art, or breaking up art into proper layers for later processing! I am also assuming that your art program has access to scatter brushes and tiling textures. Personally I use Clip Studio Paint, but this can work on other apps. Anyways, here are some good sites for this:
EZGIF - Free, easy gif maker for assembling any kind of gif*! It also has stuff like converting those damn WEBP's back into png.
*PLEASE KNOW THAT YOU CANNOT MAKE GIFS THAT ARE PARTIALLY TRANSPARENT. YOU MUST USE A SOLID COLOR UNDER ANY PART THAT IS OVER BARE CANVAS
Transparent Textures - Free to use source for HQ transparent textures that tile! Amazing for finding a paper texture for these if you commit to the paper doll look. Best results for textures that are in white or black!
So! You have a finished, prepared piece that you want to glitterfy. Well I'm not covering that right now so you can scroll down to That part if you came just for the glitter. This next section is for...
PREPARING THE PAPER DOLL
To start, your piece should already be separated into respective layers in any order you'd like! We're about to use a ton of clipping masks so Make sure you know your program before starting! So, as my example we have my oc Roy, resized to around... 1500x1500 or the nearest equivalent Smaller is better because it brings out the texture! He looks a little ah...Flat, though right now?

I'm using this guy for a couple different reasons! Those being:
Roy has translucent bodyparts! Just so you will know what to do with characters who are translucent! I'll get to this in a moment so sit tight
He has a clear, defined, and distinct palette that is easy to pick a color to slap the glitter on! This is important because I personally find balance to be the most appealing part of the finished art.
He also just has a lot of doohickeys on his design.
This is where you need your transparent texture! You can use any kind of texture and I encourage experimentation and such, but I personally use a simple paper texture. What we are going to do is go through and clip our imported and tiled texture to each applicable layer! (Make sure to just Copy and Paste the layer you do NOT need to repeatedly go through this menu...)

And... When you are done, you should have something like this:

"But why don't I just clip the texture to the entire piece through a folder? Why go through the hassle of clipping to each individual layer?"
Well that's because of the next step, where we will be adding the shadows. If we don't clip each individual layer, your shadows will look like this example on the left which sort of just ruins the 3D effect and kinda just looks icky, as opposed to this, which is nicer and smoother.


Now I'm no lighting wiz! In fact I'm rather mediocre at best but some general tips for adding the shadows:
Try to keep your shadows going all in one direction mostly! It gives the effect of one light source and generally just looks better than if you shaded around ALL edges everywhere.
Try to only shade where there are parts overlapping that need the dimension! Overdoing it can make the piece look odd. It's especially helpful to separate any details like different shades of hair, layers of hair, etc so that you can put as much volume as you want.
Once the shadows are all added in you should have something that looks like this:

Which looks good! Now I'd sometimes stop here if I can't pinpoint how I'd like the glitter to sit or if I think the piece just doesn't need it, but we're moving on to the big important steps!
ADDING GLITTER
This part is entirely up to your taste! But I'll describe how I do my glitter stuff. Firstly I start out by identifying which color I want to pop out. For Roy here I chose the red parts! For your character it may be different. Experimentation is key!
This is also, however where you need that scatter brush I mentioned earlier. Personally I just use the default CSP spray brush, but again go wild!

Make a folder above your piece, set its blending mode to glow dodge (or add, or add glow depending on what options you have), and create three layers inside of this folder. Setting the folder to clip is optional right now but will be needed later.

Then, fill each glitter layer with your choice of particle in whatever color looks good! Yes, you can do gradients and other stuff on the particles too! World's your oyster.

^ Unclipped example of a glitter layer.
Glitter tips for the early 2000's webcore enthusiast:
Use different strokes and patterns for the glitter distribution! This helps it animate better by moving around. For example this time I went diagonally for the first, horizontally for the second, and then in loose circles for the third. Particle density and stuff is also completely up to you.
Use a color that would pop against the intended area! For Roy I used an orange-ish yellow since it compliments both blue and red.
So now we have the layers! This is where clipping is our best friend once again! You're just going to go in and clip the glitter to whatever layers you want it on. Entire folder, not just one of the layers!

Once that's all done, go through and toggle the respective glitter layer for the frame, saving individual copies when done. You should end up with 3 identical images with different glitter distribution.
"BUT WAIT! JONES, THE TRANSLUCENCY!!" I hear you call! Yes, this is where we handle that! If your character is NOT translucent, you can scroll past this section.
Open up your frames all in one canvas, stacked on top of eachother (no jittering or slight displacement! ON TOP of eachother!)

Our layout should look something like this...Note how the translucent parts are rather hard to see, well if you took your frames and put them in EZgif, they'd be gone entirely! That's because you physically cannot have a partially translucent gif due to technology limitations. So an easy little cleanup thing I did was:
1. SELECT THE CANVAS AROUND THE CHARACTER WITH THE MAGIC WAND TOOL. Do not have any expansion settings on or it probably won't look right in the end.

Make sure you do not miss any gaps! I personally missed the gap between the arm, leg, and lanyard and I had to redo this next step...
2. SELECT -> INVERT SELECTION


3. FILL SELECTION WITH THE DESIRED COLOR. IT MUST BE OPAQUE. I personally picked this cloudy gray color.

You can now save individual frames of your character with the fill so that they don't go bald when you move on to the next step! Again, you should have 3 frames.
FINISHING UP
This is nice and easy. Upload your three frames into EZGIF and wait for it to process. It'll look like this if you're in the right place.

Once things have loaded, make sure to change the settings to the following:
FRAME DELAY: 0 (this is how fast the frames move.)
DON'T STACK FRAMES: ENABLED
You can play around with this but I generally leave everything else alone because you don't need it. Just hit the make a gif button and you're all done!

Aaaand that's it! If you've read this far...Firstly thank you for dealing with my rambliness and horrible explanation skills. Secondly, I hope that this can come in handy for anyone interested! Would love to see if anyone puts this to use. n_n


I was asked by a friend yesterday if I could offer basic tips about comic paneling. As it turns out, I have a lot to say on the matter! I tried breaking down the art of paneling using the principles of art and design, and I hope it helps you out!
EDIT: uh uh there are a lot of people reblogging this, so i figure i may as well append this now while i can lol
This whole thing was very much cranked out in a few hours so I had a visual to talk about with a friend! If this gives you a base understanding of paneling, that's awesome! Continue to pull in studies from the comics you see and what other artists do well and don't do well! You can tell paneling is doing well when the action is flowing around in its intended reading format.
Here's the link to the globalcomix article from which I pulled the images about panel staggering! Someone sent in a reblog that it wasn't totally clear that the 7th slide mostly covers what NOT to do in regards to staggering, and that is my mistake!
I saw in a tag that someone was surprised I used MamaYuyu too, and I don't blame them lol. If I had given myself more than a couple hours maybe I would have added something else on, I just really admire MamaYuyu's paneling personally.
uh uh, final append: I am by no means a renowned master of paneling, so if you find anything off base here, by all means, counter it with your own knowledge and ways you can build upon from here! Art is always a sum knowledge of everything we find. 💪
-
 mentodento liked this · 5 months ago
 -
 taboo-delusion liked this · 5 months ago
 -
 pineappleudh liked this · 5 months ago
 -
 anounomus21 liked this · 6 months ago
 -
 ardouradvice reblogged this · 6 months ago
 -
 jay-break75 liked this · 6 months ago
 -
 petra-creat0r liked this · 6 months ago
 -
 spoonbreakerofspoons liked this · 6 months ago
 -
 bamthefox liked this · 6 months ago
 -
 sbtorms liked this · 6 months ago
 -
 mrchaosman reblogged this · 6 months ago
 -
mrchaosman liked this · 6 months ago
-
 thetiredcheese liked this · 8 months ago
 -
 theghostadrift liked this · 10 months ago
 -
 rdorica liked this · 11 months ago
 -
 gigisworlds liked this · 1 year ago
 -
 killthebug reblogged this · 1 year ago
 -
 the-fancy-cookie liked this · 1 year ago
 -
 ye-old-references reblogged this · 1 year ago
 -
 grimaussiewitch liked this · 1 year ago
 -
 arathergrimreaper reblogged this · 1 year ago
 -
 holoanarchy reblogged this · 1 year ago
 -
 universalconection liked this · 1 year ago
 -
 g0nefischin liked this · 1 year ago
 -
 yybhhuu liked this · 1 year ago
 -
 slugsketches liked this · 1 year ago
 -
 macrowdu reblogged this · 2 years ago
 -
macrowdu liked this · 2 years ago
-
 princessvoidd liked this · 2 years ago
 -
 alleeles liked this · 2 years ago
 -
 noelle-the-sleepy liked this · 2 years ago
 -
 starstandby liked this · 2 years ago
 -
 karbobarbo liked this · 2 years ago
 -
 pinecones476 liked this · 2 years ago
 -
 blackjack-otter13 liked this · 2 years ago
 -
 totallynotthecrystalskull reblogged this · 2 years ago

sideblog for @letardoursprout so i have somewhere to collect all the tutorials/advice that i likeicon by lovelyshiz. header by hexh-pixel
66 posts