
embroideryinspoooooo
40 posts
Latest Posts by embroideryinspoooooo

Dark Science #154 - Through My Eyes
Y'know, I'm starting to think Kim may have been overlooking something...
Patreon | Gumroad | Store | Ko-Fi | Paypal

Pia Valentinis, Autostrada
Dear @samme_stitch on Instagram has finished the test stitching of my pattern Fox The Wanderer, and now It's ready to be published for Sale =)


A PDF file of cross stitch embroidery of Fox 140x109 crosses 26x20cm Full crosses, 1/2, 3/4 crosses, back stitch 64 colours, 1 blend Price: $9
You can contact me to buy it here directly, or use Etsy (link in bio lol)
Enjoy!
by threadhandedjill
Been developing new cross stitch patterns! The colour tests take a while, but worth it in the end 😁🪡
Scroll to complete the lil' gecko in his terrarium 👇

Almost.. 👇

...
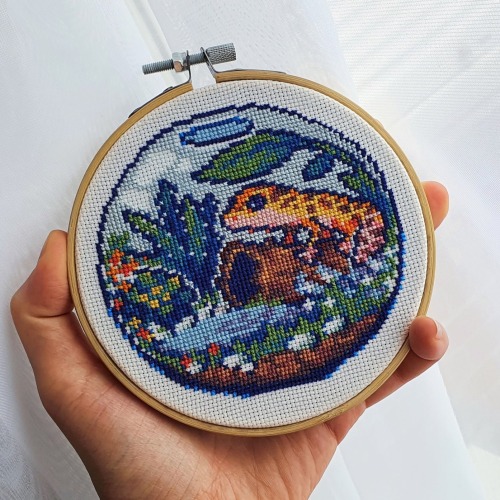
You did it! 🥳


Rose’s portrait from Steven Universe
Pattern is by me and can be found here :)


I don't think I've been uploading any of my crafts onto this blog! How dare I! This is my first cross stitch project* and I'm quite happy with how it turned out! I learned that it's a LOT more work than anticipated, but devilishly fun to do.
I added the little extra bit of changing the stars to glow in the dark. Best decision ever! Pattern from 2x2StitchArt on Etsy


Literally 5 years in the making, mostly because I haven’t touched a needle for four of those.
Kits by Riolis.
A fun (and a bit annoying) thing these kits make you do is combine two different colours of thread for one stitch. You can see this in the blue half-stitches above the branch and in most of the pink stitches.


Space Craft! Make NASA-Inspired Creations for World Embroidery Day
It’s time to get crafty with some needle and thread. At NASA, we hope to inspire art of all kinds. To highlight #WorldEmbroideryDay on July 30, we want to know: does our imagery inspire you? Show us your art and we may feature it on social media.
How?
Search for a NASA image that inspires you. Here are a few places to get you started: Hubble, James Webb Space Telescope, Ocean Color, Landsat and Earth Observatory
Create. Over the years, we've seen a growing number of embroidered pieces that showcase our organization's research, especially with needlepoint.
Share your creation, along with the image it was inspired by, on social media using the hashtag #NASAEmbroidery. We will share selected pieces on July 30 for World Embroidery Day
Why?

NASA imagery has many functions. From studying distant galaxies to tracking ocean health, our scientists use these images to not only monitor our home planet, but better understand life beyond our solar system.
Embroidery is an ancient craft that has experienced a revival over the years. It involves decorating fabric or other materials using a needle to apply thread or yarn. Have you recently taken up embroidery? What images are you inspired by? We’d love to see it.
Image Resources for #NASAEmbroidery Inspiration
NASA Images
Hubble Image Gallery
NASA’s Ocean Color Image Gallery
James Webb Space Telescope
Landsat Image Gallery
Create and Share Your #NASAEmbroidery
Take a picture of your piece and upload it to Twitter, Instagram, Tumblr or Facebook. Make sure you use the hashtag #NASAEmbroidery so we know that you are taking part in the event and make sure that your privacy permissions allow us to view your post.
If the piece catches our eye, we may share your work on NASA’s main social media accounts as well as theme-related ones. We may also feature your art in a NASA Flickr gallery and our Tumblr pages. We’ll contact you directly to grant us permission to feature your work. You can follow @NASA on Twitter, Instagram and Facebook for embroidery creations, which will be featured from July 30-Aug. 1
Make sure to follow us on Tumblr for your regular dose of space!
DECAY IS AN EXTANT FORM OF LIFE


Edit; sold! Commissions open


Embroidered tunic I made for my lawyer.

LOOK at this embroidery
stitched by samsquatch1590 on reddit
pattern by NOMADembroideryCo on etsy
A lot of my embroideries have been circulating tumblr without credit so hoping posting them here myself will help people find my silly art!


IT'S DONE! Finally finished my stained-glass embroidery version of the Tower card from DA:I's tarot :)
This one was both simpler than my Hierophant design (less busy so less sections, simpler background divisions, smoother lines/shapes) and also more complicated (taught myself vector art so I could print the design onto the fabric instead of hand drawing/transferring, I had to dye my own dark red and grey threads, which are used for the wolf + the figure and some of the background). I'm happy with how it turned out, just gotta add a hook to the wall so it can hang with the others. And I still need to finish figuring out my design for The Hermit--that one has been the hardest to transition to this style so far.
(also, I am very tentatively thinking about taking embroidery commissions later this summer. if that's something you're interested in feel free to let me know, though be warned the large illustration style are like 35-50 hours to complete and would be expensive)
It's the tail end of poppy season.


Embroidery Art // Petit Cercle

candle embroidery :) first time embroidering on black fabric, it looks much cooler


Embroidered Moth Earrings // Viva Embr


y'all said such kind words about my dad's crewel work so here are more pictures!


These are before he started putting himself and Addie (the doggo) into each one. I think my favorite is the one with the lavender fields but I'm also a big fan of the one with the stripey rocks =D


made more cross stitch patterns of my art !~ available here


Happy World Embroidery Day! Sharing one of my favourite pieces: my Jupiter red spot embroidery, inspired by this NASA Hubble Space telescope series of images, showing the interaction of the huge storms, red spots merging back in 2008: https://www.nasa.gov/mission_pages/hubble/science/hst_img_20080717.html

🦐🦐🦐🦐🦐🦐🦐🦐
Patterns here


Embroidery Art // Byebrucinar
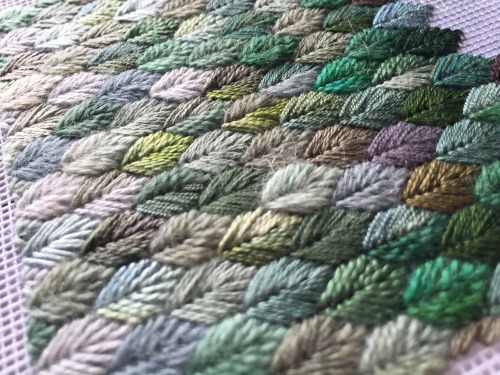
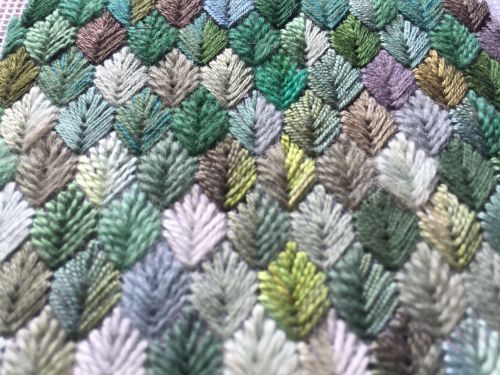
Current stitching.
Yes I know, this leaf stitch again. Yes, I know, soft greens and greys again. Sometimes you have an itch you just gotta scratch over and over.
Had a few folks interested in how I made the patches I posted for Solarpunk Aesthetic Week, so I thought I'd give y'all my step-by-step process for making hand-embroidered patches!

First, choose your fabric and draw on your design. You can use basically any fabric for this - for this project I'm using some felt I've had lying around in my stash for ages.

Next, choose your embroidery floss. For my patches I split my embroidery floss into two threads with 3 strands each, as pictured. You can use as many strands in your thread as you prefer, but for the main body of my patches I prefer 3 strands.
Next you're going to start filling your design using a back stitch.

First, put in a single stitch where you want your row to start.

Poke your needle up through the fabric 1 stitch-length away from your first stitch.

Poke your needle back down the same hole your last stitch went into so they line up end-to-end.
Repeat until you have a row of your desired length (usually the length of that colour section from one end to the other). Once you have your first row, you're going to do your next row slightly offset from your first row so that your stitches lay together in a brick pattern like this:

Make sure your rows of stitches are tight together, or you'll get gaps where the fabric shows through.
Rinse and repeat with rows of back stitch to fill in your patch design.

When you're almost to the end of your thread, poke your needle through to the back of the fabric and pull the thread under the back part of the stitching to tuck in the end. Don't worry if it looks messy - no one's gonna see the back anyway.
This next step is fully optional, but I think it makes the patch design really pop. Once your patch is filled in, you can use black embroidery floss to outline your design (or whatever colour you want to outline with - it's your patch, do what you want). I use the full thread (6 strands, not split) of embroidery floss to make a thicker outline.

I use the same back stitch I used to fill the piece to make an outline that adds some separation and detail. You could use most any 'outlining' stitch for this, but I just use back stitch because it's just easier for me to do.
Once you're finished embroidering your patch, it's time to cut it out!

Make sure to leave a little border around the edge to use for sewing your patch on your jacket/bag/blanket/whatever, and be careful not to accidentally cut through the stitches on the back of the patch.
If you have a sturdy enough fabric that isn't going to fray, you can just leave it like this. If not, I recommend using a whip stitch/satin stitch to seal in the exposed edges (I find that splitting your embroidery floss into 3-strand threads works best for this).

And then you're done! At this point you can put on iron-on backing if you want, or just sew it on whatever you wanna put it on. Making patches this way does take a long time, but I feel that the results are worth it.
Thanks for reading this tutorial! I hope it was helpful. If anyone makes patches using this method, I'd love to see them! 😁
does tumblr like short vids? here’s an embroidery hoop that i finished recently after about a year of on & off work 🏡💕