He’s Right Ya Know


He’s right ya know
More Posts from Dubiasdead and Others
This is a really easy way to further help the #BlackLivesMatter movement! Youtuber Zoe Amira made an hour long video and all you have to do is play it on an ad-blocker free browser. All of the revenue generated from the video will be donated to different blm organizations depending on time of need. So if you’re at home and you’re busy with something else, this is really simple to do!
Anyone have the gif’s of the Chilean goalkeeper Christiane Endler lifting two of her teammates with ease.
I need them for um reasons lol
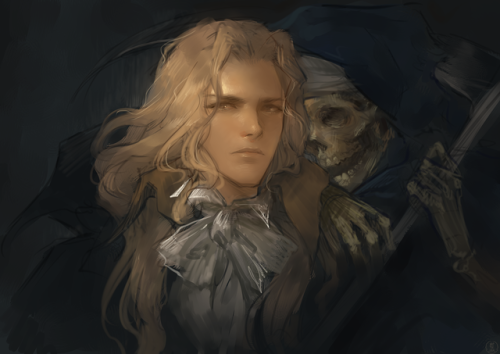
Castlevania painting(/v/ drawthread request)


Do you like Mario RPGs? Paper Mario? Do you like stories about the power of friendship? If so, have I got something for you!
I made a huge set of color keys based off the game Super Mario RPG: Legend of the Seven Stars, a game that I’ve really loved since I was a teen. This is a super self indulgent project that is very much an interpretation from the heart, so I hope you enjoy it as much as I do!
Below is a link to where you can download (click the download icon in the top right corner of the google page!) and read it! Thank you!
https://drive.google.com/open?id=14gbceNpdkB380knvofHFhnfRqSlS8xUl
(If the PDF quality is fuzzy, just zoom out once, and back in again to make it load!)
my favorite clip studio assets!
since i’ve been using csp a lot more now i thought i’d make a post of the assets i use the most for ppl looking for good stuff!
general brushes: Pen + Caspar Pen (かしペン+カスレかしペン) (my fav pen for sure) Erase Along Edge (YOU NEEED THIS ERASER YOU NEED IT!!!) Freehand Style Brush Set (フリーハンド風ブラシセット) (cant recommend this one highly enough, i use it for all my backgrounds) Bong pen OBONGBONG’S PEN Halftones (スルスル塗れる5線刻みトーンブラシ) A non-shin pen (しんでないペン) SU-Cream Pencil Noisy Ink Brush v2 Simple Retro Halftone Brushes Smeared Paintbrush (べっとり絵筆) A breather pen (一息ペン) Aj’s Pencil Set Watercolor set (수채화 세트) T-marker Wind Brush Set (Tマーカー風ブラシセット) Watercolor marker ▲ ■ and texture set (水彩マーカー●▲■とテクスチャーセット)
special effect and decorative brushes: Tights Pen (タイツペン) Glitch Brushes 2 (彩塵ブラシ(Prism Dust) Hand-painted effect set No. 2 (手描き効果セットNo.2) Oriental Emblem 11-20 (동양 문양 11-20) (this creator has so many amazing assets ive downloaded them all) Ribon brushes (りぼんブラシ) Lace Set レース セット Ornate lace Bramble (rose-玫瑰叢) Loose hand-painted sprinkle brush (ゆるゆる手描きのふりかけブラシ) Bush pen (수풀 펜) Fantasy Papers Pearl Brush (真珠ブラシ)
gradient maps: Gradient map set for hologram (홀로그램용 그라데이션 맵 세트) Yunywave★ Gradient Set cb gradients 3 ONG SET
3D: The Only Perspective Grid You Need! 3d sketch head Movable horse 1.8 A (可動のお馬 1.8a) Sitting poses collection (便利かもしれない座りポーズ集)
misc: Raiku RGB Shift Hand-drawn Rags tool Set (手描きのボロ線ツールセット) VHS action set
Just when you thought you knew everything about boobs… NSFW?


My darling friend Chizzi mentioned that there are a lot of booby tutorials out there are just predrawn boobs with the artist going HEY LOOK! HERE ARE SOME BOOBS! but not many that actually talk about the anatomical structure, and where to put the lines. I was like, “Hey, I can probably whip something up.“ And so I spent my thanksgiving making this.
Proportions probably aren’t exact, but I did my best. I also didn’t explore the various body types, but perhaps I could do a separate tutorial someday. I hope you find this tutorial useful :)
All photo references used in the tutorial were found on The Drawing Script. Credits to each photo belong to their respective owners.


Here’s a project I’ve been working on for a bit! I wanted to do mock color keys, so I decided to take something pre-existing and make scene keys for it, which ended up being kirby 64! Kirby is simple, so he makes for a good canvas to use different schemes and lighting. I totally recommend doing color keys of a game or movie; I really learned a lot about decision making from doing this!
Webcomic tips
In the conclusion for now, some things I’d really recommend doing if you’re seriously considering making a webcomic (or really a comic in general). Some of these don’t really apply to strips or gag-a-day type of comics, but I’m not talking about those here.
1. Write down ideas\sketch stuff, LEGIBLY. “I’m gonna remember it later” NEVER works. And if you scribble it somewhere on a piece of paper, you’d better scan it or retype in one doc later, because tiny notes always get lost among other doodles in my skethbooks.

(i know it’s hard to keep everything clean and organized, but this mess is just not productive)
If your project is a collaboration, save your conversations. If you’re working alone, make a blog for your ramblings. You have no clue what tears of relief I cry when I open that blog and rememeber I don’t have to painstakingly look through my heaps of sketchbooks and folders for a tiny idea I’m not even sure I wrote down a few months ago.
2. Inspiration folders, or even better, inspo blog with tags also help with collecting and remembering ideas. Color schemes, landscapes, style inspirations, atmospheric stuff, maybe some photo references, all those neat things.

3. Basic tier: character design sheets. Top tier: common poses, expressions. God tier: outfits they wear throughout the comic. Holy cow tier: turnaround sheets for all those outfits.

(I’d die trying to find good pages for references without these)
4. If you haven’t finished detailing the plot, don’t even think about moving on to drawing the comic. You’re gonna regret it when you come up with a really cool plot element that can’t be incorporated anymore because you’ve already drawn all the parts you could’ve tweaked.
5. Don’t just define the plot, make a script. Writing down the lines and the brief description of the actions serves me fine:

(notice that I approximately divided the pages & the text that’d go to each panel on a page)
6. Hard mode: make thumbnails for all the pages, if possible. At least whenever a new chapter starts.
7. If your story involves some convoluted chronology shenanigans, you’d better write down the events of your timeline in the chronological order.
8. Backgrounds. You can’t avoid them, bro. Like half of the comics are backgrounds, especially if your story involves a lot of adventuring and looking around. I know it hurts, but you’ll have to become friends with them. Read some tutorials, practice on photos, go out and sketch some streets, use 3d programs (like Google Sketch) to understand the perspective, use sites like houseplans to visualize your buildings better, I don’t know. Just be prepared for their imminent evil.
9. If you’re drawing digitally, pick a brush size for the lines and stick with it. You don’t want your lines and detail levels to look all wonky and inconsistent in different panels. And I don’t mean the cool stylistic varying lines, I mean this:

Also, things on the background should have thinner and/or lighter lines to avoid distraction. Usually less details too, unless you’re making a busy background with a simple foreground to help it pop out. Or wanna draw the attention to an object on the bg.

10. Readable fonts. Even if you chose to ignore people with poor sight or dyslexia, the majority of your readers aren’t gonna be excited about struggling to decypher this:

Also, as much as I love my black speech bubbles, colorful text on black still kinda hurts the eyes. I wouldn’t recommend doing that for all the characters. Black speech bubbles are usually used for creepy, inhuman voices. And yes, having a colorful outline in this case helps.
11. Probably newsflash, but did you know that panels have their place, order and functions? They do! My favourite thing ever is how I used panels when I was like 12:

(comics ain’t rocket science, but this one is)
The composition of the panels and word balloons always serve for a better reading experience. They guide your eyes over the page, so that you never feel lost or confused. The images in the comic equal frames in a movie, so it’s pretty damn important in what order you look at things and how quickly you can understand what’s going on!

(Eric Shanower & Scottie Young’s Wizard of Oz)
12. One update a week is fine for testing waters. Don’t overestimate yourself, especially if you have a pretty busy life outside it. A stable comic that updates slowly, but regularly is better than an unpredictable erratic one. You can always pick up the pace later, if you feel confident enough.
13. Try to always have a buffer - a couple of pages in reserve. If you’re making the pages much faster than you’re updating, this shouldn’t be a problem. But if those paces are equally the same, it’s goddamn HARD. But on the other hand, if something happens and you skip an update, those come in handy.
If you’re looking at this list and thinking “wow that’s a LOT of work”, you’re totally right. And it’s okay to be intimidated at first! But that’s why it’s important to start with something small. Once you get the formula down, these things will be natural to you.


Since Toffee knows how it all turns out, he could have done this.
Amazing Nature Phenomenons
ᴋᴀᴡᴀʜ ɪᴊᴇɴ (ʙʟᴜᴇ ᴠᴏʟᴄᴀɴᴏ) ɪɴᴅᴏɴᴇsɪᴀ

ᴛᴜʀǫᴜᴏɪsᴇ ɪᴄᴇ: ʟᴀᴋᴇ ʙᴀɪᴋᴀʟ-ʀᴜssɪᴀ

sᴜᴘᴇʀᴄᴇʟʟ sᴛᴏʀᴍ

ɢʀᴇᴇɴ ғʟᴀsʜ sᴜɴsᴇᴛ

sɴᴏᴡ ᴄʜɪᴍɴᴇʏ: ᴍᴏᴜɴᴛ ᴇʀʙᴜs-ᴀɴᴛᴀʀᴛɪᴄᴀ

sᴋʏ ᴘᴜɴᴄʜ

sᴛʀɪᴘᴇᴅ ɪᴄᴇʙᴇʀɢs:ᴀɴᴛᴀʀᴛɪᴄᴀ

ʟɪɢʜᴛ ᴘɪʟʟᴀʀs

sᴀʟᴀʀ ᴅᴇ ᴜʏᴜɴɪ (ʀᴇғʟᴇᴄᴛɪɴɢ ᴅᴇsᴇʀᴛ) ʙᴏʟɪᴠɪᴀ

ᴍᴀᴇʟsᴛʀᴏᴍ

ᴇʏᴇ ᴏғ sᴀʜᴀʀᴀ:ᴍᴀᴜʀɪᴛᴀɴɪᴀ

ғɪʀᴇ ʀᴀɪɴʙᴏᴡ

ᴘᴏʀᴏʀᴏᴄᴀ (ɴᴇᴠᴇʀ ᴇɴᴅɪɴɢ ᴡᴀᴠᴇ) ᴀᴍᴀᴢᴏɴ ʀɪᴠᴇʀ-ʙʀᴀᴢɪʟ

ᴀᴜʀᴏʀᴀ ʙᴏʀᴇᴀʟɪs

ɢʀᴇᴀᴛ ʙʟᴜᴇ ʜᴏʟᴇ:ʙᴇʟɪᴢᴇ

ʀᴀɪɴʙᴏᴡ ᴇᴜᴄᴀʟʏᴘᴛᴜs ᴛʀᴇᴇs

sᴛᴏɴᴇ ғᴏʀᴇsᴛ:ᴍᴀᴅᴀɢᴀsᴄᴀʀ

ᴄᴀᴛᴀᴛᴜᴍʙᴏ ʟɪɢʜᴛɴɪɴɢ (ɴᴇᴠᴇʀᴇɴᴅɪɴɢ sᴛᴏʀᴍ) ᴠᴇɴᴇᴢᴜᴇʟᴀ

ᴍᴀᴍᴍᴀᴛᴜs ᴄʟᴏᴜᴅs

ᴡʜɪᴛᴇ ʀᴀɪɴʙᴏᴡ

ᴜɴᴅᴇʀᴡᴀᴛᴇʀ ᴄʀᴏᴘ ᴄɪʀᴄʟᴇs

ʙɪᴏʟᴜᴍɪɴᴇsᴄᴇɴᴛ ᴡᴀᴠᴇs

ᴍᴏʀɴɪɴɢ ɢʟᴏʀʏ ᴄʟᴏᴜᴅs

ᴠᴏʟᴄᴀɴɪᴄ ʟɪɢʜᴛɪɴɢ

ɴᴀᴄʀᴇᴏᴜs ᴄʟᴏᴜᴅs

ʀᴀɪɴʙᴏᴡ ᴍᴏᴜɴᴛᴀɪɴs:ᴄʜɪɴᴀ

ʟᴇɴᴛɪᴄᴜʟᴀʀ ᴄʟᴏᴜᴅ

-
 kissyslut liked this · 2 months ago
 -
 nminz0 liked this · 3 months ago
 -
 joyful-soul liked this · 7 months ago
 -
 sprinkles257 liked this · 10 months ago
 -
 verytriumphtimetravel-blog liked this · 11 months ago
 -
 thedeadspiral liked this · 1 year ago
 -
 mugwumpnoodles666 liked this · 1 year ago
 -
 h3mogoblinz liked this · 1 year ago
 -
 you-are-forever-special reblogged this · 1 year ago
 -
you-are-forever-special liked this · 1 year ago
-
 mopiiiii liked this · 1 year ago
 -
 grainhoarder liked this · 2 years ago
 -
 crazyfangirlofeverything4 reblogged this · 2 years ago
 -
crazyfangirlofeverything4 liked this · 2 years ago
-
 jazzystar123 liked this · 2 years ago
 -
 hoffmancallhoffman liked this · 2 years ago
 -
 uselessbuthappy liked this · 2 years ago
 -
 anacarojim14 liked this · 2 years ago
 -
 magnushammersmithh liked this · 2 years ago
 -
 karvevapen liked this · 2 years ago
 -
 riley-cool liked this · 2 years ago
 -
 3ufhiuwguifh2iu liked this · 3 years ago
 -
 gogomeaty reblogged this · 3 years ago
 -
gogomeaty liked this · 3 years ago
-
 vitouseless liked this · 3 years ago
 -
 uraviriot liked this · 3 years ago
 -
 sheepvomit liked this · 3 years ago
 -
 vriskasimpnation liked this · 3 years ago
 -
 trickstermoon584 liked this · 3 years ago
 -
 haveiverrossedyourmind liked this · 3 years ago
 -
 fleshcube2000 liked this · 3 years ago
 -
 benthino reblogged this · 3 years ago
 -
benthino liked this · 3 years ago
-
 generickitten liked this · 3 years ago
 -
 h4zardb4stard liked this · 3 years ago
 -
 slashes-and-bashes liked this · 3 years ago
 -
 b1op-sy liked this · 3 years ago
 -
 fugophobic liked this · 3 years ago
 -
 stefi-the-ghoul liked this · 3 years ago
 -
 forgiveness-in-the-misery reblogged this · 3 years ago
 -
 pusantheamazonian reblogged this · 3 years ago
 -
 peachie-ghoul liked this · 3 years ago
 -
 demmysworld liked this · 3 years ago
 -
 gafflar liked this · 3 years ago
 -
 mimthan liked this · 3 years ago
 -
 somethingsomethingdrawings reblogged this · 3 years ago