Elizabethan Jewelry Chains
Elizabethan Jewelry Chains
Let’s talk Elizabethan shiny things!


Left: Portrait of a Nobelwoman in a cartwheel ruff, attributed to John Bettes the Younger, 1585 Right: Portrait of a Lady Aged 21, Unknown Artist, c.1590
Specifically, I want to talk about jewelry chains. They were often worn just like necklaces, but they were also draped around the shoulders or draped in loops at the front of the bodice. They could be extremely long – one found in the Cheapside Hoard was 8 feet long!
These chains are featured heavily in portraiture from the 16th and 17th centuries, and thanks to the Cheapside Hoard, we have quite a few extant examples of these jewelry chains.

The Cheapside Hoard was found during the demolition of a house near St. Paul’s Cathedral, back in 1912. As they broke through the floorboards of the house and into the much older basement, they discovered a cache of over 500 pieces of late Elizabethan and early Stuart-era jewelry. The jewels featured emeralds from Columbia, diamonds and rubies from India and Burma, ancient Egyptian and Byzantine jewels and coins, as well as delicate gold and enamelwork crafted by the goldsmiths in London. At the time, Cheapside was London’s main shopping center and the home to the majority of the goldsmiths. It’s thought that the hoard was buried to keep it safe, possibly during the English Civil War.
I set out on a hunt to find jewelry bits that resembled the links we see in the Cheapside Hoard pieces. Amazingly, I came across some suitable pieces on AliExpress!


Left: Chain from AliExpress Right: Detail of Cheapside Hoard chain, Museum of London
I didn’t set out to copy any one chain from the Hoard, but instead used the shapes and sizes of those chains to help guide me while I was buying my bits and pieces.

Finding the suitable pieces was really the most difficult part of making these chains. Once everything arrived, assembly was quick and simple.

I ended up with quite a variety of finished chains. None of them are as long as their cousins in the museums, but I think they’re a good start to my Elizabethan jewelry collection, and will definitely grace the front of many a bodice at future events.


Bibliography:
Cheapside Hoard Chains, London Museum —Enameled Chain of Flowers, Bows, and Leaves https://www.londonmuseum.org.uk/collections/v/object-119591/enamelled-chain-of-flowers-bows-and-leaves/ —Enameled Floral Chain https://www.londonmuseum.org.uk/collections/v/object-119585/enamelled-floral-chain/ —Diamond and Enamel Chain https://www.londonmuseum.org.uk/collections/v/object-119584/diamond-and-enamel-chain/
Cheapside Hoard Chian, V&A Museum —Chain, 1590-1620 https://collections.vam.ac.uk/item/O74076/cheapside-hoard-chain-unknown/
Forsyth, H. (2013). London’s Lost Jewels: The Cheapside Hoard. Philip Wilson Publishers.
Wheeler, R. M. (1928). The Cheapside Hoard of Elizabethan and Jacobean Jewelry. Antiquity: A Review of World Archaeology, 2(8). https://www.cambridge.org/core/journals/antiquity/article/abs/the-cheapside-hoard-of-elizabethan-and-jacobean-jewellery-by-r-e-mortimer-wheeler-london-museum-catalogues-no-2-1928-1s/1E585E583A88D8B55DB29EE30B85D79E
Ganoksin. (2016, October 19). The Cheapside Hoard – Ganoksin jewelry making community. https://www.ganoksin.com/article/the-cheapside-hoard/
Hackenbroch, Y. (1941). A jewelled necklace in the British Museum. The Antiquaries Journal, 21(4), 342–344. https://doi.org/10.1017/s0003581500048381 https://www.cambridge.org/core/journals/antiquaries-journal/article/abs/jewelled-necklace-in-the-british-museum/965C70079702E42C7096519CBF7A8470
More Posts from Clusterfrock and Others

The Párisi Udvar in Budapest, Hungary. Arcade/department store/ galleria built 1907-1913, in a mix of styles- venetian gothic, orientalism, jugendstil, renaissance.
Happy National Bat Day! Here’s a happy little bat embroidery pattern from the 1632 pattern book “The Schole-House for the Needle.”

Victorian painting of a 17th century scene, with excellent seasonal vibes

Laura Theresa Alma-Tadema (English, 1852-1909)
At the Doorway
Stripes, my beloved, I see you there.

Revue de la Mode, Gazette de la Famille, dimanche 26 septembre 1886, 15e Année, No. 769
Print maker: A. Chaillot; Printer: P. Faivre; Paris
Collection of the Rijksmuseum, Netherlands
Keep reading


This project is finally finished! I started this dress back in July '24, thinking that I had plenty of time to finish it before my trip to Dickens on the Strand in December. Of course, I grossly underestimated my ability to get distracted, so I was, as is tradition, finishing this dress up in the hotel room the first night of the event. But hey, at least it was finished!
Things started with the skirt, which was based off several designs I kept seeing in 1850s fashion plates that have tiered skirts with ruffles on them. I had always slated that amazing plaid fabric for something mid-Victorian, and the ruffles seemed like a good way to accent such a busy fabric, and to help keep fabric usage down, as I only had 9 yards of the plaid.


The ruffles were attached to a plain black panel, which was then attached to a plaid panel, which was gathered onto the skirt base, which was also made of plain black taffeta.


I hadn't decided on a bodice design when I first started, and when it came time to make it I was definitely in a time crunch, so it's pretty much a straight make of Truly Victorian's TV440. The front closes with hooks and thread bars, but I ended up making it slightly too small, which led to gapping over the bust. I didn't have time to fully address this before the event, so I made a fichu in black taffeta that I could wear to cover it.

To make the fishu, I traced the back bodice pattern onto the fabric, then just drew in the tails in chalk. I mocked it up in cotton first, and then cut it out in taffeta. If I were to do it again, I would remember to put the taffeta on the bias so it would stretch over my bust correctly. The taffeta was also super slippery on top of the bodice, which was also taffeta, so even though I intended to wear it like a sontag, as seen above, I ended up wearing it with the tails down in front.

The undersleeves were finished in the hotel room just before my first event. You can't really see them in any of the pictures, but they definitely helped make the outfit feel complete, and I didn't have my naked forearms flapping around for all the world to see!
There's a much more in-depth writeup on my main costuming blog, including a lot of skirt math!
Hello, yes, it's me with three 1850s transformation gowns, a wrapper, and all the accessories for them, all needed just five months from now.
“How’s your WIP going?”

"Have you made any progress?”

“How close are you to being done?”

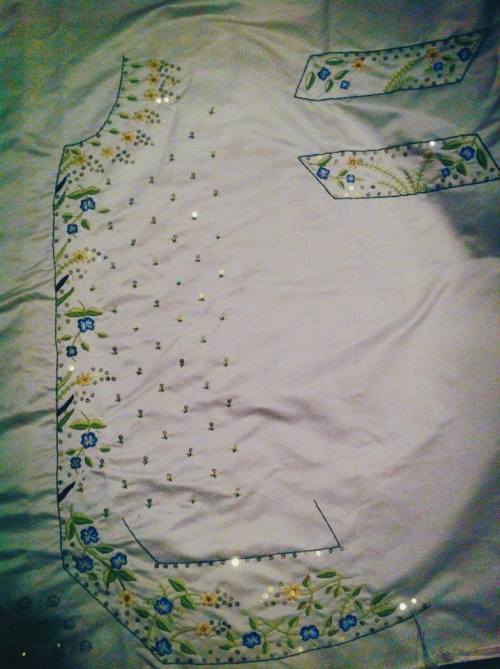
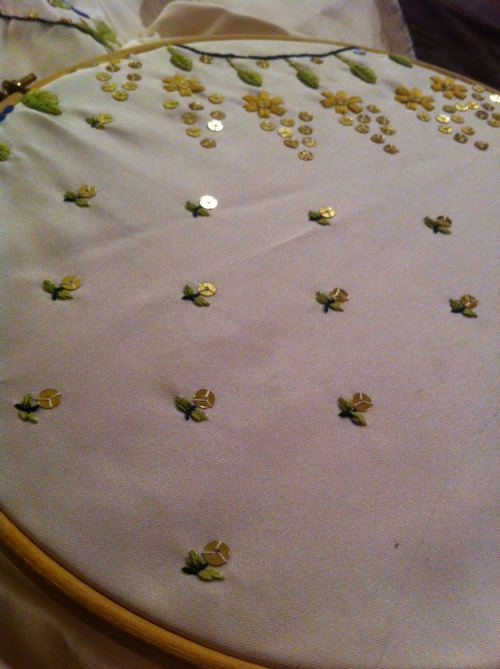
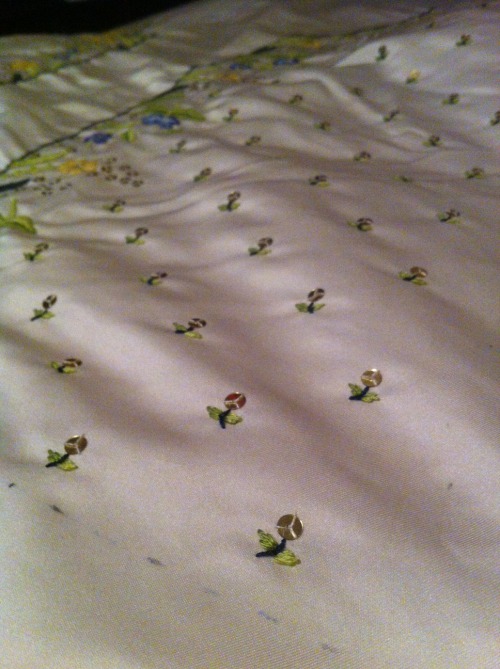
The fill pattern on one half of the waistcoat is finished! Tonight I’ll work on the other side and the remainder of the embroidery on the second pocket flap, and hopefully have all the embroidery wrapped up by tomorrow. Then it’s on to construction!


Back in 2015, I made this skirt for an 1860s ballgown. I wanted to make a daytime bodice to give the gown more wearability outside of formal events, but I had run out of fabric and since the fabric had lived in my stash for years, it had been discontinued long ago. I had a minor fabric miracle when I discovered some similar plaid taffeta on Etsy! I scooped it up and decided to make an 1850s bodice, since tiered flouced skirts like this were super popular then.
This bodice ate fabric, and I think I used three or four yards in total because the sleeves are massive and multi-layered. There is a black lace/fringe trim on the bodice, which you can’t see very well in pictures but is lovely in person.
The cap and bodice were made to accompany the new ensemble. The cap is made entirely from things found at Walmart, and the materials for the bonnet came from my fabric stash.
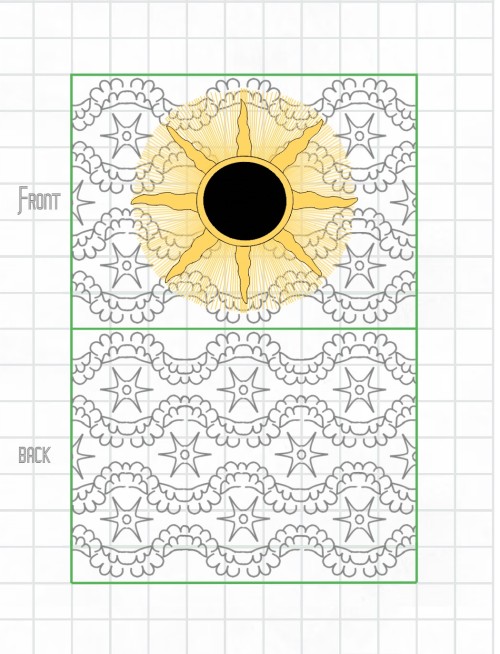
Had a last minute notion to make an Elizabethan-inspired embroidery pattern to celebrate the eclipse. I originally thought of doing a coif pattern, but thought the eclipse would get lost in the folds of the cap, so I ultimately went with a sweet bag. Since it was cloudy throughout totality, I thought it would be fun to incorporate the stars & clouds embroidery from a c.1600 waistcoat at the Bath Fashion Museum. The sun design is inspired by various period illustrations of sun motifs, minus the face they always seemed to put on every sun/moon design because I just couldn't make it not look silly.
I have no idea what stitches I would use for this bag, since sweet bags tend to use all sorts of different stitches. The original stars & clouds design is in blackwork, but I haven't seen any evidence of blackwork used on sweet bags. I'd probably do the background in a black or darkest blue metallic gobelin stitch (also ahistorical, but pretty!), the clouds/stars in silver stem stitch, the corona and rays in satin stitch or plaited braid, and the moon in black detatched buttonhole or some other fill stitch. Or I'd do the entire thing in blackwork except the corona and rays of the sun, which I'd do in gilt, documentation be damned.
-
 gothicmagpie reblogged this · 1 month ago
 -
 spadesandaces liked this · 1 month ago
 -
 cabinet-of-crafts liked this · 1 month ago
 -
 sadviper liked this · 1 month ago
 -
 darkandstormydolls liked this · 1 month ago
 -
 rowzien liked this · 1 month ago
 -
 asmallshark-blog liked this · 1 month ago
 -
 gothic-lottie liked this · 1 month ago
 -
 mintyscuriocabinet liked this · 1 month ago
 -
 sakon76 reblogged this · 1 month ago
 -
sakon76 liked this · 1 month ago
-
 sarraceniacrafts reblogged this · 1 month ago
 -
 fantacyjunky liked this · 1 month ago
 -
 clusterfrock reblogged this · 1 month ago