FREE ART PROGRAMS
FREE ART PROGRAMS
So recently I came across a fellow artist who was struggling to find a free art program, and considering dropping the large amount of money for a Photoshop license. I know not everyone can afford such an expensive program, so I’ve compiled a list of programs with no cost to download and use.
Keep in mind all computers are different, so not all will work for everyone. Also, I’ve only ever used Windows, so for the most part, I’m not sure if everything will work for Mac. if in doubt check the website linked.
Photoshop CS2 - (Windows, not sure about Mac.)
FireAlpaca - (Windows and Mac)
Sketchbook Copic Edition - (Windows and Mac)
GIMP - (Windows) (Mac)
Paint tool SAI [cracked] - (Windows) (Mac)
Paint tool SAI 2 beta - (tumblr post on said program)
iPaint - (Mac)
Paintbrush - (Mac)
Pencil - (Windows, Mac)
Paint.NET - (Windows)
Seashore [still in development, ver 0.5] - (Mac)
ChocoFlop - (Mac)
Inkscape - (Mac and Windows)
ArtRage [Demo] - (Mac and Windows)
OpenCanvas 1.1[must pay for 2.0] - (Windows, not sure about Mac.)
MyPaint - (Windows)
Krita - (Windows)
Vectorian [Supports Animation] - (Windows)
Pixia[Japanese, some English versions] - (Windows)
Asperite - (Windows)
Chasys Draw IES - (Windows)
SmoothDraw - (Windows)
TwistedBrush Open Studio - (Windows)
BOUNS - CTRL+Paint [Great for teaching all kinds of stuff, like how to use digital programs.]
If you know more free programs, please add onto this!
More Posts from Artrefforsteph and Others


This is very old but I found it again and I still like it. Amazing.
All my vampires have their own set of pointy teeth óuò. My babies.
Quick CLIP STUDIO PAINT trick
If you’re like me, then you guys love shading your sketches or lineart. Like this:

But if you erase a bit and shade more with black on low opacity it’ll look all wonky so you use the color picker. Or hell you scan or take a photo of a drawing you made on paper. But then this happens if you wanna put color under it!

Oh no! Now I have to set it to multiply to color it in! And then I can’t color in the lineart! :(
Fret not, my dear friends! I found the solution! Go to [Edit] > [Convert brightness to opacity]

And suddenly you have this:

This way you don’t need to set the lineart to multiply and can color it in! It also works perfectly, if you use this nifty little trick on traditional drawings that you scanned.
I hope this helped you guys, because I sure as hell didn’t know about this until yesterday! ♥

Low Light Likeness - Submitted by AstronomyForTwo
#a3a0a8 #514d8c #3b1287 #190f42 #0f031c
the single greatest cloud brush I've worked with so far oh my god
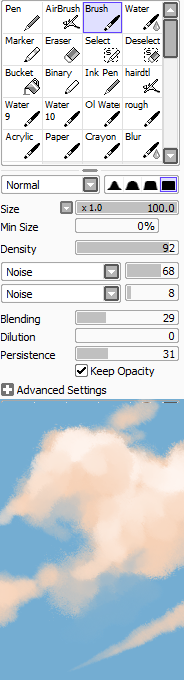
just adjust opacity and size depending on how crisp lines you want
this shit took like 10 minutes
Why Krita is Awesome: A Collection of Reasons Why This Program is Worth Taking a Look At
Krita is a painting program that has been around for a while, and in the last few years, underwent major changes and improvements. Because of these improvements, many artists are using it not just because it is free, but because it offers amazing features. These are by no means all of the great things Krita has to offer, but simply some of my favorite features of the program.

1. The Brush Engines.
Yes, engines. As in plural. There are many. And they all do different things. There is no way you could possibly capture all of its possibilities with one screen shot, but here are just some of the possibilities. Along side standard round, square, and shape, and textured brushes, there are brushes that smear, blend, and create interesting abstract strokes. There are brushes for filters, and one of my favorites, the Experiment Brush, which is basically a pre-filled lasso tool.
Brushes also support weighted smoothing, or brush stabilizers.

This is incredibly useful for line art. And while I do not usually use this feature, it is something that I feel many programs are lacking, such as Photoshop.
But its brushes aren’t the only thing about Krita with variety.

2. Color Selector Customization.
Whether you prefer something basic, or something more complicated, Krita will likely have what youre looking for. You are not likely to find yourself missing your other program’s color wheels. There are even more options than this, and other color selectors.

Gotta love that customization.
Krita also has some great naviation tools.

3. On the fly rotation, zoom, and brush sizing.
With krita, zooming, rotating, and brush size scaling are all smooth, and dynamic with the use of hot keys. These are features I miss when in other programs. To zoom, Ctrl+Middle mouse button, hover over the screen to zoom in and out. The same with shift rotates (press the ‘5’ key to reset rotation). Holding down shift and draging your brush on the canvas dynamically changes its size, allowing you to see the change, and get the exact size you want without brackets. Brackets also work, if that’s what you are used to. Krita also has highly customizable hot keys.

4. The Pop Up Pallet
The pop up pallet is a set of your 10 favorite brushes (which you can edit), and a built in color wheel that appears when you right click on the canvas. It is incredibly useful for switching between those few brushes that you use in almost every picture.

5. Real time, seamless tiles creation.
Pressing the W key in Krita will infinitely tile your canvas, and allow you to work real time on simple to complex tiled images. You can zoom in and out to see how your tiles work form a distance, and paint freely to create seamless artwork easily, without having to check using filters and manually tiling. Very usefull for patterns, backgrounds, and games.

6. The Symmetry Tool
This one goes without saying, Krita supports both horizontal and vertical symmetry, along with a brush that is capable of radial symmtry with as many directions as you like.

Go nuts, kid.
There are many more reasons why this program is awesome. And it is only going to get more awesome. And the coolest thing about it, is that it is 100% free. So go check it out! There’s nothing to lose. Krita isn’t for everyone, it can be hard to get the hang of, and it is not meant for photo editing, it is a program completely focused on digital painting from start to finish.
Give it a go and see if Krita is the program for you.

made another one of those palette challenge things, i wont be taking requests for it rn but feel free to reblog this and have ur followers challenge you
ya can repost it on other websites or w/e but for the love of god credit me, i even made it easy for u and slapped my url right on the top so u cant say u forgot who made it
WACOM TABLET DRIVER NOT FOUND - What Do
So, you put your Windows computer to sleep for the night. You come back the next day all eager to wake it up and put it right to work on that thing you’ve been working on and ….
Oh no - you’ve seemed to have lost all pressure sensitivity and high resolution pen tracking! Well, you figure, why not go check the driver settings. Maybe it’s just groggy and needs a little morning reminder? You go to your Control Panel, click on Wacom Properties Configu—
Ah.
Now, you figure, all is lost and there’s only one thing left to do: save your work, close all your programs, and do a full system restart. What a fun time this is.
But HOLD ON! There’s another way! Try this out first before pulling the plug:
Open your Start menu (or press the Windows Key) and simply type “Services”. There will be an icon at the top of your list which appears to be two small gears with the name “Services.” Click that and look what happens next:
Scroll down the list and select “Wacom Professional Tablet Service” from the list of services and click the little “Restart” link in the column to the left. Now simply wait for the service to stop and start itself back up again!
If for some reason, clicking this little “Restart” button makes matters WORSE, the failsafe approach is the manual restart. Double click the “Wacom Professional Tablet” service and a window will pop up.
Manually stop the Wacom driver by clicking the Stop button. Wait for it to shut down, then start it back up again with the Start button once it becomes visible. Once restarted, click OK!
Test your Tablet now in Photoshop. You may have your pressure sensitivity fully restored!
IF NOT, simply close and reopen Photoshop, which will be nice and quick since it (and your work) are still loaded into recent memory. Yes, this isn’t IDEAL, but it surely beats having to close EVERYTHING and restart the whole computer. Especially if you were listening to a good tune at the time.
Now, providing you’ve done it correctly, (really now, how could you not,) you should find your Wacom’s pressure and tracking sensitivity fully restored! AND you’ll have access to the Tablet Properties config app once again!
Celebrations! For discovering such a wonderful little time saver.
:: ADDENDUM ::
As pointed out by Addleton there is a permanent fix for this issue by disabling the service called “TabletServicePen” if you’re using an Intuos/Bamboo or “Tablet PC Input Service” if you’re using a Cintiq.
Disabling this will stop this issue for good – but it will disable all Windows-related tablet functions such as flicks and handwriting, and may make some software such as SAI misbehave on certain hardware. If all you use your tablet for is Photoshop and drawing, it’s probably best you disable those services.
-
 reynsh reblogged this · 1 month ago
 -
reynsh liked this · 1 month ago
-
 adviansimaginarium liked this · 1 month ago
 -
 kizuki-reblogs reblogged this · 2 months ago
 -
kizuki-reblogs liked this · 2 months ago
-
 junktapus liked this · 2 months ago
 -
 elisadevelon liked this · 2 months ago
 -
 mapleflavoreddice liked this · 2 months ago
 -
 kepar-xv reblogged this · 2 months ago
 -
 slingbees reblogged this · 2 months ago
 -
 oversizedblacksweaters reblogged this · 2 months ago
 -
oversizedblacksweaters liked this · 2 months ago
-
 corvidbrainz reblogged this · 2 months ago
 -
 deathlaw reblogged this · 2 months ago
 -
 blueethquakeinternet liked this · 3 months ago
 -
 acookiedragonblog reblogged this · 3 months ago
 -
 gayglitterqueen liked this · 3 months ago
 -
 catagory8 reblogged this · 3 months ago
 -
 ladyofmisfortune liked this · 3 months ago
 -
 stitched-rabbit00 reblogged this · 3 months ago
 -
stitched-rabbit00 liked this · 3 months ago
-
 meepedout reblogged this · 3 months ago
 -
 jurkats reblogged this · 3 months ago
 -
jurkats liked this · 3 months ago
-
 balmz liked this · 4 months ago
 -
 muffinsandviolence liked this · 4 months ago
 -
 nezjazz reblogged this · 4 months ago
 -
 itsagayhumannn12 liked this · 4 months ago
 -
 anotheraznative liked this · 5 months ago
 -
 mojonoah liked this · 5 months ago
 -
 lucecitaagos liked this · 5 months ago
 -
 thewhooshyone liked this · 5 months ago
 -
 ungato-con-internet liked this · 5 months ago
 -
 anna5skcc liked this · 6 months ago
 -
 joey-tangerine reblogged this · 6 months ago
 -
joey-tangerine liked this · 6 months ago
-
crypnox reblogged this · 6 months ago
-
 annauef3o liked this · 6 months ago
 -
 sadlyserendipityxo liked this · 6 months ago
 -
 unlizardlike-behavior liked this · 6 months ago
 -
 mkm11490 reblogged this · 6 months ago
 -
 helloliriels liked this · 6 months ago
NSFW because there will probably be nude refs | this is a side blog to sort all of the art stuff I need | none of it is mine
151 posts