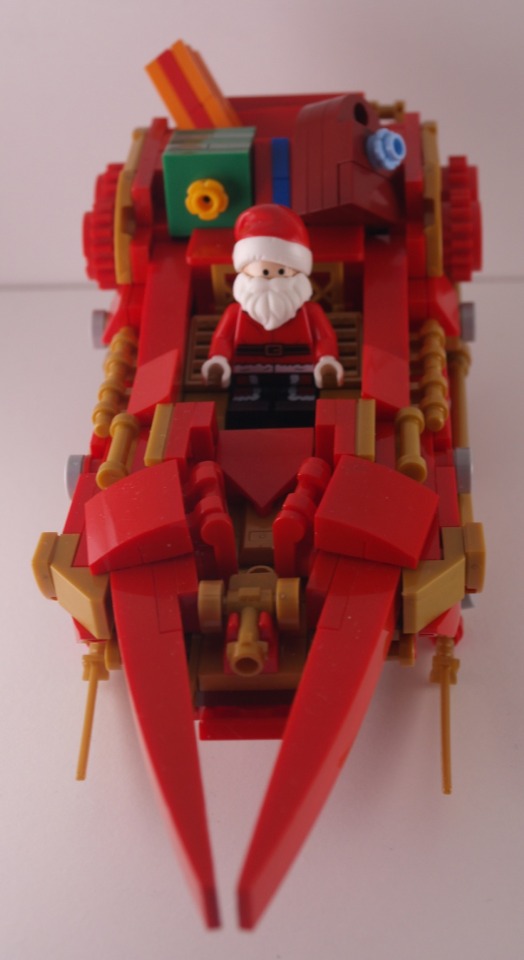
✨Santa’s Sleigh !✨

✨Santa’s sleigh !✨
I showed last week the Christmas tree I made last year, now is time for what I did for 2023 !
Closeups and commentaries beneath the cut !
Sleigh closeups :


Reindeers closeups :


Santa :

SO. Had a lot of fun with that one. The sleigh doesn’t have much exciting parts, except the blades, which are actual blades (Ninjago sabers, to be precise). The back is filled with presents from top to bottom, so they can be rearranged to give a different look each time it’s put together.
The part connecting the sledge to the reindeers probably could use the help of an iron wire to keep its shape (a neath technique I’ve used for a flower in another one of my builds to make the bendable pieces stronger), and the threads between the reindeers is a very cheap finition, but in my defence, I was on a time limit.
Reindeer-wise, I’ve hesitated whether to give them all a red nose, but they didn’t look nearly as cute without. And the antlers, I must admit, are very unsteady, because they’re illegally connected, but this was the best way to keep a small overall shape.
Finally, the Santa minifig was probably, and surprisingly, one of the hardest parts of this MOC, because the parts I stole borrowed to other minifigs were spread in multiple places, and I didn’t have one of the official Santa minifigs. So most of the piece come from different Star Wars advent calendars (mostly Darth Vader and C-3PO).
More Posts from Antrylis and Others

✨Bionicle Beetle !✨
Ah, another insect ! Check the other one here.
Does it ring a bell ? The head (and some of the brown parts) come directly and with very few modifications from the Jaller & Gukko set. I never managed to get Jaller, so instead, I turned Gukko into this nice, big Rahi.
Now, of course, detail and the other pictures below the cut !
Front, hind, and neath !


I’m absolutely delighted with how it turned out. First of all, I really like the head which has been intact for as long as I can remember, although I know that I’ll never complete the set because I don’t have Jaller’s Kanohi. What I have plenty of, however, are the pearl grey Rahkshi shells, so you can see that I’ve used three of them on top. Then, I have to find pieces with a good enough curvature. So the next piece is from a Toa torso (Hordika) and the next one is used as a wing/pauldron on different sets, which has a perfect shape. On the sides, I’m using practically only pieces from a brown Vahki.
The underside is quite simple, but I wanted to make sure the colours remained coherent with the head, so I kept this bright brown while trying to make it as light as possible (the six legs are already barely letting it stand).
Under the dual Rahkshi shells, I have a bit of space which could let me add a nice feature, although I don’t know what yet. I planned on making actual elytra, but that would have been too complex, so there is currently nothing.
There isn’t much left to add, since for once, I have made simple legs (only because the body was more complicated…), but I nevertheless want to point out how well the small arm pieces I used to connect body and feet are for insect-like shapes, while keeping it quite mechanical. Just the perfect balance.
Also. Would anyone happen to know if there is a spreadsheet referencing all Bionicle (bonkle ‽-) gens with images and additional infos ? I have done a tremendous amount of research because I can’t remember any of the names properly, and having a single spreadsheet would be easier. AND, if not, would anyone be interested in access in such a spreadsheet ? Because if I do end up making one, I would be happy to share !
Have a nice day :}
So, uhm. I wanted to post something a bit different here today. Behold a short thing I did a while ago (I'm actually posting it because I found it while cleaning some files). I'll admit, the quality of both the image and whatever I was trying to tell is pretty low. But I think overall, it's still surprisingly decent, for what it's supposed to be.
I did a lot of these some time ago, but it's terribly time-consuming, so I've had to stop. Hopefully, next break, I'll have the occasion to do these again (now with better image quality, and even proper MOCs to use). I miss doing stop-motion a lot-
I sadly don't have much of that project left (images, bits of the background...), though strangely enough, I still have some of the characters. Though I know why the lighting is so bad : at that point, I only had a set of blue lights, which caused this blue filter all over it (it looked really nice, though. Without any camera...)
I won't point out all of the weird details, but I am still quite proud of that odd use of a hair piece as a broom. Some pieces certainly have some unexpected uses.

✨Trade space station !✨
<Previous< [2/4] >Next>
Today’s gonna be about the progress of the build in time, which allows me to ramble about the building process. Yay !

Before actually commenting the build. You may notice chocolate and my (empty) tea mug. They should be apparent in most of the earliest pictures (there was not enough space on the table for them at the end of the project, sadly~
So, here, you can see that my first step was to see the scale of my project. The template of the large ring to see how much space it would take, and the small ring to see how round I could make it (and at the bottom, you can see the white curved pieces. Enjoy this view, it won’t last.)
You can also notice above that I already stared making some small ships.

The next day ! You can see on the left my long rod. This was the ideal height for the central cylinder. I also created the first core of the build (replaced later because too fragile), and the first arms to hold the ring (too fragile too).

Progress ! This is the moment I realised my original color scheme would not work (you can see orange and bright green on the side, which I tried before the sand green).
I had half of the big cylinder added (you can see the slots left for the additional details) and another naked half on the right side. And my collection of boxes on the table is growing. It’s only getting worse after that.

See ? More boxes (and pieces) scattered all around. And a hammer, too. I at this point mostly finished the big cylinder (or so I thought, some reinforcements were necessary), started the smaller cylinder, and realised white pieces were running out. I also still haven’t touch the ring yet, as I wanted to stay focused on one bit.

Mostly done with the cylinders at the point (you can even see the start of the smallest one on the right side). Agin the boxes grow ominously.
Since it was time to start the ring, I created a replica of a sixth of it. Given that there were twelve sections, I wanted to be sure of the design before starting to build them all, starting with the facade. It took some fiddling around (you can see these aren’t symmetrical, as I was trying out different designs). Really, if you have this kind of things to do, try to make it in a vacuum first, you’ll gain a lot of time later, once the prototype has every problem answered (mine were mostly the curve, and the link between each plates (solved with mod 1*2 black plates).

See ? After the prototype was done, I simply built all of the facades and attached them (you can see my 1*4 curved pieces were all missing at the time though).
I kept the prototype on the side, because I’ll still need it later. I also am missing half of the ring (the part above, since there is only a structure below), because I was not sure of how everything would fit, and I waited until these parts were assembled before making it, in case adjustments were needed.

Here is the top part ! And all the hangars done, too. It took me a surprising amount of time to do all twelve of them…

Huge progress ! There is no more room on the table for the boxes, but you can see them…on the floor, on the left…Lot was done, from the bottom cylinder now finished along with its ring, the covering pieces of the big ring (except the internal faces), the hat of the station, and a huge reinforcement for the six arms, which was done separately). At this point, except for a few details, the station itself is finished.

And there is a picture taken moments before disaster. The station is done (ignoring the transitions between cylinders) the arm…supposedly, too.
Sadly, the arm wasn’t, in fact, finished. If you read the first post, you will notice it isn’t as bulky, and isn’t attached on baseplates yet.
Well, guess what ? When I finally tried to see if the arm would hold onto the station, it broke. Rather, two pieces broke, then the rest came down, and so did the station, which shattered on the floor below. Luckily for me, the main cylinder was so dense it practically completely survived. Most of the hangars of the rings only broke section per section, so it only took a few hours to get it back together, but much more time to make the arm solid. And now, it can hold the station for ten hours without flinching ! So, here is a lesson. If something you do fails when you do it with your heart, let the rage flow through you and build it back out of spite. It works* !
*don’t hold me accountable for any failure using that method

✨Custom air Toa !✨
6/6, that’s the last one ! And the biggest one, too-
Closeups under the cut !
Front/back views


As you might notice, it is tall. And it has more than four limbs, which would not be a problem if it was the only one. But. It appears that all my green mocs end up with too much limbs, and I can’t fathom why. Really, another prototype standing on my desk also has for and so does the green hero factory one…You get the idea.
Anyway, the colour scheme for this one is dark green and silver, with some translucent bright green accents. Using only bright green would have brought too much contrast with the others Toas (notably the dark red one), but I had these cool pieces to use and no one else to put them onto. And since these are experimental…
The two supplementary limbs are intended as movement claws, given that we usually see air Toas moving in jungles (Lewa mostly, that is). The silver pieces at the front and back ends are respectively Kopaka’s skis and Pohatu’s foot pieces (shoes ?). The largest bits are made out of technic pieces directly, to give some simple angles.
Bust views


I find this silver/green chest piece really cool, it’s a shame I don’t have much of them. The two bright pieces on either sides are Vahki head pieces, and since their only connectors are on their relative tops (side of the piece in their actual orientation), you may remark that they are connected to nothing. I’m having the arm socket go through them, and the rest of the body’s shape avoid too many movements. While nice, this also limits the movement range of the arms, but it works well enough (these are not really made to play, anyway~). The two bright pieces with spikes are from a Ehlek. Wish I could have managed to put that one back together, but it instead served a higher purpose.
The Kanohi is Hordika Matau’s, with transparent Bohrok eyes underneath (it share this technic with my previous white Toa). The back piece is coming from a Piraka, but it’s actually a broken piece. I have quite a bunch of these, where the mask and flexible parts have broken off, so I make the most of it (like you might see in the future on another MOC). I’m using technic angle (type 3, to be precise) to keep the shape of the middle ones, but the others are free.
Finally, a (dismantled) leg view.

Finally, the leg segment !
The Toa was too big for proper leg showcase, my lights created terrible contrasts (shelf not deep enough…), so here is a stand alone leg instead.
Once again I have integrated the Metru chest piece to the leg, but as a foot this time. It offers a good stability and looks nice.
The next part doesn’t have much interesting bits, except that I’m using technic tubes to hold the additional piece, making this technic less illegal that my usual works (keyword : less; there is still a whole lot of stress on these poor pieces).
The top part is…somewhat more complicated. The frame is of technic pieces (like the additional limbs), which keeps together an immobile socket joint which keeps the double socket and two Bohrok feet (one for decoration, one connected to the hip socket). The double socket is used both to connect the two halves of the leg and to hold the small arm piece which is here only for decoration.
And that’s it for this series ! I’m hoping to bring them to next month’s exhibition, along with some Bionicle MOCs I haven’t showcased here because…shelf…Given the sheer size of my big project (posted here next week in theory), I’m gonna have to improvise something quickly, and profite of it to get some pictures of my other big ones while I’m at it. Eh, I’ll figure it out (and if I don’t, I’ll just delete that statement later :}
Thanks for reading, have a good day !

✨Another edited photo, yay !✨
This is an entire version of the blog’s banner, too !
Technic details under the cut !
So ! Looking through my archives, I found images for the process I described in my previous similar post, including my made up studio (and very messy desk…) :

As you can see, it’s not quite a professional set up..
To be more precise, this is three led bands hooked to a power bank, on top of which my phone is meant to be sitting to take two photos in a row. Obviously, there is also a desk lamp illuminating the scene, so here is a picture without it :

So, the way this is organised is that I have my black screen in the background which reflects the lights a little, but not the actual minifigs; the characters are held by transparent pieces connected to ball joints, so that I can have a steady but adjustable display. Light-wise, the two prominent led bands are colour-coded with the character’s color (kinda) to get them in opposition; the junction between the two is covered by some black bricks to create a darker area to offer more contrast; ans on top of the stage is help a (theoretically) white led with lesser intensity to make sure the scene stays lighted up properly, even if the light sources are from underneath. The red pieces I have used as frames are really good to hold these light bands, because I can have varied angles and heights plus a very solid structure, which is all I want.
Finally, to get the floating render, I take a first shot with the characters, then a second one at the same place without the characters :


And then, with a bit of editing magic and other simple image manipulations, you get the result I have at the top of the post ! I’d recommend trying it for yourself, because it can be a lot of fun !

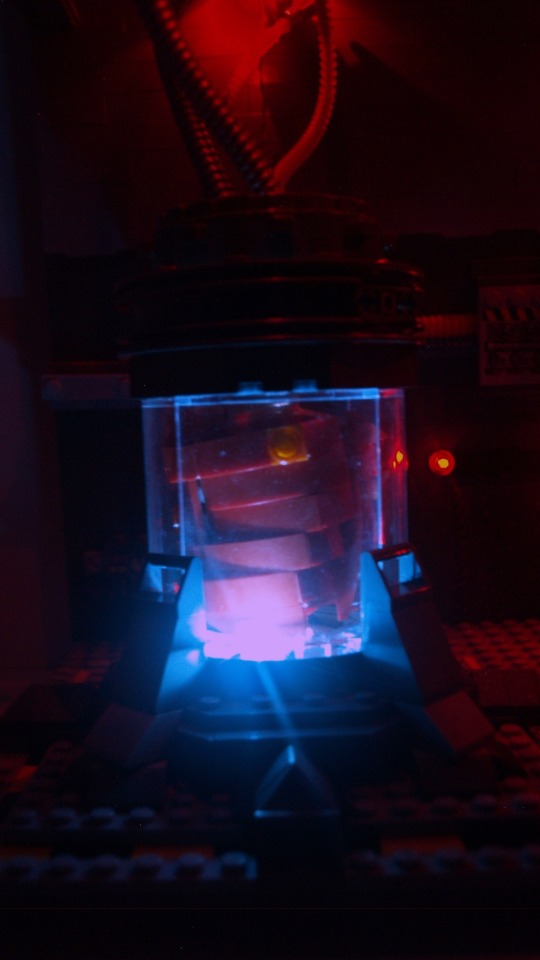
✨ Breach of containment ✨
This is the last I’ve been working on for the past few weeks, very, very inspired by the game Carrion (if you haven’t played it yet, you absolutely should !), which is made all the more special because I finally took time to use my lighting kit (seem below). Of course, closeups and commentaries below the cut

Left containment unit closeups :

Right containment unit closeups :


Top closeup :

Alt version (studio lights + in-built lights) :

This is one of the screenshots I’ve been working with (where the monster just breached containment) :

So, as I said previously, this piece is heavily inspired by Carrion. I tried to look up any previously made Lego thing related to the game, but all I could find were a few Reddit posts with (debatably) interesting takes on the monster. So, the good news is that this is most likely the most original piece I’ve made yet.
The original plan was to have only one container, and one monster, with left being the body inside and right being the outside part. However, placing Left in the middle of the transparent pieces made it mostly good on its own, so with some modifications, I made it work alone and expanded the outside part inward, and ended up with two of them.
Left is pretty okay from all angles, but Right is not necessarily as good from the back, and had a supplementary jaw on the side of the container which can’t be seen on the photos.
Getting back to comparing that to the game. I tried to stay close while adding my own little details. The wiring and cable system is from me, but the container is mostly inspired by the game, just like the electric box (middle) and the little informative display (under the electric box) which is…empty, yes.
Some details can’t be seen on the photos (or barely), which are mostly some filler sci-fi stuffs to make the wall less flat and less empty.
What also helped with breach the flatness of the wall is the switch from dark grey to light gray, using the awesome spring projectile launcher piece, which has this very nice shape which make the transition just a bit smoother.
So, let’s talk about whatever I’ve done with the lighting !
I’ve had this old lighting kit (originally designed for a car model) lying around for a long time, and finally got to use it ! It doesn’t look really good without my studio lights because my camera is not made for that (The effect in reality really gives escaping monstrosity a dark vibe which is not well depicted with my photos…). Another thing which is not noticeable with the photos is that the two red dots in the center are actually blinking lights (and somehow, they tend to desynchronise).
The choice of letting some of the wires out is debatable, but I think it adds to the vibe (and some of them would have been a pain to hide anyway). And sadly, the back is but a mess of wires, but I can’t actually do anything about that.
Speaking of the back, the whole thing is one dot large and completely flat, and the ceiling only hold without pillars because of the use of tension linking directly the baseplate and the roof through the use of technic bars; and probably because the ceiling itself is not that heavy. It is, in fact, only constitued of six old road pieces connected together and frames, which give the roof little weight and high sturdiness (and the shape on the side of the piece offers a nice sci-fi effect as a bonus).
The addition of tentacles in the vent (which hides the connection between road plates in the roof) is just another reminder of the game : you can’t be safe anywhere, if air flows~


✨Custom clones !✨
I really like messing around with minifigs, and I had recently got my hand on a 501st battle pack, which meant I had some spare accessories !
Of course, custom weapons, else it would be no fun, and of course of of them use illegal technic, because it's kind of my signature at that point. I really like how they all turned out - including the Dimension plates which are a really nice display base.
The most interesting piece it the small cloak piece I used on the sword one (Nexo Knight sword obviously !), because, first of all, it's blue, and it comes from some Marvel sets, which isn't a theme I manipulate often - which is a shame, there are some really cool pieces in there.
Also, these need names, but I did not find any yet...

✨Custom fire Toa !✨
Yay, yet another custom bionicle ! And a big one this time !
Details below the cut !
Front/side views :


I’m using Vakama Metru’s kanohi for that one, as it’s pretty good shape-wise and there are few dark-red kanohis anyway.
Anyway, this was a lot of fun to make, and this time starting with absolutely nothing. Most of the bright red pieces were added at the end to give a bit of contrast. You might recognise some Stars elements, as well as some Bohrok elements from an unknown set, and even a very old piece from the precursors of Bionicle.
If you pay attention to proportions, the legs are completely messed up (bottom part too small, higher part far too long). It’s fixed on all the others of this series, luckily. Given it still works visually, I kept it that way.
The weapon is a mix of a cool disc launcher, with the flame sword from Stars set, to make…what you want it to be. I initially said it was some type of crossbow, but to be fair, it doesn’t look like anything at all.
Just like the others I have shared so far, I am doubling some limb pieces to quickly give some thickness. On the higher part of the legs, though, I have used the body
Most of this is quite experimental, from the feet to the higher parts of the legs using Vakama Metru’s body piece (it’s a fun one to work with).
And, yes, maybe I will be spreading this over 6 weeks to get enough time to finish my current project (currently waiting for important parts to arrive…), and because I am running out of content faster than I can make it, but well.
To pardon me, take this picture I took to see if the articulations had a good enough range :

Nice LEGO work! Glad to see MOCs are still shared by folks.
Thank you very much !
And as a proper answer, here is a little silly thing I made recently !
Still working on making it reliable, but’s a fun little project on the side of other things I have going on !

-
 aeramisu liked this · 1 year ago
 -
 toclimbandbeheard liked this · 1 year ago
 -
 parkourninjaxd liked this · 1 year ago
 -
 antrylis reblogged this · 1 year ago

They/them - AroaceLego MOCs and photography with a wide range of different characters and environments, every Wednesday (in theory-)
77 posts