✨Geonosis !✨

✨Geonosis !✨
Ah, Geonosis. What a terrible place. But it’s aesthetically pleasing, so I did it anyway. And it was a good excuse to use the movie-accurate minfigs (a commander, a sergeant, and three shinies. I have a lot of other commanders, but I’ll figure what to do with them later).
Since I didn’t have much of these orange bricks, so most of them are sideways, with some modified bricks to keep the clones in place. Also, the bottom of the first spike is an old bionicle part I thought I’d never use, but it did a good job here.
More Posts from Antrylis and Others


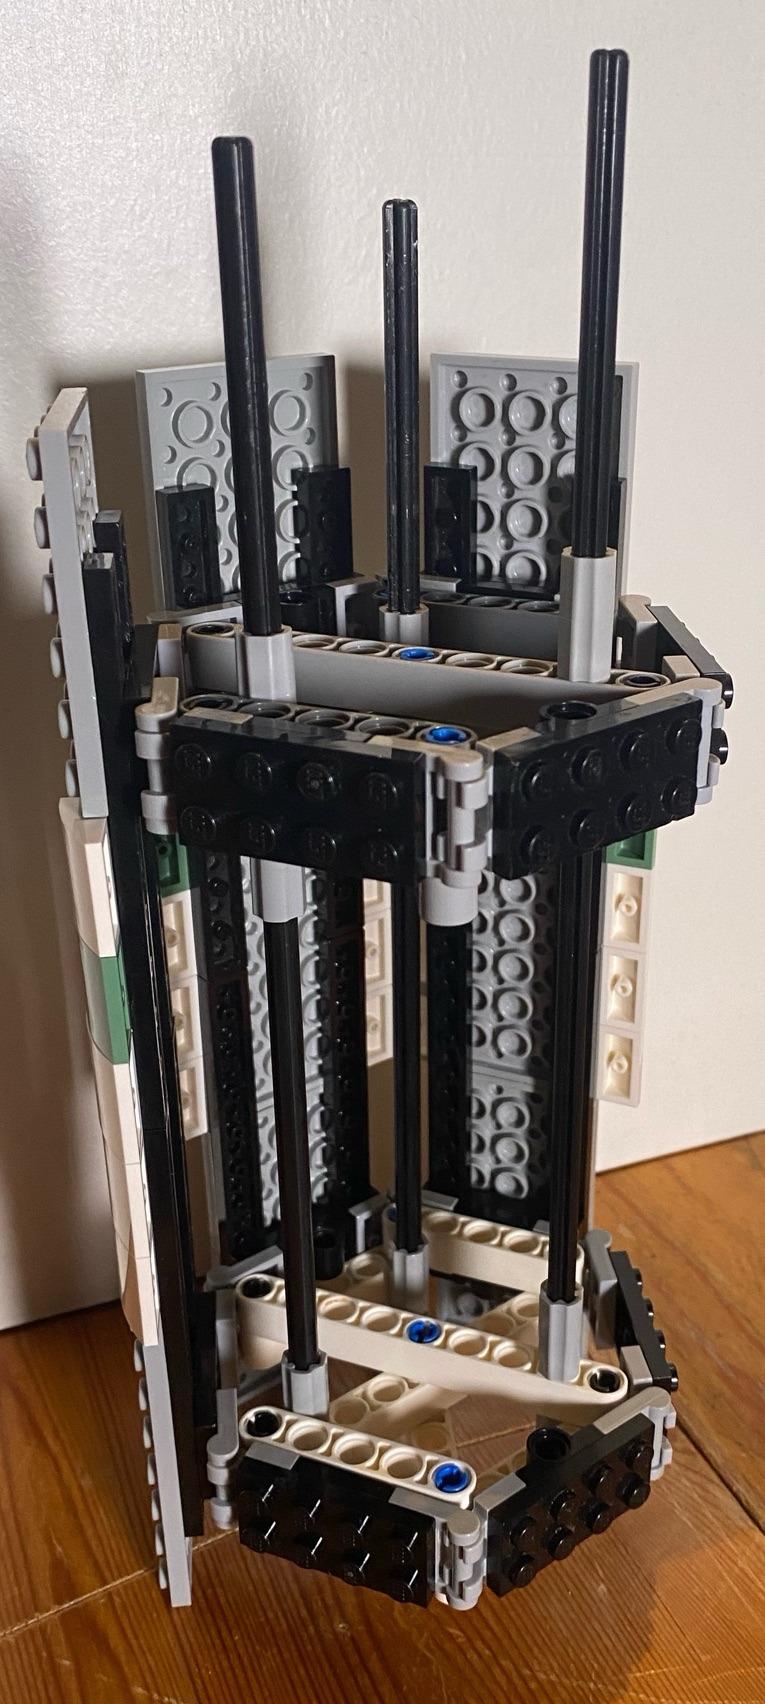
✨Bile titan✨
Or the fact that I don’t have access to real legos anymore will not stop me from making mocs (more on that under the cut).
I’ve really enjoyed Helldivers and I’ve been meaning to make one of those for some time, now. And I think it turned out quite alright, all things considered. It’s a shame this happened he will never physically be on my shelf, but it’s better than nothing~
Anyway, details and rumbling under the cut, as always.
Here are more viewpoints :


Most of the parts here are articulated, although the head barely moved, and the second joint of each leg is fixed, because making it movable with this size would have been a hassle.
Though, it still has a lot of posability (even the small pincers move !).
The bottom is not really detailed, because it won’t be seen much, but I’ve still added a few things, including the protuberant bile sack underneath, because it gave me a great excuse to use an alien egg, which used to be an incredible piece.
Now though, let’s deal with what this isn’t : real.
It’s fully made with Bricklink’s Studio, which is a free computer software giving one access to pretty much all the bricks you can think of, without limitations on colour (this is great, because 99% of the pieces I use here do not exist in the colour scheme I used). It also comes with a part designer, to create custom prints and/or bricks. There aren’t any prints here, but I am working on something else which uses them.
The only down part is that I can’t use any illegal technic, which is a shame since I usually rely on those a lot (check my post about the Citadel and you’ll understand~). It does make sense, though, and custom rotations are allowed, so it’s not all bad.
Also, if you’ve read until there, congrats ! I do have one more thing to say, though. Given that I know have access to an infinite amount of bricks, I can take requests, if you ever have an idea you’d want to see realised (albeit note it might take a while !).

✨Bionicle crab !✨
It was, originally, meant to be just another arthropod. However, someone reblogged my previous rahi, along with this comment :

Well, guess what ? Yes, absolutely. I’m glad I saw it because it gave me the inspiration for this monstrosity (and it made me laugh more than I would admit, too). Thanks.
I must recognise that if I compare my rahis, there is a clear pipeline. I don’t think it can go much further in this direction.
Anyways, details/closeups/weird illegal technic I just found out, below the cut !
Front (smol Visorak for scale) :

Because it’s really big. It’s also a good excuse to show off my really fancy and glittery Kanohi. No clue where it comes from but it’s beautiful !
I’m really happy with how mean this things looks, overall. It’s most definitely the bad guy for Toas to fight. It has a really good scale to work with my larger customer Toas [here], but it could also act as a really large rahi for my smaller space-based Toas [here]. Why a large crab stealing Kanohis in space, you may ask ? No idea. I’d have to actually think out a lore for that.
I started the conception with the frame (which does make sense, in theory), then the legs, and finally the shell. This was only partially smart, because that meant I did not account for the shell's mass when building the legs. Essentially, this poor thing can't stand on it's own, so I'm using two technic bars underneath to keep it up right (which are hidden in editing, of course).
Top/Hind (shell) :


I think the shell was pretty decent. I tried to use as little pieces as possible to keep it light, but it's still a lot. Among these pieces can be found one Visorak claw and three Mantax feet, which have a nice texture for organic feet. There is also another foot at the front which comes from an Inika set which I can't seem to find. I'm also using some of these large technic panels, which cover a lot of surface without being too much of a pain to set up (still quite a lot, since they're connected to the feet at at an angle, feet which which are also connected to the frame at an odd angle...) Speaking of Mantax, I alsu used the black-pearl shells, because these, too, have a really organic vibe, and it gave a small touch of pearl which was missing on the body.
I tried to keep the back relatively slick, to avoid something similar to an abdomen since it's not a spider. Still I had to extend it a little bit using the rounded cubical cover, to hide some socket joints, but it's okay-ish.
Neath :

Truly a mess, I must admit. As I started with each side separately, I tried to somehow connect them with the large grey technic frame (in the middle). On either sides, I have a whole bunch of axle connectors, both standard and angled, which allow for the thing to appear rounder than it could have been. The two leg sockets peices at the front are used for the eyes, and the pieces abov (barley visible) is a classic Bionicle shoulders piece clipped backward as a base for the pincers arms.
Pincer :

Or mandatory unusual feet usage. These really works well as any kind of claw or armor, in my opinion. The black arm pieces used here (Hordika leg piece) were particularly good for the job as they technic pin holes in there allowed me to add ad additional socket practically at the same level at the original one (even if I would rather have used black technic bars instead of the light grey ones, but i couldn't find any in my supplies... It's likely the Space station's fault.
Legs :

Or equally mandatory foot out of not foot pieces. Here is a cursed homebrew way to make legs : one Bohrok head part (bricklink call these shoulders ?) to display the piston-like element and serve as structure, linked with Toa Metru legs (which slots above nicely. And then comes the magic trick, for the Rahkshi shells (silveragain, because I have many of these) have a small attachment point toward the end, that is meant to hold the back blades in place; but it also perfectly fits right on the small ledge in the middle of the leg piece ! Granted, it's not a very secure connection, but these two pieces don't need anything else but that to hold. I actually loved this one so much, you can notice two additional Rahkshi shells held similarly on the tope of the crab's shell.
In order to connect the legs individually to the frame, I am using Vahki legs for the exterior limbs, and Pihraka arms for the central ones (these arms have the particular property of having the restrictive sockets on either sides, which makes it good to keep the leg's shape.
The middle sections are made using two simple axle-socket pieces connected by old plates, usually found in technic sets predating the Bionicle them.
…And obviously, I had to make another makeshift studio (I actually really like this one). Have a look at all these terribly assembled elements !


✨Aroace pride flag✨
Since I’m mostly doing these as room decoration for me, I’m slowly running out of idea, but I’m open to taking requests (potentially with instruction, if anyone is interested, simply ask me) :}
(See previous work here)

Following in my pride flag series :
✨Ace pride flag✨
(Previous work here !)
![✨Looks To The Moon✨ [1/2]](https://64.media.tumblr.com/8673892d6391d798d2e17a3d5ce540c4/b43f6ed2c41a5d1f-3b/s500x750/bc7b11f6b9448e7e96451100f0081125861f2c1f.jpg)
✨Looks To The Moon✨ [1/2]
Where do I even start with that ? Oh, yeah. It’s not done just yet (if that wasn’t obvious enough).
Though, I won’t have the opportunity to work on it for a while, so I figured I might as well share the progress.
Obviously, I’m missing the water; and an outside — as well as a few other things I’ll mention somewhere below (along with closeups and way too many details, as always).
If you don’t care about any of that, you could still check up my silly little FP there !
Lots, lots of things to talk about here…
(Structure first, feel free to skip to the first actual close up if you consider that as boring.)
First of all, here is an edited version of the first pic, with water :
![✨Looks To The Moon✨ [1/2]](https://64.media.tumblr.com/ea39d63ea2dcbb3bc92aa755b0d4d40c/b43f6ed2c41a5d1f-71/s500x750/61199b745c19b0917b1b6e8368b0c7546abaa1a8.jpg)
Looks much better already. And although it might prove complicated, I have a plan. Sort of. Because Lego has this really cool, transparent blue piece which they produced a lot of : folding garage doors. They’re everywhere on firefighter sets, and they’re really wide. With a few tricks, they might work.
As for the outside, well…I’m not there just yet. I’ll try to cover it up with some Iterator-esque pattern, I suppose.
I’m also missing a scug ! I absolutely want one, and given how I chose to represent the scene, it won’t be Saint nor Spears (shame). Rivulet is really tempting, but it might make too much blue; currently, my choice might be on Monk, to have sufficient contrast (and Monk is cute). Though I might change that, depending on how much small yellow pieces I have.
Now, before talking about the inside, let’s take a peek at the outside :
![✨Looks To The Moon✨ [1/2]](https://64.media.tumblr.com/871f4a5f0d56b953e8de148ff40a2c3c/b43f6ed2c41a5d1f-0a/s500x750/11b869101b74a3016e20b69dbf5ba74211c1b821.jpg)
Here it is (back side, specifically). It’s a bit of mess because of the technics im using — which I’ll come to in just a seconds — but I also find it oddly fitting with the Iterators theme. The blacks on each sides are holding the cube together, and the technic bars in the middle are ensuring everything is held together — and also compensating for the weight of the top plate, kind of like how I did with my Carrion MOC a while back.
Anyway, the Technic™️.
The one thing which I find striking in Iterators cans is the tiling (14x14 from my last count), and it’s not that easy to replicate through Lego. Either you have no gap at all, and you use only the tiles’ grove as a separation (which, here, is way too small) or you make them very far apart, which looks terrible here). However, my tiling technic here is (not entirely mine) usually something you’d see to make floors, especially castels.
Here, I have three layers : the dark grey layer, which is the base; the light gray, which is the tiles; and, in between, I have a layer of black dots forming a grid diagonally to the first layer, on which the tiles are placed. This diagonality explains why, on the pic above, my plates have so much spiky edges, and which I have to use this whole complicated system to hold everything together.
Of course, it gets worse ! Because the cans are not perfect cubes, the edges are bevelled. And so I bevelled. Now, with all these intricacies, there was no way any regular connection would keep these edges in place. You can also spot what I used instead, which is an awful lot of ball and socket joints (mixel style). Incredibly useful, those pieces.
Anyway, enough boring structural details, here come the fun part !
Small things first, here is a comparison of the first vs final design for the neuron flies :
![✨Looks To The Moon✨ [1/2]](https://64.media.tumblr.com/6fc18f71aa5a566f239a04658bdaa2b1/b43f6ed2c41a5d1f-d7/s500x750/8c00b65ae9ed9e3815a0dfa05afac4aef312f2c9.jpg)
![✨Looks To The Moon✨ [1/2]](https://64.media.tumblr.com/7aa3ed3889c2725fda3cb5707181c360/b43f6ed2c41a5d1f-00/s500x750/cf712d96ae5c58a6774642670aa9cc465c46911d.jpg)
I’m really glad I actually managed to do that — they’re an important element, and the conception had me worried for a little bit.
The first design is, in my opinion, the best one can make at this scale. Slight issue : it’s not actually physically possible to make it hold together. After a lot of different iterations (ah !) I’m came up with the design on the right. It’s a bit more square, but it has a distinct head and floppy tails, which was all I was asking for. Obviously, the two tooth pieces I’m using are hardly held at all (using a mod 1x1 joint piece). There’s also, behind, a white dot with a hole, which ensures that these can be connected to the background via the long, transparent bars. Wasn’t easy to stick them without breaking them, and there’s no way I’m touching these now.
![✨Looks To The Moon✨ [1/2]](https://64.media.tumblr.com/7217074bc04fbf14f9c736e361ec67e5/b43f6ed2c41a5d1f-98/s500x750/02db63d8269d5e91989886e7d82ce393ba743cb6.jpg)
Her. She is the central piece of my MOC after all. It took me a while to figure out the design (mostly the head), but I’m glad of how it turned out. It’s not perfect, of course, but I feel like it works well, both scale-wise and color wise. And there’s only one (two) illegal connections, for the antennas which I’m making using hands. It’s very tempting to draw her a face — I’ll probably consider it, at some point.
The arm behind is also relatively good, with loose cables hanging from it. Once again, ball and socket joints are here to save the day; although I do feel like some parts of it are a little bulky, and it doesn’t drop down low enough…
Additional details, the piles of debris.
![✨Looks To The Moon✨ [1/2]](https://64.media.tumblr.com/669c04363442a3247a589729a9662ce0/b43f6ed2c41a5d1f-b8/s500x750/6a07583141d576aa968ae6e966c49c008336bf10.jpg)
It’s…really difficult to make debris which don’t look purpose, and aren’t simply horrendous to look at. I tried to keep some grey tones, but also incorporated some brown, because it does actually bring some well needed contrast to the whole scene; and a few plants.
Speaking of plants, I’m no really liking these vines hanging from the ceiling (much thinner and darker in game), but as far as my expertise go, I dont see another way to get them here — and if there’s nothing at all, the whole piece suddenly gets really dull. Of course, there’s also the gap in the ceiling, with cables falling out; this, I will add more details to later on — and I have the hope to get a proper light source to go through it and act as a sun which will fall directly on my small LttM.
To conclude, here are final views of it, from further away, and with a brick separator from scale. It does look quite flimsy, doesn’t it ?
![✨Looks To The Moon✨ [1/2]](https://64.media.tumblr.com/d51f8a684b768c0a7223411e69dff690/b43f6ed2c41a5d1f-c8/s500x750/88d4ed5aa97df2a0f985dfbdd56187b5f046232e.jpg)
![✨Looks To The Moon✨ [1/2]](https://64.media.tumblr.com/f11171cfd8f3d6d55b2f41f46b2d7314/b43f6ed2c41a5d1f-5b/s500x750/69aeba2df224bab421ecb45cd578b90c68e1620c.jpg)
Oh, and, well. I’ve been messing with Dots recently. Figured this was worth including as a footer (probably on of the first achievements I unlocked — poor Moon~).
![✨Looks To The Moon✨ [1/2]](https://64.media.tumblr.com/2ed459bb6232038d802ac64afd31fe15/b43f6ed2c41a5d1f-77/s500x750/a88a5b9e2dfba1a119dd2d0ae623e595a0c06b84.jpg)
A tangent about hexagons
Because the project I’m working on brought it, I found it interesting, and I thought some people might need it.
So, as I’m working on a quite large project (hopefully done by next week, although I have doubts on that), and the base structure of it is more or less hexagonal. Anyway, here are some of my tips to get good hexagonal shapes.
The easiest way to do this is obviously with hinges and plates, like that :

While not necessarily accurate, it’s cheap and efficient, albeit squishy, and can be expanded to any size.
Instead, we can go the technical way, and use maths, by considering that a hexagon is the combination of 6 equilateral triangles. We end up with this :

Practically unbreakable, very stable, and can be made with as much technical bricks as possible, so it is easily expandable, but it’s harder to attach it to classic bricks.
So, none of these two designs are really good alone, whether on pure usability, or on durability. Alone, that is. Now, here is the fun part : thanks to the way Lego works…


…they work together ! And, with some modified 2*2 plates, they mostly hold to one another ! Isn’t that awesome ? What’s more is that, while I’m using 2*4 plates and a 7 holes technic bars, that also works with 2*6 and 11 holes bars, which is good.
Now, let’s apply this knowledge to make a solid prism with an hexagonal base :

By using a bunch of plate and two of these hexagonal bases, we get a hollow tube, which is solid through the hexagons, but can still break because of a diagonal force. To fix that, we need to add supports between the supports, like so :
This also means that this design becomes stackable. Congrats, you made a long hexagon tube ! It can also be round, with the right modifications, notably with 2*2 curved tiles :

It fits perfectly, and it’s good to make solid near-circles !
Sorry for the photos’ quality !- They were taken quite late with my phone, and without proper lighting.

✨Custom earth Toa !✨
It’s spiky ! And we’re now at 5/6 !
More below !
Front/back :


He’s spiky ! Some might have already noticed I took for base the old Von Nebula set, because I acquired it recently and it worked well, plus the joints are interesting. Pretty much everything else was change, though I kept the mask, sphere, and spiky plates. These were nice, and even if stone colours are usually black and purple, but blue works well too.
I relocated the sphere directly in the thorax so that it looks like some kind of core. The back is mostly composed of two large car pieces.
The hands are using black pieces to make them larger, which works well with the blue blades (which supposedly come from either Chima or Hero Factory, I can’t remember).
Leg :
Another type of Bohrok piece to act as feet ? Yes. These are the head pieces, and they work well with a classic foot as a back piece. The piston in the leg was there originally, but I covered it with these large technic panels and some other technic pieces.
There is also an interesting mechanism to stop the legs from doing too odd moves on top, which can have some interesting applications. Here, I’m wondering about removing them to gain a larger range of movements though.
Head :

Kept the original mask and teeth, but with a cable and a spider’s claw to elongate it.
This picture also allows for a clear view of how much dust has accumulated. Don’t judge me, these are on a top shelf which isn’t the easiest to clean…
Also, my project is now finished (officially) ! I went to a small exhibition with it this weekend actually, and…a recruiter from a much larger exhibition found it good enough to offer me a place next month (I’ll post it here once the bionicle series is done) ! I also brought some of my pride flags, which seemed to be doing their effect, so I’ll bring more next time. So overall, yay !

✨Snowman !✨
Couldn’t miss this year’s Christmas-themed MOC, of course ! Although it certainly is way less 'christmasy' than the previous ones (here and here) and more of a general winter decoration, it fits well.
There’s not a lot of technical work here, the spheres are classic designs which I tweaked a little, the arms are quite simple, the scarf has nothing complicated either; the only interesting bit might be the hat, because I used a really old technic piece — can’t find its id on bricklink… — with some other gears and such.
Anyway, merry Christmas to those who celebrate, and good day to everyone else !
Also, sorry for the terrible pic quality, I don’t have any proper set up; and I know I have a few things sitting in my inbox, I’ll get to it I swear.

✨Bionicle Beetle !✨
Ah, another insect ! Check the other one here.
Does it ring a bell ? The head (and some of the brown parts) come directly and with very few modifications from the Jaller & Gukko set. I never managed to get Jaller, so instead, I turned Gukko into this nice, big Rahi.
Now, of course, detail and the other pictures below the cut !
Front, hind, and neath !


I’m absolutely delighted with how it turned out. First of all, I really like the head which has been intact for as long as I can remember, although I know that I’ll never complete the set because I don’t have Jaller’s Kanohi. What I have plenty of, however, are the pearl grey Rahkshi shells, so you can see that I’ve used three of them on top. Then, I have to find pieces with a good enough curvature. So the next piece is from a Toa torso (Hordika) and the next one is used as a wing/pauldron on different sets, which has a perfect shape. On the sides, I’m using practically only pieces from a brown Vahki.
The underside is quite simple, but I wanted to make sure the colours remained coherent with the head, so I kept this bright brown while trying to make it as light as possible (the six legs are already barely letting it stand).
Under the dual Rahkshi shells, I have a bit of space which could let me add a nice feature, although I don’t know what yet. I planned on making actual elytra, but that would have been too complex, so there is currently nothing.
There isn’t much left to add, since for once, I have made simple legs (only because the body was more complicated…), but I nevertheless want to point out how well the small arm pieces I used to connect body and feet are for insect-like shapes, while keeping it quite mechanical. Just the perfect balance.
Also. Would anyone happen to know if there is a spreadsheet referencing all Bionicle (bonkle ‽-) gens with images and additional infos ? I have done a tremendous amount of research because I can’t remember any of the names properly, and having a single spreadsheet would be easier. AND, if not, would anyone be interested in access in such a spreadsheet ? Because if I do end up making one, I would be happy to share !
Have a nice day :}

✨Custom stone Toa !✨
Yay ! It’s so big there are shadows on the top of my shelf studio.
Also, we’re already at 4/6 for these, isn’t that crazy ? I think it is.
Details below the cut !
Front/back :


I had some kind of vision with this one. As I started messaging by around with pieces, my brain said 'scorpion'. So mandibles and tail (and that’s about where the scorpion resemblance ends). Of course, I had to keep an element of Pohatu, so his foot is the end of the tail (which is quite wobbly-).
I tried to vary shapes from what I had previously, so I made some big shoulder parts, which look okay and offer some interesting movements, but are pretty weird if you think about it too hard.
The body-legs connection is a bit thin, but it still kind of work with the overall design, so I left it that way (that, and I am running out of brown pieces…)
The weapon are simple sticks with harpoons (?), nothing too complicated, though it was meant to be a single stick originally, it was waaaay to long for the photos. Also, has anyone any idea of which set these harpoons (still '?') come from ? I can’t seem to find it, apparently.
Side shot :

As you may see, I’ve made all the limbs quite thick, because it fitted what I had in mind well, and I messed with a bunch of old pieces for the legs (mostly the sand pieces). There is also have a Bohrok’s body for each foot, because these work surprisingly well, and the middle segment of the leg is backward to give some hypothetical springiness to the legs. Also, Rahkshi feet as armor, that’s always a good recipe.
Head shot ! (Ah, that’s funny.)

Look at how dark that shot is ! If only I had taller shelves…
Anyway, the head is a mix of Rahkshi and Vahki heads, which mix well (there is also a gear underneath. Don’t ask me why. It just exists.)
All of that makes it looks like a V2 Rahkshi (when there is a single stick) which was pretty much on purpose.
On a side note, I’m pretty much done with my big project (which is good, I’m meant to expose it this weekend. Whoops, that’s suddenly very close.)
And, yes, I finally added the #moc, thank you for reminding me every time, I’ll add it from now on :}
-
 aeramisu liked this · 1 year ago
 -
 sad-melted-sapphic liked this · 1 year ago
 -
 coline7373 liked this · 1 year ago
 -
 antrylis reblogged this · 1 year ago

They/them - AroaceLego MOCs and photography with a wide range of different characters and environments, every Wednesday (in theory-)
77 posts